Battery-Powered Watering Timer Converted To Solar On The Cheap

Watering the garden or the lawn is one of those springtime chores that is way more appealing early in the season than later. As the growing season grinds along, a chore that seemed life-giving and satisfying becomes, well, just another chore, and plants often suffer for it.

Automating the watering task can be as simple as buying a little electronic timer valve that turns on the flow at the appointed times. [A1ronzo] converted his water hose timer to solar power. Most such timers are very similar, with a solenoid-operated pilot valve in line with the water supply and an electronic timer of some sort. The whole thing is quite capable of running on a pair of AA batteries, but rather than wasting money on new batteries several times a season, he slipped a LiPo pack and a charge controller into the battery case slot and connected a small solar panel to the top of the controller.

The LiPo is a nominal 3.7-volt pack, so he did a little testing to make sure the timer would be OK with the higher voltage. The solar panel sits on top of the case, and the whole thing should last for years. And bonus points for never having to replace a timer that you put away at the end of the season with batteries still in it, only to have them leak. Ask us how we know.

Like the best of hacks, this one is quick, easy and cheap — $15 in parts, aside from the timer. There are more complicated irrigation solutions, of course, one of which even won the Hackaday Prize once upon a time. But this one has us ordering parts to build our own right now.

HFT On HF, You Can’t Beat It For Latency

If you are a radio enthusiast of A Certain Age, you may well go misty-eyed from time to time with memories of shortwave listening in decades past. Countries across the world operated their own propaganda radio stations, and you could hear Radio Moscow’s take on world events, the BBC World Service responding, and Radio Tirana proudly announcing that every Albanian village now had a telephone. Many of those shortwave broadcast stations are now long gone, but if you imagine the HF spectrum is dead, think again. An unexpected find in an industrial park near Chicago led to an interesting look at the world of high-frequency trading, or HFT, and how they have moved to using shortwave links when everyone else has abandoned them, because of the unparalleled low latency they offer when communicating across the world.

Our intrepid tower-hunter is [KE9YQ], who was out cycling and noticed a particularly unusual structure adorned with a set of HF beams. These are the large directional antennas of the type you might otherwise expect to see on the roof of an embassy or in the backyard of a well-heeled radio amateur, and were particularly unusual in this otherwise unexciting part of America. There followed an interesting process of tracking down the site’s owners via the FCC permits for its operation, leading to the deduction of its purpose. With other antenna-hunters on the lookout for corresponding sites elsewhere in the world, it seems that this unusual global network hiding in plain sight could soon be revealed.

Unsurprisingly we’ve not covered many shortwave HFT stories. There are however other higher-latency ways to cross the world on HF.

Via SWLing Post, and thanks [W6MOQ] for the tip.

A Two-Range OLED Capacitance Meter

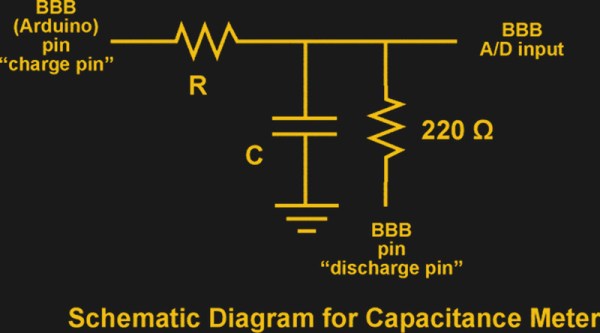
If you are just starting out in electronics, you need tools. But it is hard to build all your tools. Even though we see a lot of soldering station builds, you really ought to have a soldering iron to build the station. It is hard to troubleshoot a multimeter you just built if you don’t have a multimeter. However, a capacitance meter is a handy piece of gear, relatively simple to build, and you should be able to get it working without an existing capacitance meter. [gavinlyonsrepo] presents a simple design using an Arduino, an OLED display, and a few components.

The principle of operation is classic. On one range, the Arduino charges the capacitor through one resistor and discharges it through another while timing the operation. The amount of time taken corresponds to the capacitance.

Continue reading “A Two-Range OLED Capacitance Meter”

The Current Advances Of PCB Motors

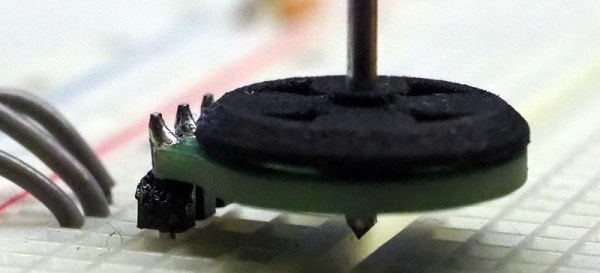
There’s something to be said about the falling costs of printed circuit boards over the last decade. It’s opened up the world of PCB art, yes, but it’s also allowed for some experimentation with laying down fine copper wires inside a laminate of fiberglass and epoxy. We can design our own capacitive touch sensors. If you’re really clever, you can put coils inside four-layer PCBs. If you’re exceptionally clever, you can add a few magnets and build a brushless motor out of a PCB.

We first saw [Carl]’s PCB motor at the beginning of the year, but since then we’ve started the Hackaday Prize, [Carl] entered this project in the Prize, and this project already made it to the final round. It’s really that awesome. Since the last update, [Carl] has been working on improving the efficiency and cost of this tiny PCB motor. Part of this comes from new magnets. Instead of a quartet of round magnets, [Carl] found some magnets that divide the rotor into four equal pieces. This gives the rotor a more uniform magnetic field across its entire area, and hopefully more power.

The first version of this 3D printed PCB motor used press-fit bushings and a metallic shaft. While this worked, an extra piece of metal will just drive up the cost of the completed motor. [Carl] has redesigned the shaft of the rotor to get rid of the metallic axle and replace it with a cleverly designed, 3D printed axle. That’s some very nice 3D printing going on here, and something that will make this motor very, very cheap.

Right now, [Carl] has a motor that can be made at any board house that can do four-layer PCBs, and he’s got a rotor that can be easily made with injection molding. The next step is closed-loop control of this motor. This is a challenge because the back-EMF generated by four layers of windings is a little weak. This could also be accomplished with a hall sensor, but for now, [Carl] has a working PCB motor. There’s really only one thing to do now — get the power output up so we can have real quadcopter badges without mucking around with tiny brushed motors.

[Carl] has put up a few videos describing how his PCB motor works; you can check those out below.
Continue reading “The Current Advances Of PCB Motors”

A Vacuum Tube And Barbecue Lighter X-Ray Generator

A certain subset of readers will remember a time when common knowledge held that sitting too close to the TV put you in mortal peril. We were warned to stay at least six feet back to avoid the X-rays supposedly pouring forth from the screen. Nobody but our moms believed it, so there we sat, transfixed and mere inches from the Radiation King, working on our tans as we caught up on the latest cartoons. We all grew up mostly OK, so it must have been a hoax.

Or was it? It turns out that getting X-rays from vacuum tubes is possible, at least if this barbecue lighter turned X-ray machine is legit. [GH] built it after playing with some 6J1 rectifier tubes and a 20-kV power supply yanked from an old TV, specifically to generate X-rays. It turned out that applying current between the filament and the plate made a Geiger counter click, so to simplify the build, the big power supply was replaced with the piezoelectric guts from a lighter. That worked too, but not for long — the tube was acting as a capacitor, storing up charge each time the trigger on the lighter was pulled, eventually discharging through and destroying the crystal. A high-voltage diode from a microwave oven in series with the crystal as a snubber fixed the problem, and now X-rays are as easy as lighting a grill.

We have to say we’re a wee bit skeptical here, and would love to see a video of a test. But the principle is sound, and if it works it’d be a great way to test all those homebrew Geiger counters we’ve featured, like this tiny battery-powered one, or this one based on the venerable 555 timer chip.

Jeremy Cook's strandbeest kit RC conversion

Stepper Motor And Key Fob Controlled Strandbeest

We never tire of watching Strandbeests with their multitude of legs walking around, and especially enjoy the RC ones. [Jeremy Cook], prolific Strandbeest maker, just made one by motorizing and adding remote control to a small, plastic wind-powered kit.

We’ve seen a Strandbeest kit conversion like this before, such as this DC motor one but it’s always interesting to see how it can be done differently. In [Jeremy’s], he’s gone with two inexpensive $2.00 stepper motors. The RC is done using a keyfob transmitter with a receiver board wired into an Arduino Nano’s analog pins. He tried driving it directly off the LiPo batteries but had issues which he solved by adding a 5-volt regulator. Check out his build and the modified Strandbeest walking around in the video below.

Continue reading “Stepper Motor And Key Fob Controlled Strandbeest”

NeoPixel Game Rewards Button Mashing

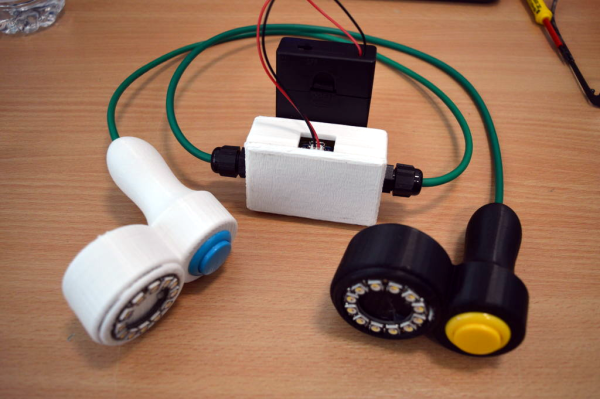
Who has the fastest thumbs at Maker Faire UK? That’s the question [wellsey1972] sought to answer when he created this simple game using little more than two NeoPixel rings, two chunky arcade buttons, and a Trinket.

The idea is simple: each button push lights up one NeoPixel. The first one to fill up their ring is the winner, and is treated to a ring of flashing green lights. The loser, of course, gets flashing red. Both controllers are hard-wired to a box containing a Trinket, a custom PCB with pull-up resistors, and two sets of solderless terminals. [wellsey1972] smartly re-purposed a cat 5 cable for sleeker wiring.

He has a few ideas for the future, like going wireless, printing smaller controllers, and making winning more difficult via potentiometer. We humbly suggest that the loser be taunted by the cry of a sad tuba. Mash past the break for a brief demo.

If you like lights and simplicity but find this build less than challenging, try building a minimal secret maze game.

Continue reading “NeoPixel Game Rewards Button Mashing”