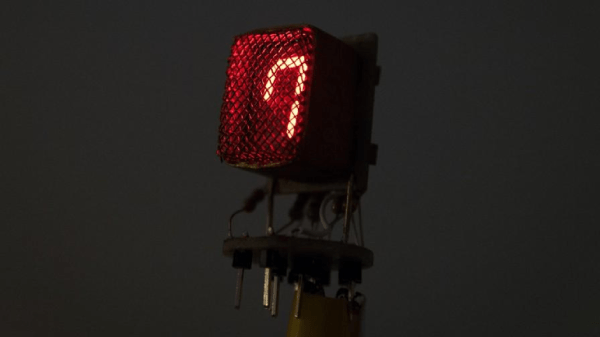
Custom Electronics And LED Panels Brighten Up A Nightclub

ledPanels

When [Robert] is presented with a challenge, he doesn’t back down. His friend dreamed of reusing some old LED panels by mounting them to the ceiling of the friend’s night club. Each panel consists of a grid of five by five red, green, and blue LEDs for a total of 75 LEDs per panel. It sounded like a relatively simple task but there were a few caveats. First, the controller box that came with the panels could only handle 16 panels and the friend wanted to control 24 of them. Second, the only input device for the controller was an infrared remote. The friend wanted an easy way for DJ’s to control the color of the panels and the infrared remote was not going to cut it. Oh yea, he also gave [Robert] just three weeks to make this happen.

[Robert] started out by building a circuit that could be duplicated to control each panel. The brain of this circuit is an ATtiny2313. For communication between panels, [Robert] chose to go with the DMX protocol. This was a good choice considering DMX is commonly used to control stage lighting effects. The SN75176 IC was chosen to handle this communication. In his haste to get this PCB manufactured [Robert] failed to realize that the LED panels were designed common cathode, as opposed to his 25 shiny new PCB’s which were designed to work with a common anode design. To remedy this, he switched out all of the n-channel MOSFET with p-channel MOSFET. He also spent a couple of hours manually cutting through traces and rewiring the board. After all of this, he discovered yet another problem. The LED’s were being powered from the same 5V source as the microcontroller. This lead to power supply issues resulting in the ATtiny constantly resetting. The solution was to add some capacitors.

Click past the break for more on [Robert’s] LED panels.

Continue reading “Custom Electronics And LED Panels Brighten Up A Nightclub”

Driving 1000 NeoPixels With 1k Of Arduino RAM

timing

NeoPixels, or WS2812 RGB LEDs, are the display device du jour for impressive and blinding lighting projects. Commonly known for very tight timing requirements, [Josh] discovered this is, in fact, usually unnecessary. The timing requirements for NeoPixels aren’t as bad as they seem, once you get to know them.

The official WS2812 timing specs give values that are fairly constraining for anyone writing a library to drive these RGB LED pixels, but simplifying the timing diagram by assuming a 50% duty cycle on the data lines and ignoring the longer maximum times results in a surprising conclusion: the only tight timing parameter for NeoPixel signaling is the maximum width of the 0-bit pulse.

Realizing this, [Josh] wrote a simple demo program to drive over 1000 NeoPixels – an 11 meter long strip – using 1K of RAM on an Arduino. The trick comes by simply delaying the bitbanging a set number of cycles. No obtuse assembly required.

There is only one problem with [Josh]’s method of driving a nearly unlimited amount of NeoPixels – building a display where every NeoPixel is an element in a larger image, such as in a video display, is impossible on systems with limited amounts of RAM. The code writes values to the NeoPixel strip algorithmically, so if you can’t build your animation with for loops, you’re out of luck. Still, Driving this many NeoPixels is a migraine trigger, and we have to give [Josh] credit for doing this with 1K of RAM.

Check out the video of [Josh]’s extreme NeoPixel strip below.

Continue reading “Driving 1000 NeoPixels With 1k Of Arduino RAM”

A Raspi Ambilight With HDMI Input

With the Raspberry Pi now most famously known as a $30 media PC, it only makes sense that the best uses for the GPIO pins on the Pi are used for an Ambilight. [Great Scott Labs] put up a great video on using the Pi as a uniquely configurable Ambilight with Hyperion and just about any video input imaginable.

This isn’t the first Ambilight clone [Great Scott] has put together, but for the first version the Ambilight functioned only under Raspbian and not any random HDMI input. The new version solves this by using an HDMI splitter box, feeding into an HDMI to composite converter, and finally into a USB composite capture dongle attached to the Raspi.

With the software in the instructions, the Raspi effectively mirrors the video coming from the video capture dongle. The Pi is running Hyperion to control a strip of WS2801 RGB LEDs, making the back of any TV glowey and blinkey.

Since [Great Scott] is using a component video signal as an input, the adapters necessary to have any device work with this Ambilight are readily available. We’d honestly like to see this build working with the old Commodore disk access screen border going nuts, so be sure to send that in if you ever get that working.

Continue reading “A Raspi Ambilight With HDMI Input”

LED Snowboards Light Up The Night

night time snowboarding

Snowboarding at night is awesome — but unless your riding on a well-lit ski slope you’re not going to have much luck free-styling through the mountains — unless of course you’ve got a board equipped with floodlights!

The folks over at Signal Snowboards do tons of cool snowboard mods, like making a snowboard completely out of paper, making a heated board to melt the snow as you go, making a bullet proof snowboard… the list goes on. Eager to make use of the dwindling 2014 boarding season, they decided to make the Floodlight Snowboard, a board equipped with LED lights on all sides that makes for amazing nighttime riding — and really cool video and photo effects!

A company donated a ton of LED headlights and flashlights to them and they got to work. While it’s technically as simple as strapping a flashlight to the board, since they actually manufacture boards, they’ve gone ahead and fully integrated the lights right into design. It’s quite cool to see the full process in their shop!

Continue reading “LED Snowboards Light Up The Night”

Huge RGB Ring Light Clock

After several months of work, [Greg] has completed one of the most polished LED clocks we’ve ever seen. It’s based on the WS2812 RGB LEDs, with an interesting PCB that allowed [Greg] to make a huge board without spending a lot of money.

The board is made of five interlocking segments, held together with the connections for power and data. Four of these boards contain only LEDs, but the fifth controller board is loaded up with an MSP430 microcontroller, a few capsense pads for a 1-D touch controller, and programming headers.

Finishing up the soldering, [Greg] had a beautiful LED ring light capable of being programmed as a clock, but no enclosure. A normal plastic case simply wouldn’t do, so [Greg] decided to try something he’d never done before: casting the PCB inside a block of resin.

A circular mold was made out of a piece of MDF and a router, and after some problems with clear resin that just wouldn’t cure, his ring light was embedded in a hard, transparent enclosure.  Conveniently stuck in the mold, of course. The MDF had absorbed a little bit of the resin, forcing [Greg] to mill the resin ring free from the wood, with a lot of finish sanding to make the clock pretty.

It’s a clock that demonstrates [Greg]’s copious manufacturing skills, and also his ability to troubleshoot the problems that arose. While he probably won’t be casting things inside an MDF mold anymore, with the right tools [Greg] could easily scale this up for some small-scale manufacturing.


Roman Headgear Looks Less Silly With Lots Of Blinky

centurion-project

Look, it’s not Steam-Punk because the period is way out of whack. And we’ve never seen ourselves as “that guy” at the party. But it would be pretty hard to develop The Centurion Project and not take the thing to every festive gathering you could possibly attend. This sound-reactive helm compels party-going in a toga-nouveau sort of way.

[Roman] tells us that it started as a movie prop. The first build step was to remove the plume from the top of it. The replacement — seven meters worth of addressable RGB LEDS — looks just enough like an epic mohawk to elicit visions of the punk rock show, with the reactive patterns to make it Daft. The unexpected comes with the FFT generated audio visualizations. They’re grounded on the top side of each of the LED strips. Most would call that upside-down but it ends up being the defining factor in this build. Seriously, watch the demo after the break and just try to make your case that this would have been better the other way around.

As a final note, this project was written using Cinder. It’s an Open Source C++ library that we don’t remember hearing about before.

Continue reading “Roman Headgear Looks Less Silly With Lots Of Blinky”

Aluminum LED Matrix Looks Professionally Made

IMG_1073

[David Donley] has wanted to make a LED matrix for a while now, and has decided to finally pull the trigger — after all, that many LEDs certainly aren’t cheap!

He’s using a set of 16 Adafruit 8×8 NeoPixel LED Matrices (almost $600 worth of LEDs) and a BeagleBone Black to control them. To mount the LED matrices he bought a sheet of 6061-T6 aluminum for two purposes — one to act as a giant heatsink, and two, to look cool. All he had to do was drill some holes in the sheet for the connectors, and then use 3M 300LSE double-sided adhesive to stick the NeoPixels to the surface. The result is a border-less display that looks clean and professional.

To power the array he’s using a 5V 90A power supply — at full brightness these LEDs can consume around 325W, or 65A at 5V!  Taking notes from the opensource LEDscape code on GitHub he’s made his own software to control the display — stick around after the break to see it in action.

Continue reading “Aluminum LED Matrix Looks Professionally Made”