What Time Is It? Infinity Time

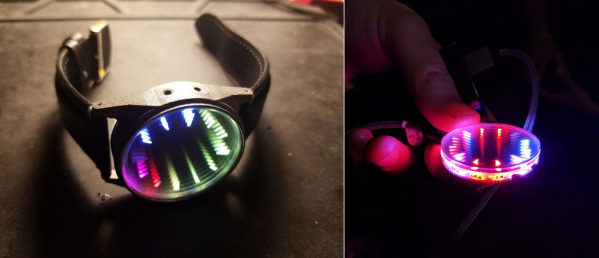
Since the dawn of the infinity craze, we’ve seen all kinds of projects — mirrors, smart mirrors, coffee tables, clocks, you name it. Unfortunately all of these cool projects sit at home, unappreciated by the public. Well, not anymore. [nolandoktor] is taking infinity to the streets with this beautiful and functional vortex watch.

Though this project is pretty darned advanced, it’s all open source and completely within reach for anyone who has the tools and the time. The watch is based around an ATmega32u4 and uses a DS3231 real-time clock to keep accurate time on the WS2812 LEDs that represent the numbers. The time is displayed using R, G, and B assigned to hour, minute, and second. Actually reading the time is bit tricky until you understand how the colors work together, but something this lovely deserves to maintain a slight air of mystery.

The watch’s case parts are all printed — metal for the bezel, and SLA for the white inner ring that lets a bit of light leak out the side in order to illuminate the USB port and the two stainless steel screws that act as touch contacts. In the future, [nolandoktor] wants to add flashlight mode that turns all the LEDs white, some gaskets to resist water, and wake-on-gesture functionality with an IMU. Take a second to check out the demo after the break.

If you prefer a more traditional timepiece of infinite interest, this clock moves more mundanely, but still looks cool.

Continue reading “What Time Is It? Infinity Time”

The Newbie’s Guide To JTAG

Do you even snarf?

If not, it might be because you haven’t mastered the basics of JTAG and learned how to dump, or snarf, the firmware of an embedded device. This JTAG primer will get you up to snuff on snarfing, and help you build your reverse engineering skills.

Whatever your motivation for diving into reverse engineering devices with microcontrollers, JTAG skills are a must, and [Sergio Prado]’s guide will get you going. He starts with a description and brief history of the Joint Test Action Group interface, from its humble beginnings as a PCB testing standard to the de facto standard for testing, debugging, and flashing firmware onto devices. He covers how to locate the JTAG pads – even when they’ve been purposely obfuscated – including the use of brute-force tools like the JTAGulator. Once you’ve got a connection, his tutorial helps you find the firmware in flash memory and snarf it up to a file for inspection, modification, or whatever else you have planned.

We always appreciate guides like these that cover the basics, since not everyone is in the same place in their hardware hacking journey. This puts us in the mood to crack something open and start looking for pins, if for no other reason than to get some practice.

[Thumbnail image source: LufSec]

Bitluni Brings All The ESP-32 Multimedia Hacks To Supercon

Of all the people I was looking forward to meeting at Supercon, aside from my Hackaday colleagues with whom I had worked for five years without ever meeting, was a fellow from Germany named Matthias Balwierz. The name might not ring a bell, but he’ll certainly be familiar to Hackaday readers as Bitluni, the sometimes goofy but always entertaining and enlightening face of “Bitluni’s Lab” on YouTube.

I’d been covering Bitluni’s many ESP32 hacks over the years, and had struck up a correspondence with him, swapping ideas and asking for advice on the many projects I start but somehow never finish. Luckily for us, Bitluni is far better on follow-through than I am, and he brought that breadth and depth of experience to the Design Lab stage for that venue’s last talk of the 2019 Superconference, before the party moved next door for the badge-hacking presentations.

Continue reading “Bitluni Brings All The ESP-32 Multimedia Hacks To Supercon”

New Part Day: Ooh, The Things You Can Do With A CLUE

There’s a new development board in town from Adafruit, and it’s called the CLUE. This tiny board can be programmed in Arduino or CircuitPython, and it is absolutely stuffed with sensors and functionality, including Bluetooth. It’s essentially a BBC Micro:bit with more sensors, a screen, and a much beefier processor. Sound interesting? Let’s get out the magnifying glass and take a look, shall we?

(Editor’s note: Adafruit ran out of the first alpha run of the hardware. While we didn’t run into any bugs, the next versions will presumably have even fewer, but will also cost $40 instead of $30. That said, they’re giving out 3,000 of them to attendants of PyCon in April, so you might also get your hands on one that way.)

And Bit:Bot takes the checkered flag! Image via Seeed Studio

First and foremost, there’s the form factor — if that bottom edge looks familiar, that’s because the CLUE is designed to work with micro:bit robot kits and anything else with that edge connector, like the CRICKIT for micro:bit, or the Bit:Bot from Seeed Studios. This is big news for the micro:bit ecosystem, and not just because the CLUE brings tons of sensors and a screen to the scene, although a 1.3″ screen at 240×240 resolution is nothing to sneeze at.

The main brain is a Nordic nRF52840, so you can pair it to your phone and stream your collected data. Or, use it to get two CLUE boards talking to each other. This is a major upgrade from the micro:bit’s nRF51822 — the CLUE is four times faster, has four times the flash memory, and has sixteen times as much RAM. We hope someone can find a way to make them into short-range messaging machines with Q10 keyboards.

Continue reading “New Part Day: Ooh, The Things You Can Do With A CLUE”

DJ Hero Controller Gets A New Gig

Fans of the Guitar Hero etc. franchise may be interested to hear about Spin Rhythm XD, a similar rhythm game which uses a jog wheel for much of the chase-down-the-notes action. Although it can be played with a keyboard and mouse, the ideal input is a professional DJ MIDI controller — imagine two capacitive “turntables” the size of 45s, and a lot of buttons, knobs, and sliders.

Like most of us, [Dave] doesn’t have one of those. But what he does have is an old DJ Hero controller made for the Wii. It’s a lot like the big boy version of a DJ MIDI controller as far as the inputs go, except that the turntable isn’t capacitive.

Since the Wii brain is just sending I²C over a funny-looking connector, [Dave] was able to replace the Wiimote with a Teensy LC, and write new firmware for the controller inputs using a breakout board built for another project.

[Dave] tried to use as many of the DJ Hero controller’s inputs as he could, so in addition to mapping the wheel and wheel buttons to the main game controls, he wired up the joystick, effects knob, and buttons to navigate through the game menus. The game’s designers had the forethought to map these to keyboard keys, so it was pretty easy to do. He can even use dual turntables and mix or isolate them with the crossfader. Slide past the break to check out the build video, and stick around for a full-length song demo.

Are these games a little too frantic for you? Turn those ‘tables into an Etch-A-Sketch instead.

Continue reading “DJ Hero Controller Gets A New Gig”

The TMS1000: The First Commercially Available Microcontroller

We use a microcontroller without a second thought, in applications where once we might have resorted to a brace of 74 logic chips. But how many of us have spared a thought for how the microcontroller evolved? It’s time to go back a few decades to look at the first commercially available microcontroller, the Texas Instruments TMS1000.

Imagine A World Without Microcontrollers

The Texas Instruments Speak And Spell from 1978 was a typical use for the TMS1000.
The Texas Instruments Speak & Spell from 1978 was a typical use for the TMS1000. FozzTexx (CC-SA 4.0)

It’s fair to say that without microcontrollers, many of the projects we feature on Hackaday would never be made. Those of us who remember the days before widely available and easy-to-program microcontrollers will tell you that computer control of a small hardware project was certainly possible, but instead of dropping in a single chip it would have involved constructing an entire computer system. I remember Z80 systems on stripboard, with the Z80 itself alongside an EPROM, RAM chips, 74-series decoder logic, and peripheral chips such as the 6402 UART or the 8255 I/O port. Flashing an LED or keeping an eye on a microswitch or two became a major undertaking in both construction and cost, so we’d only go to those lengths if the application really demanded it. This changed for me in the early 1990s when the first affordable microcontrollers with on-board EEPROM came to market, but by then these chips had already been with us for a couple of decades.

It seems strange to modern ears, but for an engineer around 1970 a desktop calculator was a more exciting prospect than a desktop computer. Yet many of the first microcomputers were designed with calculators in mind, as was for example the Intel 4004. Calculator manufacturers each drove advances in processor silicon, and at Texas Instruments this led to the first all-in-one single-chip microcontrollers being developed in 1971 as pre-programmed CPUs designed to provide a calculator on a chip. It would take a few more years until 1974 before they produced the TMS1000, a single-chip microcontroller intended for general purpose use, and the first such part to go on sale. Continue reading “The TMS1000: The First Commercially Available Microcontroller”

Sherbet Custom Game Pad Is Smooth And Sweet

When [Billiam]’s beloved Logitech G13 game pad went to that great spectate room in the sky, he decided to pay homage by designing a custom, more ergonomic replacement from the desk up. Grab a spoon and dig into the story of [Billiam]’s journey toward Sherbet, because it’s a sweet ride.

Here’s the scoop: like a lot of DIY game pads and keyboards, Sherbet is based on the Teensy. We often see the micro USB coming straight off the Teensy, especially in clear acrylic builds, but [Billiam] added a USB breakout board so there’s no direct stress on the Teensy itself.

One of [Billiam]’s design challenges comes from the game pad placement — he has a tall desk and uses a keyboard tray, so it has to fit the space and leave enough room for his hand. Fortunately, there are low-profile mechanical switches out there, although the keycap options are strongly limited. We love that [Billiam] embedded a tiny ceramic bearing into one of them to use as a homing bump, because that’s a great idea.

If you want to take a crack at this project, [Billiam] has all the goodies laid out. [Billiam] wanted to use QMK firmware, but they didn’t have joystick support yet, so he’s got an Arduino sketch running in the meantime.

We love a good custom game pad around here, especially if they can reprogram themselves.