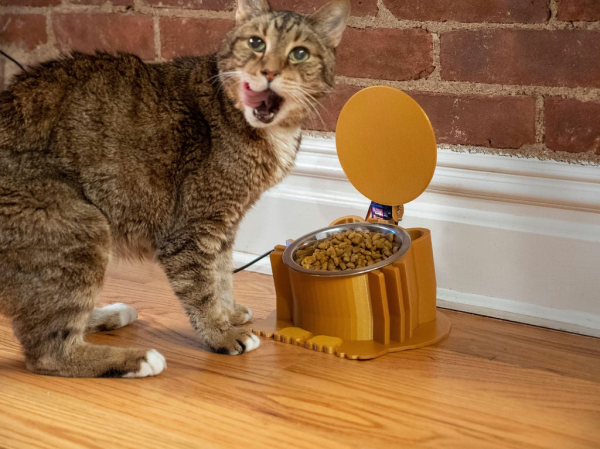
Print From The ESP8266, Courtesy Of Google

The ESP8266 has become the hacker’s microcontroller of choice because it’s exceptionally easy to get the chip connected to the network and talking to other devices. The fact that it’s also absurdly cheap is just a bonus. Since nearly every piece of electronics you buy today is “smart” enough to include some form of Internet control, that means there’s no shortage of gadgets these MCUs can potentially poke and prod.

In their latest tip, [TecnoProfesor] shows how you can interface the ESP8266 with Google’s Cloud Print, a service that enables simple remote printing over the web without having to worry about having the proper device drivers. Remote printing from the ESP8266 might seem like little more than a gag at first glance, but if you’re the kind of person who likes to have hard copies of data, adding the capability to generate a daily printed report to your weather station could be a nice weekend project.

[TecnoProfesor] provides explanations and source code for printing documents of various sizes from both the ESP8266’s internal flash storage and an SPI-attached SD card. Towards the end of the write-up, there’s even some explanation of how the setPrintDocument() function of the Cloud Print API can be used in more advanced scenarios, such as printing web pages or documents stored in Google Drive.

When we see microcontrollers connected to printers, they’re usually of the small thermal kind. Being able to access “real” printers with such a simple technique offers some interesting possibilities, though like most technology, there’s potential for it to be misused.

[Thanks to Andrew for the tip.]

The ESP32, Laid Bare

Most readers will be familiar with the ESP32, Espressif’s dual-core processor with integrated WiFi and Bluetooth. Few of us though will have explored all of its features, including its built-in encryption facilities and secure booting capability. With these, a developer can protect and secure their code, and keep their devices secure.

That sense of security may now be illusory though, thanks to [LimitedResults] who has developed a series of attacks on the chip that compromise its crypto core, secure boot, and flash encryption. This enables both the chance of arbitrary code execution and firmware extraction on locked-down ESP32 devices.

To achieve all this he used a glitching technique on the device’s power supply, inserting a carefully timed glitch in the rail to coincide with a particular instruction being executed. For those of us who are not experts in this technique, he provides a basic primer with a description of his home-made glitcher made using a CMOS switch chip.

It appears that there is no solution to this attack short of new silicon, however, it should be borne in mind that it’s something that depends upon a specialist hacker with a well-equipped bench, and is thus only likely to be a significant headache to manufacturers. But it undermines a key feature of a major line of microcontrollers, and as such it remains a significant piece of work.

A Self-Expanding PWM Driver

For smaller microcontrollers, having enough outputs for the job is sometimes a challenge. A common solution is to do some sort of multiplexing with the available outputs or perhaps something more advanced such as Charlieplexing, but another good option is to use a specialized driver board. What’s even better is if you can daisy chain driver boards to get even more outputs.

[Eric] has been working on a 16 channel LED project but first wanted to build a driver board with 8 channels. Before building a full 16 channel version he realized that he could take the same 8 channel board, make a mirror image of it, and attach it underneath the first board with headers in order to double the number of channels available. Without having to build a separate 16-channel board, this shortcut saved [Eric] some time and a great deal of effort.

This is a great example of working smarter, not harder. Each of the 8 or 16 channels has full PWM support as well to support PWM dimming, and a similar board could be built for motor control as well. It’s a good illustration of how good design can end up working for you as well. And if you need even more outputs, Charlieplexing is one way to get them.

Continue reading “A Self-Expanding PWM Driver”

Break The Caps Lock Habit With This Annoying Buzzer

The much-maligned Caps Lock key has been causing problems for decades, and its continued existence is controversial enough that Google decided to drop it all together in their Chromebooks. Until the rest of the industry decides to follow their lead, they’ll likely be no shortage of awkward emails or overly aggressive comments that are the direct result of this treacherous key.

But [Glen Akins] thinks he has the solution. His creation is a tiny little USB notification device that has only one purpose: to make a terrible noise as long as the Caps Lock key is engaged. Think of it like the little indicator LED on your keyboard, but one that makes a terrible screeching noise that you simply can’t ignore. This is made possible by the fact that the Caps Lock status is handled at the OS level rather than the local input device.

The notifier is built around the PIC16F1459, as it allowed him to implement USB 2.0 while keeping the part count low. Beyond the PIC, the board uses a handful of passives and a transistor to drive the buzzer from a PWM signal. To avoid duplicated effort, everything was designed to fit inside the enclosure he already developed for his single-key keyboard that we covered last year. [Glen] and a fellow coworker from Keysight put together an excellent video on the creation and use of the buzzer that you can see after the break.

On the other end of the spectrum, and even smaller, is the “USB Capslocker” which is designed to weaponize this already troublesome feature of your keyboard.

Continue reading “Break The Caps Lock Habit With This Annoying Buzzer”

RISC-V: Why The ISA Battles Aren’t Over Yet

A computer processor uses a so-called Instruction Set Architecture to talk with the world outside of its own circuitry. This ISA consists of a number of instructions, which essentially define the functionality of that processor, which explains why so many ISAs still exist today. It’s hard to find that one ISA that works for as many distinct use cases as possible, after all.

A fairly new ISA is RISC-V, the first version of which was created back in 2010 at the University of California, Berkeley. Intended to be a fully open ISA, targeting both students (as a learning tool) and industrial users, it is claimed to incorporate a number of design choices that should make it more attractive for a number of applications.

In this article I’ll take a look behind the marketing to take stock of how exactly RISC-V differs from other open ISAs, including Power, SPARC and MIPS.

Continue reading “RISC-V: Why The ISA Battles Aren’t Over Yet”

Weather Station Gets Much-Needed Upgrades

Weather stations are a popular project, partly because it’s helpful (and interesting) to know about the weather at your exact location rather than a forecast that might be vaguely in your zip code. They’re also popular because they’re a good way to get experience with microcontrollers, sensors, I/O, and communications protocols. Your own build may also be easily upgradeable as the years go by, and [Tysonpower] shows us some of the upgrades he’s made to the popular Sparkfun weather station from a few years ago.

The Sparkfun station is a good basis for a build though, it just needs some updates. The first was that the sensor package isn’t readily available though, but some hunting on Aliexpress netted a similar set of sensors from China. A Wemos D1 Mini was used as a replacement controller, and with it all buttoned up and programmed it turns out to be slightly cheaper (and more up-to-date) than the original Sparkfun station.

All of the parts and code for this new station are available on [Tysonpower]’s Github page, and if you want to take a look at a similar station that we’ve featured here before, there’s one from three years ago that’s also solar-powered.

Continue reading “Weather Station Gets Much-Needed Upgrades”

Tiny SAO, Tough CTF Challenge!

Over the year or two since the SAO connector specification was published, otherwise known as the Shitty Addon, we’ve seen a huge variety of these daughter boards for our favourite electronic badges. Many of them are works of art, but there’s another subset that’s far less about show and more about clever functionality. [Uri Shaked]’s little SAO is rather unprepossessing to look at, being a small round PCB with only an ATtiny microcontroller, reset button, and solitary LED, but its interest lies not in its looks but its software. It contains a series of CTF puzzles within, and despite its apparent simplicity should contain enough to detain even the hardiest puzzle-solving hackers.

It’s a puzzle of three parts, at the simplest level merely flashing the LED is enough, while the next level involves retrieving a buried string from the firmware and the last requires replacing the string with one of your own. You are only allowed to do so through the SAO connector, but fortunately you do have the benefit of access to the source code to trawl for vulnerabilities. There is a hefty hint that the data sheet for the microcontroller might also be useful.

[Uri] has appeared many times on these pages, most recently when he added a microscope to his 3D printer.