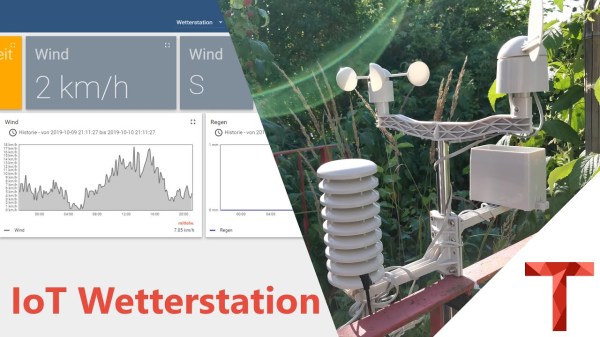
Particle Mesh Powers The Internet Of Fans

With the winter months not far off, [Ben Brooks] was looking for a way to help circulate the heat from his wood-burning fireplace throughout his home. Rather than go with a commercial solution, he decided to come up with his own automated air circulation system powered by the mesh networking capabilities of one of his favorite pieces of tech, the Particle Photon.

Particle Xeon remote sensor

The idea here is pretty simple: use a remote temperature sensor to tell a fan located behind the fireplace when it’s time to kick on and start sharing some of that warmth with the rest of the house. But as usual, it ended up being a bit trickier than anticipated. For one, when [Ben] took a close look at the Vornado 660 fan he planned on using, he realized that its speed controller was “smart” enough that simply putting a relay on the AC line wouldn’t allow him to turn it on and off.

So he had to do some reverse engineering to figure out how the Sonix SN8P2501B microcontroller on the board was controlling the fan, and then wire the Photon directly to the pins on the chip that corresponded with the various physical controls. This allows the Photon to not only “push” the buttons to trigger the different speeds, but also read the controls to see if a human is trying to override the current setting.

For the remote side [Ben] is using a Particle Xenon, which is specifically designed for Internet of Things endpoints and sensor applications. Combined with a TMP36 temperature sensor and 3.7 V 500 mAh battery, this allowed him to easily put together a wireless remote thermometer that will publish the current temperature to the Photon’s mesh network at regular intervals.

This isn’t the first time we’ve seen the Particle Photon used to augment an unassuming piece of hardware. We’ve previously seen one get grafted into a coffee maker, and if you can believe it, somebody even stuck one inside an umbrella to create a mobile weather station.

Handheld LoRa Joystick For Long-Range Bots

Wanting a simple tool to aid in the development of LoRa controlled robotic projects, [Jay Doscher] put together this very slick one-handed controller based on the 900 MHz Adafruit Feather M0. With a single trigger and a miniature analog joystick it’s a fairly simple input device, but should be just enough to test basic functionality of whatever moving gadget you might find yourself working on.

Wiring for this project is about as simple as you’d expect, with the trigger and joystick hanging off the Feather’s digital ports. The CircuitPython code is also very straightforward, though [Jay] says in the future he might expand on this a bit to support LoRaWAN. The controller was designed as a barebones diagnostic tool, but the hardware and software in its current form offers an excellent opportunity to layer additional functionality on a known good base.

Everything is held inside a very well designed 3D printed enclosure which [Jay] ran off on his ELEGOO Mars, one of the new breed of low-cost resin 3D printers. The machine might be pretty cheap, but the results speak for themselves. While resin printing certainly has its downsides, it’s hard not to be impressed by the finish quality of this enclosure.

While LoRa is generally used for transmitting small bits of information over long distances, such as from remote sensors, this isn’t the first time we’ve seen it used for direct control of a moving object. If you’re not up to speed on LoRa, check out this excellent talk from [Reinier van der Lee] that goes over the basics of the technology and how he used it to build a community sensor network.

Detecting Cars With An ESP8266 Magnetometer

Having a motorized gate on your driveway is great, but only if there’s an easy way to trigger it. [Andrew] says the gate at his parent’s place could only be controlled by manually pushing a button on the panel or with a dinky remote that didn’t have nearly the range they wanted. So he decided to build his own magnetometer allowing the gate to automatically open when a car was trying to leave.

Naturally, there are commercial offerings that would solve this problem. But with a sticker price of more than $150 USD, [Andrew] was more than happy to spend a bit of time tinkering to get the job done for less than 1/10th the cost with an ESP8266 and a QMC5883X series magneto-resistive sensor. Of course, this is one of those projects that seems simple enough in your head, but ends up taking a bit of finesse to pull off in the real-world.

For one, [Andrew] had to figure out how to prevent false positives. Pretty much any object brought close enough to the sensor, including his hand, would cause it to react. He ended up coming up with a way to use a rolling average to prevent the gate from firing off just because a squirrel ran past. The built-in safeties are designed to ensure that the gate only opens when an actual car is sitting in the appropriate spot for long enough.

Speaking of, we love how [Andrew] deployed the QMC5883X sensor for this project. The small sensor board and a few moisture-absorbing packets were placed in a Sonoff IP66 waterproof enclosure, and buried under the rocks of the driveway. A standard CAT5 cable is used to tether it to the ESP8266, relay, and assorted other goodies that now live in the gate’s control box. In the future he says the cable will likely have to go into a conduit, but for now the system is working more or less how he expected.

If your estate isn’t quite palatial enough to have a motorized gate out front, we’ve seen plenty of projects that add some much-needed intelligence to the humble garage door opener which might be more your speed.

Everything You Wanted To Know About Padauk MCUs And More

At this point you’d need to have lived underneath a rock somewhere on the dark side of the Moon to not have heard about these amazing, 3-cent microcontrollers. A number of places have pitched in on them, but comprehensive reviews, let alone a full-blown review of the entire ecosystem surrounding these Padauk MCUs have been scarce. Fortunately, [Jay Carlson] has put in a lot of effort to collect everything you could possibly want to know about anything Padauk.

The most important take-away is that these MCUs do not have any kind of communication peripherals. UARTs, I2C, and SPI all have to be done in software. They’re not very great at low-power or battery-powered applications due to high power usage. Essentially you’ll be using GPIO pins a lot. On the other hand, its multi-CPU context, FPPA feature is rather interesting, with the article covering it in detail.

As for the development tools, [Jay] came away very impressed with the In-Circuit Emulation (ICE) instead of running code on an MCU, as this can reduce development times significantly. This makes even the OTP (one-time programmable) property of most Padauk MCUs less significant than one might at first assume.

Then there’s the actual programming of the MCUs. The Micro C compiler Padauk provides essentially implements a sub-set of the C language, with some macros to replace things like for loops. Initially this may seem like a weird limitation, until you realize that these MCUs have 64 to 256 bytes of SRAM. That’s bytes, without any prefixes.

Finally, [Jay] shows off a couple of test projects, including a NeoPixel SPI adapter and bike light, which are all available on Github. The WS2812b project is something we have seen before, for example this project from [Anders Nielsen] (featured in the article image), which provides another take on this range of MCUs.

Did reading [Jay]’s article change your mind on these Padauk parts? Have you used these MCUs and ICE parts before? Feel free to leave your thoughts in the comments.

Reading The Water Meter In A Literal Sense With An ESP8266

In our info-obsessed culture, hackers are increasingly interested in ways to quantify the world around them. One popular project is to collect data about their home energy or water consumption to try and identify any trends or potential inefficiencies. For safety and potentially legal reasons, this usually has to be done in a minimally invasive way that doesn’t compromise the metering done by the utility provider. As you might expect, that often leads to some creative methods of data collection.

The latest solution comes courtesy of [Keilin Bickar], who’s using the ESP8266 and a serial TTL camera module to read the characters from the LCD of his water meter. With a 3D printed enclosure that doubles as a light source for the camera, the finished device perches on top of the water meter and sends the current reading to HomeAssistant via MQTT without any permanent wiring or mounting.

Of course, the ESP8266 is not a platform we generally see performing optical character recognition. Some clever programming was required to get the Wemos D1 Mini Lite to reliably read the numbers from the meter without having to push the task to a more computationally powerful device such as a Raspberry Pi. The process starts with a 160×120 JPEG image provided by a VC0706 camera module, which is then processed with the JPEGDecoder library. The top and bottom of the image are discarded, and the center band is isolated into blocks that correspond with the position of each digit on the display.

Within each block, the code checks an array of predetermined points to see if the corresponding pixel is black or not. In theory this allows detecting all the digits between 0 and 9, though [Keilin] says there were still the occasional false readings due to inherent instabilities in the camera and mounting. But with a few iterations to the code and the aid of a Python testing program that allowed him to validate the impact of changes to the algorithm, he was able to greatly improve the detection accuracy. He says it also helps that the nature of the data allows for some basic sanity checks;  for example the number only ever goes up, and only by a relatively small amount each time.

This method might not allow the per-second sampling required to pull off the impressive (if slightly creepy) water usage data mining we saw recently, but as long as you’re not after very high resolution data this is an elegant and creative way to pull useful data from your existing utility meter.

Hack Your Brain To Stop Overeating

Sometimes the easiest advice can be the hardest to follow. For example: if you want to lose weight, you must eat right and exercise. You can avoid both and still lose weight by simply eating less, but that takes willpower.

Losing weight is one of the hardest things a person can do, because we have to eat to survive. That leaves the problem of stopping when we’re full. Here in the united states of high-fat foods and huge portions, that can be really, really difficult, as evidenced by the obesity statistics. But no matter where you live, it’s easy to ignore the ‘stomach full’ signal. It’s kind of slow, anyway. So how do you get yourself tuned into the signal? All it takes is a little classical conditioning.

Slim Band is simple, but effective. Basically, it’s a pack of breath-freshening strips strapped to a timer PCB and set into a watchband. Set the five-minute timer when you start eating, and when it goes off, take out a strip and mintify your mouth. By the time the minty-ness wears off, you should feel full enough to push your plate away. The convenience factor is a big plus—there’s no getting the phone out to set an alarm, or digging for mints in your pocket or purse.

Though the idea began as a personal improvement project, [Chaz] would like to see it widely adopted as a way of fighting obesity and evening out the world’s food distribution in the longer term. We would, too.

Micropython And C Play Together Better

Python is a versatile, powerful language but sometimes it’s not the best choice, especially if you’re doing work in embedded systems with limited memory. Sometimes you can get away with MicroPython for these cases, but the best language is likely C or assembly. If you’re really stubborn, like [amirgon], and really want C and Python to play well together, you can make use of his new tool which can bring any C library to MicroPython.

As an example of how this tool is used, a “Pure MicroPython” display driver for ILI9341 on the ESP32, which means that everything was implemented in MicroPython. [amirgon] wanted to see how the Python driver would compare to one that’s already been written in C, and use it to showcase MicroPython binding. This tool also automatically converts structs, unions, enums and arrays to Python objects, and provides a means to work with pointers which is something that Python doesn’t handle in the same way that C requires.

[amirgon] hopes that this tool will encourage the adoption of Micropython by removing the obstacle of missing APIs and libraries in MicroPython. Since most libraries for systems like these are written in C, a way to implement them in Python is certainly powerful. We featured one use case for this a while back, but this is a much more generic fix for this coding obstacle.