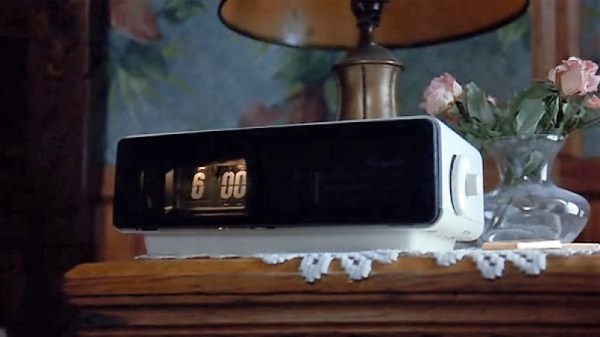
RGB Word Clock Doesn’t Skimp On The Features

Like most pieces of technology, word clocks seem to be getting better and better every year. As hackers get their hands on better microcontrollers and more capable LED controllers, these builds not only look more polished, but get improved features and functions. Luckily for us, the rise of these advanced modular components means they’re getting easier to build too. For an example of these parallel traits, look no further than VERBIS by [Andrei Erdei].

This colorful word clock is powered by an ESP8266, a 8×8 RGB LED matrix, and a WS2812 RGB LED controller module. [Andrei] used the diminutive ESP-01 which can plug right into the LED controller, and just needs a 3.3 VDC regulator board to complete the very compact electronics package.

To keep the LEDs from interfering with each other, [Andrei] has designed a 3D printed grid which fits over the matrix board. On top of that goes a piece of paper that has the letters printed on it. He mentions that he was able to get good results printing this “stencil” out on an inkjet printer by simply running the same piece of paper through a few times; picking up more black ink each time it went through. Judging by the sharp characters seen in the video after the break, the trick worked well.

With his hardware put together, [Andrei] turned his attention to the software. We really think the project shines here, as his clock not only supports NTP for automatically setting the time over the Internet, but offers a full web interface to control various functions such as the LED colors. You can even change the NTP server and network configuration right from the UI, which is a nice touch compared to just hard coding the values into the code. Even if you don’t use the same hardware, the open source control software is definitely something you should look into if you’re building your own word clock.

We recently covered another easy to build word clock that used an LED matrix and not a whole lot else, but it was quite tiny. This build is a much more reasonable size for a desk, but you’ll probably need to break out the laser cutter if you want to get much bigger.

Continue reading “RGB Word Clock Doesn’t Skimp On The Features”

The Heat Is On With This ESP8266 Controlled Sauna

We’ll be perfectly honest: sitting inside a heated box sounds just a bit too much like torture for our tastes. But if we did somehow find ourselves in possession of a fancy new sauna, we’d more than likely follow in the footsteps of [Al Betschart] and make the thing controllable with the ESP8266. After all, if you’re going to be cooked alive, you might as well do it on your own terms.

The sauna itself was purchased as a kit, and included an electric heater controlled by a thermostat. As explained in his detailed documentation, [Al] integrated a Sonoff TH16 into the original heater circuit so he could control power to the coils remotely. The TH16 also includes support for a thermal sensor, which allowed him to get a reading on the sauna’s internal temperature. The new electronics were mounted in a weather-proof box on the back of the sauna, complete with an external WiFi antenna to help get a good signal back to the house.

At this point the project could technically be done if all you wanted was remote control, but [Al] wanted to create a replacement firmware for the Sonoff that was specifically geared towards the sauna. So he came up with some code that uses MQTT to connect the heater to his home automation system, and allows configuring things like the maximum temperature and how long the sauna will run before turning itself off.

Interestingly, the company who makes these saunas thought the work [Al] did to integrate their product into his home automation system was so impressive they actually interviewed him about it and put it up on their site for others who might be inspired by his work. We’ve covered a lot of hacks to consumer devices here at Hackaday, and it’s exceedingly rare for a company to be so supportive of customers fiddling around with their products (especially in a case like this where there’s a real chance of burning your house down), so credit where credit is due.

The last time we brought you a sauna hack it was quite literally in a van down by the river, so the addition of an ESP8266 certainly brings this more into our comfort zone. Figuratively, if not literally.

[Thanks to Jon for the tip.]

Jaromir Sukuba: The Supercon 2018 Badge Firmware

If you missed it, the Hackaday Supercon 2018 badge was a complete retro-minicomputer with a screen, keyboard, memory, speaker, and expansion ports that would make a TRS-80 blush. Only instead of taking up half of your desk, everyone at the conference had one around their neck, when they weren’t soldering to it, that is.

The killer feature of the badge was its accessibility and hackability — and a large part of that was due to the onboard BASIC interpreter. And that’s where Jaromir comes in. Once Voja Antonic had finalized the design of the badge hardware for our conference in Belgrade in the spring of 2018, as Jaromir puts it, “all we needed was a little bit of programming”. That would of course take three months. The badge was battle-tested in Belgrade, and various feature requests, speed ups, and bugfixes were implemented (during the con!) by Jaromir and others.

Firmware work proceeded over the summer. Ziggurat29 helped out greatly by finding ways to speed up the badge’s BASIC interpreter (that story is told on his UBASIC and the Need for Speed project page) and rolled into the code base by Jaromir. More bugs were fixed, keywords were added, and the three-month project grew to more like nine. The result: the badge was in great shape for the Supercon in the fall.

Jaromir’s talk about the badge is supremely short, so if you’re interested in hacking a retrocomputer into a PIC, or if you’ve got a badge and you still want to dig deeper into it, you should really give it a look. We don’t think that anyone fully exploited the CP/M machine emulator that lies inside — there’s tons of software written for that machine that is just begging to be run after all these years — but we’re pretty sure nearly everyone got at least into the basement in Zork. Dive in!

Continue reading “Jaromir Sukuba: The Supercon 2018 Badge Firmware”

Programmable Ruler Keeps 1970’s Computing Alive

A ruler seems like a pretty simple device; just a nice straight piece of material with some marks on it. There are some improvements out there to the basic design, like making it out of something flexible or printing a few useful crib notes and formulas on it so you have a handy reference. But for the most part, we can all agree that ruler technology has pretty much plateaued.

Well, not if [Brad] has anything to say about it. His latest creation, the Digirule2, is essentially an 8-bit computer like those of the 1970’s that just so happens to be a functional ruler as well. Forget lugging out the Altair 8800 next time you’re in the mood for some old school software development, now you can get the same experience with a piece of hardware that lives in your pencil cup.

Even if you’ve never commanded one of the blinkenlight behemoths that inspired the Digirule2, this is an excellent way to get some hands-on experience with early computer technology. Available for about the cost of a large pizza on Tindie, it represents one of the easiest and most cost-effective ways to tell your friends that as a matter of fact you have programmed a computer in binary.

The Digirule2 is powered by a Microchip PIC18F43K20, and is programmed by punching binary in one byte at a time with a bank of eight tactile switches. To make things a little easier, programs can be saved to the internal EEPROM and loaded back up just as easily thanks to the handy buttons next to the power switch. Now all you’ve got to do is figure out what all those blinking LEDs mean, and you’ll be in business.

The original Digirule was a logic gate simulator that we first covered back in 2015. We’re always happy to see projects grow and evolve over time, and think this new retro-computer themed variant is going to be quite popular with those who still love toggle switches and blinking lights.

Continue reading “Programmable Ruler Keeps 1970’s Computing Alive”

Live Hacking And A MIDI Keytar

We can’t think of where you’d buy a new, cheap, MIDI keytar that’s just a keyboard and a handle with some pitch and mod wheels or ribbon controllers. This is a format that died in the 90s or thereabouts. Yes, the Rock Band controller exists, but my point stands. In fact, the closest you can get to a cheap, simple MIDI keytar is the Alesis Vortex Wireless 2 Keytar, but the buttons on the handle don’t make any sense. [marcan] of Wii and Kinect hacking fame took note. (YouTube, embedded below.)

Reverse engineering is a research project, and all research projects begin with looking at the docs. When it comes to consumer electronics, the best resource is the documents a company is required to submit to the FCC (shout out to FCC.io), which gave [marcan] the user manual, and photos of the guts of the keytar. The ‘system update download’ files are living on the Alesis servers, and that’s really all you need to reverse engineer a keytar.

The first step is extracting the actual device firmware from whatever software package appears on the desktop when you download the software update. This is a simple job for 7zip, and after looking at a binary dump of the firmware, [marcan] discovered this was for an STM chip. With the datasheet of the chip, [marcan] got the entry point for the firmware, some values, and the real hardware hacking began. All of this was done with IDA.

This is a five-hour hacking session of cross-referencing the MIDI spec and a microcontroller built thirty years after this spec was developed. It’s an amazing bit of work just to find the bit of code than handled the buttons on the keytar grip, and it gets even better when the patched firmware is uploaded. If you want to ‘learn hacking’, as so many submitters on our tip line want to do, this is what you need to watch. Thanks [hmn] for the tip.

Continue reading “Live Hacking And A MIDI Keytar”

LittlevGL Brings GUI Tools To Micropython

Microcontrollers are wonderfully useful things, but programming them can be a little daunting if you’re used to the simplicity of compiling for regular PCs. Over time though, this has become easier. Communities have strayed away from assembly code and created higher-level languages such as Micropython, to allow these devices to be programmed in a more accessible manner. Unfortunately, Micropython has historically lacked a decent high-level GUI library. Thankfully, that’s no longer the case, with [amirgon] porting LittlevGL to the platform.

Putting a GUI into a project with a screen seems simple, until one actually gets down to brass tacks. A simple button can consist of a background color, text, and a symbol – and that’s not even considering the use of shading or other visual effects. Having a library to handle the grunt work can massively cut down development time.

LittlevGL is the work of [kisvegabor], and is programmed in C, but this effort has made it possible to integrate it with Micropython code. It’s all object-oriented, and thus works well in the broader Python framework. [amirgon] notes that it’s particularly good for quick development, due to Python’s ability to run code without a slow compiling step.

There are other approaches to this problem, too – with MyOpenLab being a particularly versatile example.

Teardown Of A Luxury Bluetooth Nightlight

If you had asked us yesterday what peak nightlight technology looked like, we might have said one of those LED panels that you stick in the outlet. At least it beats one of those little wimpy light bulbs behind the seashell, anyway. But after looking at a detailed teardown of the “Glow Light” from Casper, we’ve learned a lot about the modern nightlight. Such as the fact that there are adults who not only sleep with nightlights, but are willing to pay $89 USD for one.

But more importantly, as [Tyler Mincey] demonstrates in his excellent look inside one of these high-end nightlights, they are gorgeous pieces of engineering. Even if a nightlight next to the bed has long since gone the way of pajamas with feet on them for you personally, we think you’ll be impressed just how much technology has gone into these softly glowing gadgets.

On the outside they might look like marshmallows, but the insides look far more like what you’d expect from an expensive piece of consumer gear. It’s based on the Nordic nRF52832 Bluetooth SoC which is becoming an increasingly common sight in consumer gadgets, and uses an inertial measurement unit (IMU) to detect when it’s moved or twisted and adjusts the light output accordingly. If you’ve got the disposable income for two of these things, they’ll even synchronize so that twisting one will dim its counterpart.

The teardown that [Tyler] did on the Glow Light is quite frankly one of the best we’ve ever seen, and while it might be a bit light on the gritty technical details, it more than makes up for that with the fantastic pictures that are about as close to actual hardware porn as you can get. The only question we have now is, how long until a hacker replicates this design with a 3D printed enclosure and an ESP?

[Thanks to Adrian for the tip.]