Update From Wayback: AVGA Reborn As RetroWiz

retrowiz-vga-avr-gaming-system

This one has been a long time coming. We’re finally seeing an update to [Jaromir’s] retro gaming platform based around and ATmega chip. The thing that was novel about it back in 2009, and continues to be to this day, is the use of VGA output (PAL) from an AVR chip rather than composite video like most offerings.

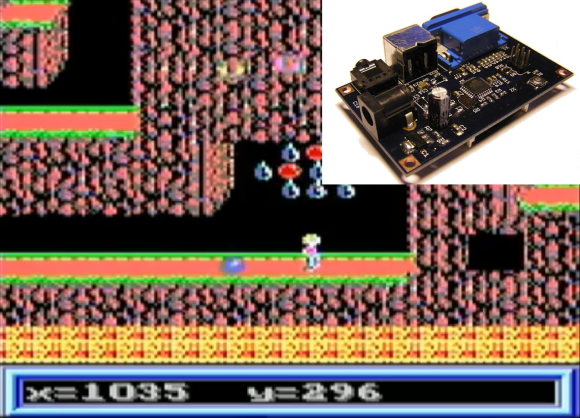
Good projects never die and recently he picked the hardware up again, spinning a mostly surface mount board and putting together a new website to feature his work. Above you can see a demo of Commander Keen 4 running on the hardware (video below). He’s also has a rather trippy Super Mario port and adapted [Albert Seward’s] PacMan source for the hardware.

The chip is being clocked at 32MHz with VGA clock running at 19.6608 MHz. This gives him sixteen colors with a resolution of 192×144. He concedes that you get better resolution out of composite video, but who needs resolution for retro gaming?

Continue reading “Update From Wayback: AVGA Reborn As RetroWiz”

SLDongle: The Microcontroller Gift That Keeps On Giving

It must be nice to be one of [kiu]’s colleagues. Some people pass out chocolates or stress balls at work as Christmas gifts, but [kiu] made a bunch of SL dongles to introduce his colleagues to the world of microcontrollers.

The dongles are based on the ATMega88PA and work on three levels to provide something for everyone. The no-experience-necessary option is to plug it in to a USB port and admire the light show sequences. If you know enough to be dangerous, you can remotely control the LEDs from a USB host using [kiu]’s sldtool for Linux or Mac. He originally included examples that visualize CPU utilization and ultimately added a Ruby-based departure countdown for the next outbound train at the nearby station.

If you’re 1337 enough you can flash your own C or assembly code via USB. Holding down the button during power-up lets you use the dongle as a USBasp so it can be flashed with avrdude. [kiu] says the bootloader can’t be unlocked through software and is theoretically unbrickable. Stick around after the break to see the full demo.

Continue reading “SLDongle: The Microcontroller Gift That Keeps On Giving”

GPS Engagement Ring Box

gpsEngagementRingBox

[James] got engaged recently, in part thanks to his clever GPS Engagement Ring Box, and he sent us a brief overview of how he brought this project to life. The exterior of the box is rather simple: one button and an LCD. Upon pressing the button, the LCD would indicate how far it needed to be taken to reach a pre-selected destination. After carrying it to the correct location, the box would open, revealing the ring (and a bit of electronics).

Inside is a GPS antenna and a Stellaris Launchpad, which are powered by three Energizer lithium batteries to ensure the box didn’t run out of juice during the walk. To keep the lid closed, [James] 3D printed a small latch and glued it to the top of the box, which is held in place by a micro servo. Once the box reaches its destination, the microcontroller tells the servo to swing out of the way, and the box can then open. As a failsafe, [James] added a reed switch to trigger an interrupt to open the box regardless of location. It seems this was a wise choice, because the GPS was a bit off and the box didn’t think it was in the correct place.

Swing by his blog for more information on the box’s construction and the wiring. We wish [James] the best and look forward seeing his future hacks; perhaps he’ll come up with some clever ones for the wedding like our friend Bill Porter.

Happy Birthday, Son. Here’s Your Very Own Claw Machine

mrclaw
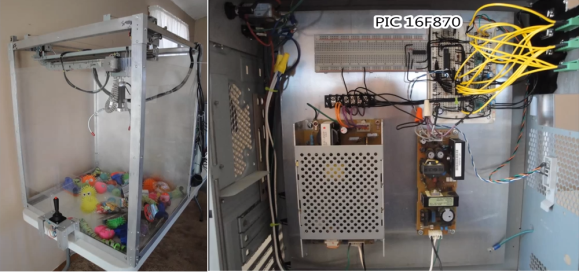
If [Will Baden] is in the running for Father of the Year, he’s a shoe-in. His son requested a robot-themed birthday party, so [Will] did what any superhero father would do and built him a toy claw machine.

[Will] harvested many of the parts from copy machines: both the 5V and 24V power supplies, the limit switches, 2/3 of the motors, and the 24V solenoid coil in the claw. The carriage is from a commercial printer. He made many of the mounts, including the ones holding the 3 stepper motors from Pololu.

A PIC16F870 is running the show. [Will] programmed it in assembly using Timer2 for stepper pulsing and RB0 interrupt to drop the claw when the button is pushed. He also added a WDT to get out of code trouble if needed. The claw’s solenoid is driven by a ULN2001A Darlington array. [Will] put a kickback diode on the coil so the pulses don’t go farther than they need to. He formed the fingers of the claw by bending pieces of brake line.

Not your kind of claw? Check out these incredible Wolverine claws!

Continue reading “Happy Birthday, Son. Here’s Your Very Own Claw Machine”

Chachka: A Trinket Clone

Why would you clone something as cheap as the adafruit Trinket? Well, because you can, of course. And that’s exactly why [Ray] started to build a clone two days after his Trinket came in the mail. He encourages you to support adafruit by buying at least one Trinket before attempting a clone, and we agree. Besides, you’ll be able to use the support forum with a clear conscience.

[Ray]’s design uses an 1800Ω pull-up resistor rather than the 1500Ω in the Trinket. He made this change based on his experience with V-USB and the ATtiny85. He has a lot more information on his build on the Arduino forum. Check out a short video of Chachka responding to a Sony-esque remote control after the break.

Need an application for your Trinket clone? Check out this incredibly well-built USB volume knob.

Continue reading “Chachka: A Trinket Clone”

Sucking PIC Firmware Out Of An Old APC Battery Backup

reverse-engineering-pic-firmware-of-APC-power-supply

Looking at this huge Uninterruptible Power Supply we are a little envious. It’s meant to hang on the wall of a utility room and power your critical devices. [Radek Hvizdos] has had it in service for quite some time, and when he started thinking of replacing the internal battery he decided to see if he could also extend the functionality. To do so he needed to get at the firmware of the chip controlling the device. And so began his adventure of dumping the firmware from the read-protected PIC 18F452.

The challenge of dumping code from a write-protected chip is in itself a fun project. But [Radek] was actually interested in fixing bugs and adding features. The wishlist feature we’d be most interested in is a kind of triage for shutting down devices as the internal battery starts to run low. Nice! But starting from scratch with the firmware is a no-go. You can see the two places where he connected to the PCB. The upper is for using a PIC programmer. The lower is an I2C connection used to dump the EEPROM with an improvised Bus Pirate.

In the end it was improper lock bit settings that opened the door to grabbing the firmware. The bootloader section of the PIC is not locked, and neither is the ability to read from FLASH at run-time. These two combined allowed him to write his own code which, when flashed to the bootloader section, dumps the rest of the firmware so that it may be combined into a complete file afterward. Since posting this fascinating article he has made a follow-up about disassembling the code.

A Light-Up Dress For A New Year’s Dance Party

wearableLedress

Don’t let the above picture’s lack of blinking colors fool you, the light-up dress [Sam] fashioned for his girlfriend is rather eye-catching; we’d just rather talk about it than edit the gifs he’s provided. [Sam’s] been a busy guy. His last project was a Raspberry Pi digital photo frame, which we featured just over a week ago, but wearable hacks allow him to combine his favored hobbies of sewing and electronics.

If you’re looking to get started with wearable electronics, then this project provides a great entry point. The bulk of the build is what you’d expect: some individually-addressable RGB LEDs, the ever-popular FLORA board from Adafruit, and a simple battery holder. [Sam] decided to only use around 40 of the LEDs, but the strips come 60 to a meter, so he simply tucked the extra away inside the dress and set his desired limits in the software, which will allow him to preserve the entire strip for future projects. If you’ve ever attempted a wearable hack, you’re probably familiar with how delicate the connections can be and how easily the slightest bend in the wiring can leave you stranded. Most opt for a conductive thread solution, but [Sam] tried something different and used 30 AWG wire, which was thin enough to be sewn into the fabric. As an added bonus, the 30 AWG wire is insulated, which permits him to run the wires close to (or perhaps over) each other while avoiding shorts. [Sam’s] guide is detailed and approachable, so head over to his project page if you think you’ve caught wearables fever, and check out his GitHub for the source code.