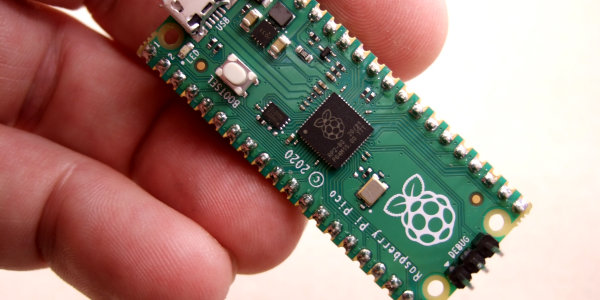
MicroPython ESP32 IDE Makes Life Simpler

In theory, using MicroPython on the ESP32 is easy —  just flash an image and connect using a serial port. But that leaves a lot of things you still have to do. You need to move files between the two platforms. You’ll want to manage network configurations. You might want better editing and assistance, too. So there are a number of IDEs made to help you and one we recently noticed was MPY-Jama.

The IDE provides source code editing, of course. But it also allows you to do things like pull information about the network using a dashboard or connect to a WiFi network easily. You can even create your own AP with a simple interface.

Although the front part of the README mentions it is for Windows or Mac, if you scroll down you’ll find instructions for installing under Linux. The IDE is extensible using “Jama Funcs” and can handle the flashing operation from inside the IDE.

Of course, there is an IDE from Arduino (but not the Arduino IDE) that handles MicroPython. You can also find a rundown of several similar alternatives online.  If you need some inspiration for a MicroPython project, perhaps you’d like to play a game?

Scratch Your Itch To Program A Microcontroller

One of the fun things about “old school” computers is that it was fairly easy to get kids into programming them. The old Basic interpreters were pretty forgiving, and you could do some clever things easily with very little theory or setup. These days, you are more likely to sneak kids into programming via Scratch — a system for setting up programs via blocks in a GUI. Again, you can get simple results simply. With Scratch or Basic, complex things have a way of turning out complex, but that’s to be expected. If you want to try a Scratch-inspired take on microcontroller programming, check out MicroBlocks. It will work with several common boards, including the micro:bit and the Raspberry Pi Pico. You can use it in a browser or download versions for Linux, Windows, Mac, or even Chromebooks.

You can see a video below about the micro:bit version from a year ago. The tool is advancing, so you’ll find many new features compared to the video, but it will still give you an idea of what’s happening.

Continue reading “Scratch Your Itch To Program A Microcontroller”

Audio Playback Toy For DSP Adventures

The declining costs of single-board computers has made serious computing power available for even the most trivial of tasks. It’s easy enough to slap a Raspberry Pi onto almost anything for nearly the same cost as a powerful 32-bit microcontroller platform, but this takes some of the fun out of projects for a few of us. Looking to get into the weeds can be a challenge as well, as [Michal Zalewski] demonstrates in this audio playback device he built from a simple 8-bit microcontroller.

The small toy takes audio input from a microphone through an op-amp and feeds this signal to an ADC within the AVR128DA28 microcontroller. The data is then stored on a separate memory chip ready to be played back through another op-amp paired with a speaker. This is where being familiar with the inner workings of the microcontroller comes in handy. By manipulating the interrupt routines in specific ways, the audio stored in memory can be played back at various speeds.

[Michal] intended this build to be a toy for one of his younger relatives, and for the price of a few ICs and buttons it does a pretty good job of turning a regular voice into a chipmunk voice like some commercial children’s toys some of us might remember. If the design aesthetics of this gadget look familiar, you may be thinking of his minimalist gaming device which we recently featured.

Cheap Kitchen Scale Learns To Speak JSON With ESP32

Smart kitchen appliances are expensive, and more often than not, your usage data goes to whichever company operates the inevitable cloud service. Meanwhile the cheap ones contain substantially the same components without the smarts, so surely a hardware hacker can add a microcontroller to a cheap appliance for a bit of smart home technology without the privacy issues? It’s something [Liore] has done with an Amazon Basics kitchen scale, removing the electronics and wiring up an ESP32 to the load cell instead.

The Wheatstone bridge load cell circuit generates a tiny voltage difference that’s far too small for an ESP32 to measure, so in between the pair is an Avia Semiconductor HX711 strain gauge amplifier module. In addition, there’s a small OLED screen and the two buttons used in the Amazon scale are wired in too, providing the the kitchen scale functionality you’d expect.

Naturally the ESP32 brings along with it WiFi networking capabilities, which [Liore] has taken full advantage of here. By navigating a web browser to its IP address, you’ll receive the scale’s current reading in JSON format. This should make it easy to integrate with other systems, from Home Assistant to OctoPrint. We can see that there is plenty of scope for further enhancements for those prepared to write a little code.

Of course, this isn’t the first enhanced scale we’ve brought you, here’s one with Bluetooth. We’ve also seen hackers dispense with the kitchen-safe trappings and build the load cell directly into their own contraptions.

A wooden box sits on a darker wooden table. The box has a red, glowing number 8 on it.

Ambient Display Tells You If Borealis Is Coming To Town

For those times when you’d rather not get sucked down another internet rabbit hole when you really just wanted the weather, an ambient display can be great. [AlexanderK106] built a simple ambient display to know the probability the Northern Lights would visit his town.

Starting with a NodeMCU featuring the ESP8266, [AlexanderK106] walks us through a beginner-friendly tutorial on how to do everything from configure the Arduino IDE, the basics of using a breadboard. finding a data source and parsing it, and finally sticking everything into an enclosure.

The 7-segment display is taped and set into the back of the 1/4″ pine with enough brightness to shine through the additional layer of veneer on top. The display is set to show one digit and then the next before a three second repeat. A second display would probably make this easier to use day-to-day, but we appreciate him keeping it simple for this tutorial.

Looking for more ambient displays? Checkout the Tempescope or this clock that lets you feel the temperature outside!

3D Printed Triptych Shows Trio Of AI-Generated Images

Fascinated by art generated by deep learning systems such as DALL-E and Stable Diffusion? Then perhaps a wall installation like this phenomenal e-paper Triptych created by [Zach Archer] is in your future.

The three interlocking frames were printed out of “Walnut Wood” HTPLA from ProtoPasta, and hold a pair of 5.79 inch red/black/white displays along with a single 7.3 inch red/yellow/black/white panel from Waveshare. There are e-paper panels out there with more colors available if you wanted to go that route, but judging by the striking images [Zach] has posted, the relatively limited color palettes available on these displays doesn’t seem to be a hindrance.

Note the clever S-shaped brackets holding in the displays.

To create the images themselves, [Zach] wrote a script that would generate endless customized portraits using Stable Diffusion v1.4, and then manually selected the best to get copied over to a 32 GB micro SD card. The side images were generated on the dreamstudio.ai website, and also dumped on the card.

Every 12 hours a TinyPico ESP32 development board in the frame picks some images from the card, applies the necessary dithering and color adjustments to make them look good on the e-paper, and then updates the displays. Continue reading “3D Printed Triptych Shows Trio Of AI-Generated Images”

RP2040 DMA Hack Makes Another ‘CPU Core’

[Bruce Land] of Cornell University will be a familiar name to many Hackaday readers, searching the site for ‘ECE4760′ will bring up many interesting topics around embedded programming. Every year [Bruce] releases yet more of the students’ work out into the wild to our great delight. This RP2040-based project is a bit more abstract than some previous work and shows yet another implementation of an older hack to utilise the DMA hardware of the RP2040 as another CPU core. While the primary focus of the RP2040 DMA subsystem is moving data between memory spaces, with minimal CPU intervention, the DMA control blocks have some fairly complex behaviour. This allows for a Turing-complete CPU to be implemented purely with the DMA hardware and a sprinkling of memory.

The method ties up three of the twelve DMA channels, and is estimated to have a similar performance to ‘an Arduino’ but [Bruce] doesn’t specify which one of the varied models that could be. But who cares anyway? Programming the CPU is a matter of leveraging the behaviour of the hardware, which is all memory mapped and targetable by the DMA. For example, the CPU can waggle GPIO pins by using the DMA to write values to the peripheral address space. The basic flow can be seen in the image above. DMA0 is used as the program counter, which points DMA1 to an array of DMA control blocks, a sequence of which codes for some of the ‘opcodes’ of the CPU model. DMA0 chains to (hands over control to) DMA1 which reads the control blocks and configures itself accordingly. DMA1 performs whatever data move is programmed, chains to DMA2, which in turn reprograms the DMA0 program counter to point to the next block in the list to be executed by DMA1.

Continue reading “RP2040 DMA Hack Makes Another ‘CPU Core’”