A small circuit board glowing purple inset with computer code

Power Cycling Museum Computers On The Cheap

Flicking a circuit breaker to power cycle hundreds of desktop computers inside interactive museum exhibits is hardly ideal. Computers tend to get cranky when improperly shutdown, and there’s an non-zero risk of data loss. However, financial concerns ruled out commercial computer management solutions, and manually shutting down each exhibit at the end of the day is not practical. Tasked with finding a solution, [Jeff Glass] mixed off-the-shelf UPS (uninterruptible power supply) hardware, a Featherwing and some Python to give the museum’s computer-run exhibits a fighting chance.

Without drastically changing the one-touch end-of-day procedure, the only way to properly shutdown the hundreds of computers embedded in the museum exhibits involved using several UPS units, keeping the PCs briefly powered on after the mains power was cut. This in itself solves nothing – while the UPS can trigger a safe shutdown via USB, this signal could only be received by a single PC. These are off-the-shelf consumer grade units, and were never intended to safely shut down more than one computer at a time. However, each 300 watt UPS unit is very capable of powering multiple computers, the only limitation is the shutdown signal and the single USB connection.

To get around this, the Windows task scheduling service was setup to be triggered by the UPS shutdown signal, which itself then triggered a custom Python script. This script then relays the shutdown signal from the UPS to every other computer in the museum, before shutting itself down for the evening.

While many computers can be enabled to boot on power loss, the UPS and safe shutdown scripts meant that this wasn’t an option. To get around this, an ESP32 Featherwing and a little bit if CircuitPython code sends out WOL (wake-on-LAN) signals over Ethernet automatically on power up. This unit is powered by a non-UPS backed power outlet, meaning that it only sends the WOL signal in the morning when mains power is restored via the circuit breaker.

There are undoubtedly a variety of alternative solutions that appear ‘better’ on paper, but these may gloss over the potential costs and disruption to a multi-acre museum. Working within the constraints of reality means that the less obvious fix often ends up being the right one. How would you have tackled this problem? Sound off in the comments below. And while you’re here, make sure to check out our coverage of other UPS solutions, like this supercap UPS.

Render HTML And CSS On An ESP32

As the available computing power from affordable microcontrollers continues to increase, there is an inevitable blurring of the line between them and the lower tier of application processors capable of running Linux-based operating systems. For the most part a microcontroller busies itself with behind-the-scenes tasks, but as so many projects here have demonstrated, they can be pretty capable when it comes to user-facing applications too. Now [Andy Green] has extended the possibilities with affordable silicon, by producing a proof-of-concept HTML + CSS renderer over h2 on ESP32 for libwebsockets. Surf the web on a microcontroller without settling for a text-only experience? Why not!

He freely admits that this is far from being a complete HTML rendering engine, in that while it parses and renders HTML and CSS with JPEG and PNG image support, it does so only with a subset of HTML and is not tolerant of any malformations. There is also no JS support, which is hardly surprising given the available resources.

Even with those limitations it remains an impressive piece of work, which we hope will one day be able to make some effort at displaying Hackaday on ESP32 devices such as the badge.team European conference badges. Definitely a project to watch!

Careful Cuts Lets Logger Last A Year On A Coin Cell

Coin cells are great for backup power for things like real-time clocks, or even for powering incredibly small mechanical devices like watches. But for something like a data logger, running on a standard microcontroller, most people would reach for a lithium cell of some sort. Not so with this build, though, which squeezes every joule of energy from a coin cell in order to run a data logger for a full year.

Won’t be needing that anymore.

Most of the design and engineering required to improve the efficiency of the data logger involve standard practices for low-power devices such as shutting off unnecessary components and putting the device to sleep when not actively running, but this build goes far beyond that. The Vcc pin on the RTC was clipped which disables some of its internal logic but still keeps its basic functionality intact.

All of the voltage regulators were removed or disabled in favor of custom circuitry that doesn’t waste as much energy. The status and power LEDs were removed where possible, and the entire data logger is equipped with custom energy-efficient code as well.

If you’re starting a low-power project, even one that isn’t a datalogger, it’s worth checking out this build to see just how far you can go if you’re willing to hack at a PCB with cutting tools and a soldering iron. As to why this data logger needed such a low power requirement, it turns out it’s part of a kit being used in classrooms and using a coin cell brought the price of the entire unit down tremendously. Even if you have lithium cells on hand, though, it’s still worthwhile to check out the low power modes of your microcontroller.

Thanks to [Adrian] for the tip!

Reversible Ventilation Hack Keeps The Landlord Happy

When a person owns the home they live in, often the only approval they need for modifications is from their significant other or roommate. In the worst case, maybe a permit is required. But those who rent their dwellings are far more constrained in almost every case, and when it comes to environmental controls, they are most decidedly off limits. Unless you’re a resourceful hacker like [Nik], that is, who has seamlessly integrated his apartment’s ventilation system into his smart home controller — all without any permanent modifications!

The controller itself only gives three settings to vent the apartment: Low, Medium, High, and then High for 30 minutes, with all modes having to be actuated with a manual button press. [Nik] wanted automation and integration with his smart home.

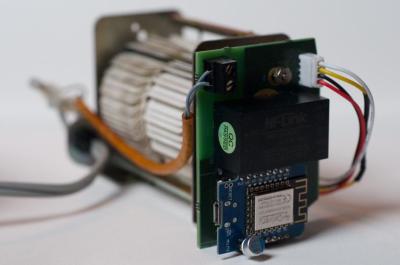
A clean 3D printed enclosure wraps things nicely

Thankfully, the engineers who designed the controller used in [Nik]’s apartment made it very convenient to reverse engineer it. A flat ribbon cable conveniently breaks out all of the buttons and 12 VDC, and he can interface directly using its connector. First hack: done.

Next, [Nik] needed a longer cable to run between the controller and his ESP8266 based control module. Finding the connector on AliExpress was easy, but finding a compatible cable of length required some more resourcefulness. The cable was eventually sourced from the airbag controller of a Renault Megane! Second hack, using a car part in a controller: well done!

Integration into his smart home wasn’t just electronic. The module looks right at home above the original controller, and if you didn’t know better you’d never think it wasn’t original equipment. Final hack: Done!

Be sure to check out his build log over at Hackaday.io, and if home automation hacks are your cup of tea, check out this automatic tea maker.

Remote MQTT Temperature Sensor Shows How It’s Done

First of all, there are definitely simpler ways to monitor remote temperatures, but [Mike]’s remote MQTT temperature sensor and display project is useful in a few ways. Not only does it lay out how to roll such a system from scratch, but it also showcases system features like solar power.

After all, if one simply wants to monitor temperature that’s easily done, but once one wishes to log those temperatures and use them to trigger other things, then rolling one’s own solution starts to get more attractive. That’s where using someone else’s project as a design reference can come in handy.

[Mike’s] solution uses two Wemos D1 boards: one with a DS18B20 temperature sensor for outdoors, and one with a small OLED screen for an interior display. The external sensor relies on a rechargeable 18650 cell and a solar panel for a hassle-free power supply, and the internal sensor (of which there can be many) has a cute enclosure and is powered by USB. On the back end, a Raspberry Pi running an MQTT gateway and Node Red takes care of the operational side of things. The whole system has been happily running for over two years.

What is MQTT? It is essentially a messaging protocol, and takes care of the whole business of reliably communicating data back and forth between IoT devices. It scales very well and doesn’t need to be hard or intimidating; our own [Elliot Williams] can tell you all about implementing it.

Build Yourself A Weather-Reporting Diorama

These days, if you don’t fancy watching morning TV, you can always get an update on the day’s weather from your smartphone, computer, or any one of a series of other connected devices. However, if you’re looking for a more fun way to see what’s in store, this weather diorama from [Lewis] of DIY Machines might be just what you’re looking for.

The build uses an ESP32 as the brains of the project, responsible for querying the Internet for up-to-date weather information. This info is then displayed on a 2.9″ e-ink display, showing the temperature, chance of rain, and wind speed predicted for the local area. So far, so straightforward.

However, where it gets really creative is the use of laser-cut “scene discs” with different graphics on them to represent different weather conditions. They can alternatively be 3D printed,too. These are rotated via servos controlled by the ESP32, allowing the diorama to display a representative scene informed by the current forecast. If there’s snow coming, you’ll see a snow man, but if things are looking fine, you’re more likely to see a woman strolling with a dog.

It’s a fun way to learn about what Mother Nature has in store, and would look great on any breakfast bar to boot. We’ve seen some great builds from [Lewis] before, too, like this amazing seven-segment clock shelf.

Continue reading “Build Yourself A Weather-Reporting Diorama”

How Small Is Too Small?

Not a rhetorical question! This week we consider the most micro microcontroller: the HC32L110. It’s the new title holder of the smallest ARM Cortex M0+ part. But could you actually use it?

MCU is the black thing that’s smaller than the capacitor.

I remember way back, when I first learned to solder surface-mount components. It was fiddly at first, but nowadays I don’t use through-hole components unless someone’s twisting my arm. And I still do my soldering myself — down to 0603 really isn’t all that bad with an iron, and below that, there’s always the heat plate. My heat plate has also gotten me through the two times I’ve actually needed to put down a ball-grid-array part. It wasn’t as bad as I had feared, honestly.

So maybe it’s time for me to take the BGA plunge and design a board or two just to get more familiar with the tech. I probably won’t dive straight into the deep end, like the featured chip here with 0.35 mm ball pitch, but rather stick with something that the cheap PCB services can easily handle. My experience tells me that the best way to learn something is just to test it out.

Now, off to go part shopping in the middle of a chip crisis! Wish me luck.