A super-material that’s non-toxic, highly flame resistant, and a good enough insulator, you can literally hold fire in your hand? Our interest was definitely caught by [NightHawkInLight] and his recent video about Starlite, embedded below the break.
Starlite was the brainchild of English hairdresser, [Maurice Ward]. The famous demo was an egg, coated in Starlite, and blasted with a blowtorch for a full 5 minutes. After heating, he cracked the egg to show it still raw. The inventor died in 2011, and apparently the recipe for Starlite died with him.
[NightHawkInLight] realized he had already made something very similar, the Pharoah’s Serpent demonstration, also known as a black snake. In both examples, a carbon foam is produced, providing flame resistance and insulation. A bit of trial and error later, and he’s out doing the original Starlight demo, pointing the blow torch at his hand instead of an egg.
The purpose of a Zen garden, those stylized landscapes created by painstakingly placing rocks and raking gravel into perfect patterns, is the doing of the thing. Making sure every line is perfectly formed is no mean feat, and the concentration required to master it is the point of the whole thing. But who has time for that? Why not just build a robot to create the perfect Zen garden in miniature?
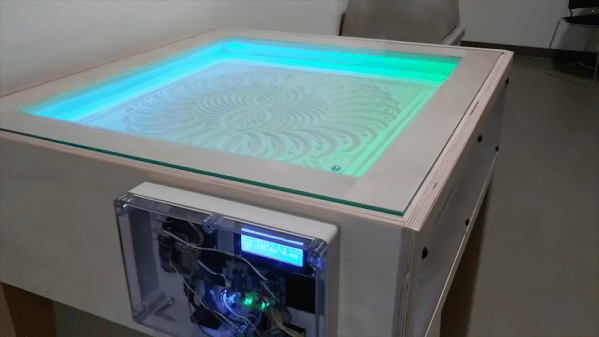
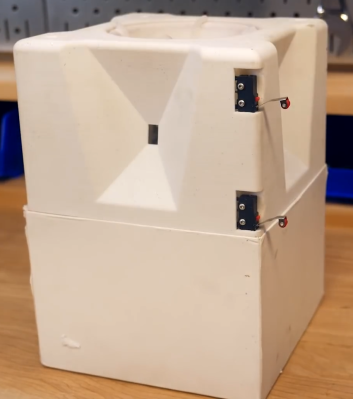
That was what [Tim Callinan] and his classmates did for a semester project, and the “ZenXY” sand plotter was the result. There isn’t a build log for the device per se, although the video below makes it plain how they went about this. The sand table itself is a plywood box whose bottom is layered with fine white sand and contains a single steel ball. Below the table is an X-Y gantry carrying a powerful magnet. A gShield riding on top of an Uno turns G code into slow, stately movement of the ball through the sand. The patterns are remarkably intricate, and while it might not be the same as mastering the body control needed to rake gravel with precision, watching the ball push the sand around is pretty Zen all by itself
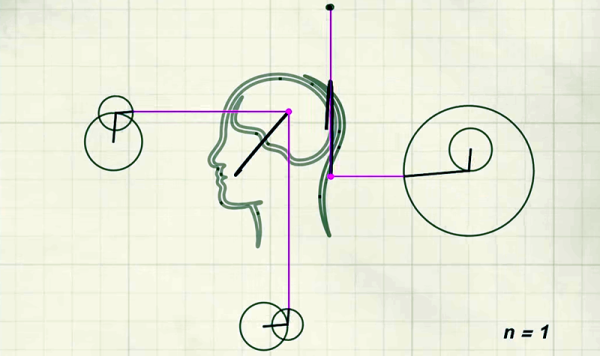
One of the nice things about living in the Internet age is that creating amazing simulations and animations is relatively simple today. [SmarterEveryDay] recently did a video that shows this off, discussing a blog post (which was in Turkish) to show how sine waves can add together to create arbitrary waveforms. You can see the English video, below.
We’ve seen similar things before, but if you haven’t you can really see how a point on a moving circle describes a sine wave. Through adding those waves, anything can then be done.
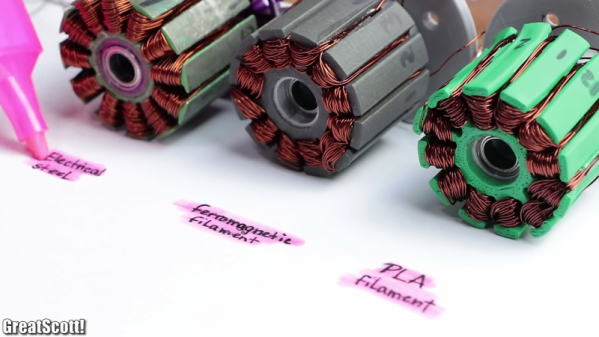
Betteridge’s Law holds that any headline that ends in a question mark can be answered with a “No.” We’re not sure that [Mr. Betteridge] was exactly correct, though, since 3D-printed stators can work successfully for BLDC motors, for certain values of success.
It’s not that [GreatScott!] isn’t aware that 3D-printed motors are a thing; after all, the video below mentions the giant Halbach array motor we featured some time ago. But part of advancing the state of the art is to replicate someone else’s results, so that’s essentially what [Scott!] attempted to do here. It also builds on his recent experiments with rewinding commercial BLDCs to turn them into generators. His first step is to recreate the stator of his motor as a printable part. It’s easy enough to recreate the stator’s shape, and even to print it using Proto-pasta iron-infused PLA filament. But that doesn’t come close to replicating the magnetic properties of a proper stator laminated from stamped iron pieces. Motors using the printed stators worked, but they were very low torque, refusing to turn with even minimal loading. There were thermal issues, too, which might have been mitigated by a fan.
So not a stunning success, but still an interesting experiment. And seeing the layers in the printed stators gives us an idea: perhaps a dual-extruder printer could alternate between plain PLA and the magnetic stuff, in an attempt to replicate the laminations of a standard stator. This might help limit eddy currents and manage heating a bit better. Continue reading “Can You 3D-Print A Stator For A Brushless DC Motor?”→
Betteridge’s law of headlines states that any headline that ends in a question mark can be answered by the word ‘no’. It’s the case with articles asking if Millennials are responsible for all of the world’s ills, or if some technology is the future. So we come to this fascinating case of native content (amusing, veiled advertising) from a store that sells really, really powerful magnets. The title of the article asks if magnets can replace the spring in a pogo stick. The answer, of course, is no, but it does provide a fascinating look at linear versus exponential growth.
A pogo stick is simply a spring with a set of handles and footholds that is the subject of a great number of hilarious YouTube videos, at least one of which is impressive. The physics of a pogo stick is determined entirely by Hooke’s Law, and is a linear equation, not counting the strength of a spring and the yield point of steel, but this is a pogo stick we’re talking about. Magnets, on the other hand, obey the inverse square law. Is it possible to fit an exponential function to fit a linear function? No. No, it is not.
I refuse to believe this is the first use of the phrase, ‘immensely disappointing pogo stick’
But a lack of understanding of the basic forces of nature never stopped anyone, so the folks at K & J Magnetics made a really neat test. They printed out a 1/8th scale pogo stick, complete with a spring. It worked like any pogo stick would. Then they took out the spring and put a few magnets where the spring should go. How did that work? Well, it bottomed out and was an immensely disappointing pogo stick.
If a problem is worth solving, it’s worth solving wrongly, so more magnets were added. Mounting three magnets onto a pogo stick gave the same exponential force, but still not enough. Four, five, and six magnets were added to the model pogo stick, and while six magnets gave this model pogo enough force to be ‘bouncy’, there simply wasn’t enough space for the pogo stick to compress.
The takeaway from this experiment is extremely obvious in retrospect, but probably too subtle for a lot of people. There’s a difference between a linear relationship and and exponential relationship. There’s also a video, you can check that out below.
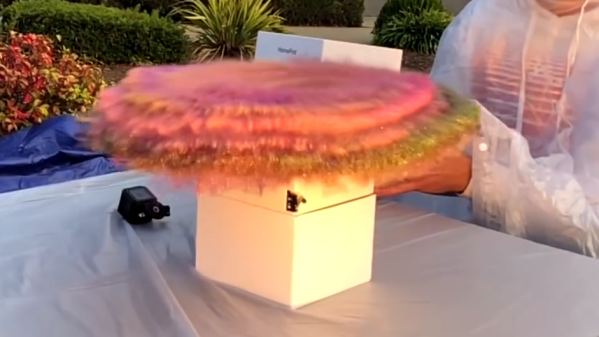
[Mark Rober] was fed up with packages going missing. He kept receiving notifications that his shipments had been delivered, but when checking his porch he found nothing there. Reviewing the CCTV footage revealed random passers-by sidling up to his porch and stealing his parcels. It was time to strike back. Over six months, [Mark] and his friends painstakingly designed, prototyped and iterated the perfect trap for package thieves, resulting in a small unit disguised as an Apple HomePod. The whole scheme is wonderfully over-engineered and we love it.
The main feature of the device is a spinning cup on the top which contains a large amount of glitter. When activated, it ejects glitter in every directions. You could say it’s harmless, as it’s just glitter. But then again, glitter has a way of staying with you for the rest of your life — turning up at the least expected times. It certainly leaves an emotional impression.
Activation is quite clever; the fake package sits on the porch until an accelerometer detects movement. At that point, GPS checks to see if the package has traveled outside a geo-fence around [Mark]’s house. A signal is then sent to the four smartphones to start recording — yes, that’s right, there are 4 phones inside, one on each side to capture the reaction of the thief.
How can [Mark] be so confident that he’ll be able to recover the four phones and their footage? That’s answered by GPS tracking and a can of fart spray actuated by a 3D printed cam and DC motor, ensuring the thief won’t want this package around for long. This actuator and the glitter motor are controlled by a custom PCB, which also triggers the phones to start recording through their headphone jacks and detects the opening of the package with some microswitches. This is truly a masterpiece that outsmarts the package thieves in a way that leaves an impression while still being playful.
(Editor’s Note 2: On 12/20/18 it was announced that two of the five thieves shown in the originally video were staged, apparently without [Mark Rober’s] knowledge. Here is his statement on the matter.)
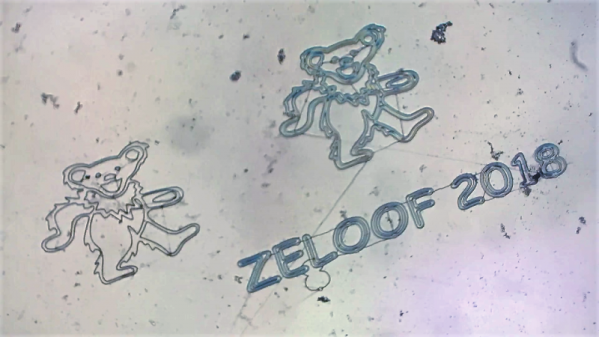
Looks like [Sam Zeloof] got bored on his Thanksgiving break, and things got a little weird in his garage. Of course when your garage contains a scanning electron microscope, the definition of weird can include experimenting with electron-beam lithography, resulting in tiny images etched into silicon.
You’ll probably remember [Sam] from his 2018 Hackaday Superconference talk on his DIY semiconductor fab lab, which he used to create a real integrated circuit. That chip, a PMOS dual-channel differential amp, was produced by photolithography using a modified DLP projector. Photolithography imposes limits to how small a feature can be created on silicon, based on the wavelength of light.
[Sam] is now looking into using the electron beam of his SEM as a sort of CNC laser engraver to produce much finer features. The process involves spin-coating silicon wafers with SU-8, an epoxy photoresist normally used with UV light but that also turns out to be sensitive to electron beams. He had to modify his SEM to control the X- and Y-axis deflection with a 12-bit DAC and provide a custom beam blanker. With a coated wafer in the vacuum chamber, standard laser engraving software generates the G-code to trace his test images on the resist. A very quick dip in acetone develops the exposed chip.
[Sam] says these first test images are not too dainty; the bears are about 2.5 mm high, and the line width is about 10 μm. His system is currently capable of resolving down to 100 nm, while commercial electron beam lithography can get down to 5 nm or so. He says that adding a Faraday cage to the setup might help him get there. Sounds like a project for Christmas break.