Cue up the [Christopher Walken] memes, it’s time for moped turn signals with more cowbell. Because moped turn signals with less cowbell are clearly the inferior among moped turn signals.
It seems that [Joel Creates] suffers from the same rhythm recognition disorder that we do. The slightest similarity between a rhythmic sound such as turn signals, and any song in our seemingly infinite intracranial playlist cues up that song for the rest of the day. [Joel] heard “(Don’t Fear) The Reaper” in his turn signals, and that naturally led to a need for More Cowbell. So with a car door lock actuator, a relay, an improvised clapper, and a lot of hot glue and cable ties, the front of his scooter is now adorned with a cowbell that’s synchronized to the turn signals. The video below shows that it’s of somewhat limited appeal in traffic, but at least [Joel’s dad] was tickled pink by it.
Kudos to [Joel] for marching to the beat of his own [Gene Frenkle] on this one. It may be a little weird, but not as weird as an Internet of Cowbells.
Some of us here at Hackaday are suckers for a bit of chiptune music as the backdrop for many excellent times. The authentic way to create chiptunes is of course the original hardware, but in 2019 it’s far more common to do so with an emulator on a modern computer. That computer doesn’t have to sport a high-end processor and desktop operating system though, as [Deater] shows us with his ZX spectrum chiptune player on an STM32L46G Discovery board.
The impetus for the project came he tells us while teaching students to code simple sine wave music players, having code already in the bag for emulating the classic AY-3-8910 sound chip on the Raspberry Pi and the Apple II he decided to port that to the STM32L476 dev board. An earlier version used the internal DAC, but this was refined to send I2S data to an external DAC. The code can be had from GitHub (confusingly buried among code for an LED driver), and we’ve attached a video below of it playing some chiptune goodness.
Of course, Sinclair chiptunes don’t grab all the limelight. There have been plenty of Nintendo and Sega players too. You might also recognize [Deater] from his non-chiptune work, porting Portal to the Apple ][.
If you’ve been kind enough to accompany me on these regular hardware explorations, you’ve likely recognized a trend with regards to the gadgets that go under the knife. Generally speaking, the devices I take apart for your viewing pleasure come to us from the clearance rack of a big box retailer, the thrift store, or the always generous “AS-IS” section on eBay. There’s something of a cost-benefit analysis performed each time I pick up a piece of gear for dissection, and it probably won’t surprise you to find that the least expensive doggy in the window is usually the one that secures its fifteen minutes of Internet fame.
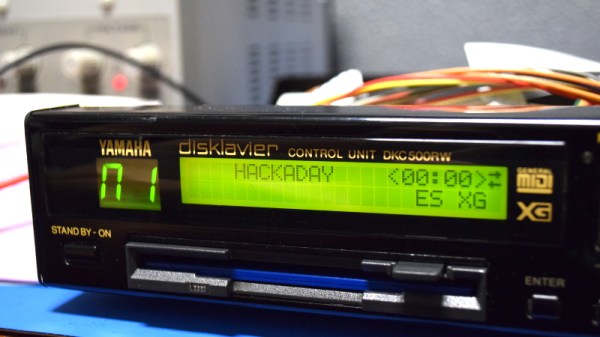
DKC500RW installed on right side.
But this month I present to you, Good Reader, something a bit different. This time I’m not taking something apart just for the simple joy of seeing PCB laid bare. I’ve been given the task of repairing an expensive piece of antiquated oddball equipment because, quite frankly, nobody else wanted to do it. If we happen to find ourselves learning about its inner workings in the process, that’s just the cost of doing business with a Hackaday writer.
The situation as explained to me is that in the late 1990’s, my brother’s employer purchased a Yamaha Mark II XG “Baby Grand” piano for somewhere in the neighborhood of $20,000. This particular model was selected for its ability to play MIDI files from 3.5 inch floppy disks, complete with the rather ghostly effect of the keys moving by themselves. The idea was that you could set this piano up in your lobby with a floppy full of Barry Manilow’s greatest hits, and your establishment would instantly be dripping with automated class.
Unfortunately, about a month or so back, the piano’s Disklavier DKC500RW control unit stopped reading disks. The piano itself still worked, but now required a human to do the playing. Calls were made, but as you might expect, most repair centers politely declined around the time they heard the word “floppy” and anyone who stayed on the line quoted a price that simply wasn’t economical.
Before they resorted to hiring a pianist, perhaps a rare example of a human taking a robot’s job, my brother asked if he could remove the control unit and see if I could make any sense of it. So with that, let’s dig into this vintage piece of musical equipment and see what a five figure price tag got you at the turn of the millennium.
[Eliot Curtis] found himself a little too close to 1960’s counterculture while restoring a vintage modular synthesizer — he began tripping out on acid. The instrument in question is a Buchla Model 100. The Buchla is a modular synth. Instead of a keyboard, it used capacitance-sensitive touch plates. This particular model 100 was purchased by California State University East Bay Campus. The synth was popular for a while, but eventually fell into disuse, and was stored in a classroom closet.
Modular synths are experiencing a renaissance, as can be seen right here on Hackaday. The Buchla was pulled out of storage and given a proper restoration. [Eliot Curtis] is the Broadcast Operations Manager at KPIX 5, the San Francisco CBS TV station. He also is the hacker who volunteered to restore the Buchla.
During the restoration, [Curtis] found residue and crystals stuck under one of the knobs of the Control Voltage Processing Module. Was it flux, conformal coating, or something else? [Eliot] hit the board with contact cleaner and wiped it down. Within 45 minutes, he was feeling a strange tingling. It was the beginning of a nine-hour LSD trip. Three independent tests on the module came back positive for LSD.
Lysergic acid diethylamide (LSD for short) can be readily absorbed through the skin, which is exactly what happened to [Eliot]. Synth designer [Don Buchla] was friends with [Owsley Stanley], who worked for the Grateful Dead and allegedly cooked up some very potent LSD. Some of Buchla’s modules even found their way into Ken Keesey’s hands, where they wound up on his famous bus “further”. As it turns out there were rumors that modules had been dipped in LSD back in the ’60s. Why someone would do that to an electronic module, we’re not sure — they must have been on drugs. [Eliot] recovered from his brush with the ’60s and continued with the restoration with gloves on.
If there is a moral here, it should be to take precautions when working on equipment which might contain dangerous substances. We’ve learned this lesson ourselves cracking open broken laptops. You might find anything from coffee to soda, to pet urine or worse. A box of nitrile gloves definitely should be standard equipment in any hacker’s lab.
CDs were a great advancement in audio quality when they were first put on the market. There’s no vinyl-style degradation of the medium if it’s played over and over, and there’s no risk of turning them into a giant pile of ribbon while rewinding like a cassette tape. The one downside was that if you were to take them on the move you needed special hardware and software to prevent the inevitable skipping. If you look at the skipping not as a downside, though, but as a way to produce interesting music, you might end up with a pretty unique piece of hardware.
[Dmitry] is known for his interesting art installations, and the latest one uses parts from three 1988 Sony D2 CD players that have been reassembled in order to take advantage of a skipping and glitching CD. The modified equipment is able to play during pause or rewind thanks to a processor modification, and can also change the rotational speed of the disc. There are other pieces of hardware included for more fine control of glitching and skipping of the audio being read off of the CD.
The new device functions as a working musical instrument, although [Dmitry] says that it is more useful for deconstructing the information stored on the disc, and exploring the medium itself. Of course if you have enough motivation, you can find sounds from almost anywhere on (or in) the planet too.
It’s one thing to assemble your own circuits from scratch using off the shelf components. It’s quite another to build the components first, and then build the circuit.
That’s the path [Joris Wegner] took with this video distortion effects box, dubbed PHOSPHOR. One might wonder why you’d want a box that makes a video stream look like playback from a 1980s VHS player with tracking problems, but then again, audio distortion for artistic effect is a thing, so why not video? PHOSPHOR is a USB MIDI device, and therein lies the need for custom components. [Joris] had a tough time finding resistive optoisolators, commonly known as Vactrols and which are used to control the distortion effects. He needed something with a wide dynamic range, so he paired up a bright white LED and a cadmium sulfide photoresistor inside a piece of heat shrink tubing. A total of 20 Vactrols were fabricated and installed on a PCB with one of the coolest silkscreens we’ve ever seen, along with the Sparkfun Pro Micro that takes care of MIDI chores. Now, distortions of the video can be saved as presets and played back in sync with music for artistic effects.
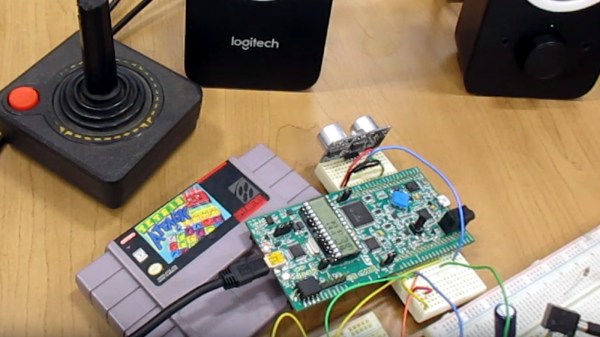
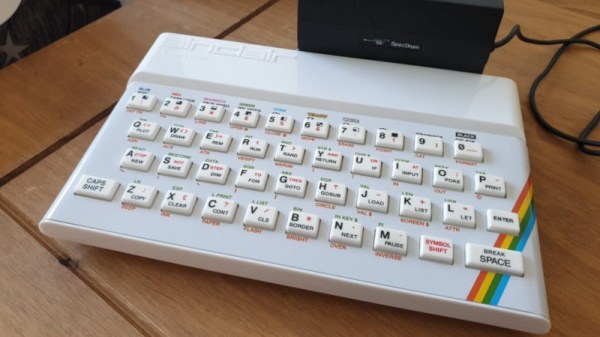
The Sinclair ZX Spectrum was a popular computer in the 8-bit era, and particularly so in its homeland of the United Kingdom. It was known more for its low cost than its capabilities, but it gained many add-ons over the years. One of those was the Cheetah SpecDrum, which turned the Spectrum into a rudimentary drum machine. [PianoMatt] wasn’t happy with the original drum samples, so he set about loading a custom kit into the SpecDrum.
The SpecDrum software initially came with extra sample tapes, so [PianoMatt] knew it was an achievable task to load in custom samples. Starting by loading the software in an emulator, the RAM was then exported as raw data and loaded up in Audacity. After some experimentation, it was determined the samples were stored in 8-bit format at a sample rate of approximately 20 kHz. With this figured out, it was then possible to load replacement samples directly into RAM through the emulator.
However, this wasn’t enough for [PianoMatt]. Further digging enabled him to reverse engineer the format of the replacement sample tapes. Armed with this knowledge, [PianoMatt] then generated his own tape, complete with proper headers and labels for each drum sound.
It’s a tidy effort to bring a more modern sound to a now positively ancient piece of hardware. We’d love to hear a track with drums courtesy of the SpecDrum, so we’ll keep an ear out on Soundcloud. Mucking around with old sound hardware is a popular pastime in these parts – we’ve even seen people go so far as to build bespoke Sega chiptune players from scratch.