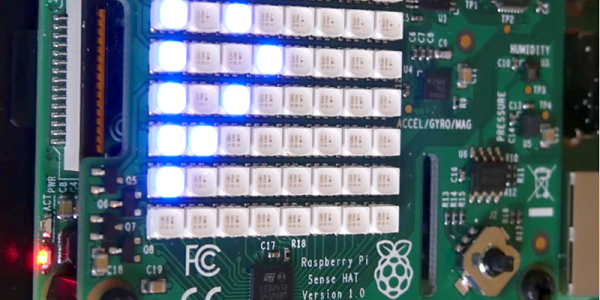
Give Your Raspberry Pi A Good Hammering

One of the features of the Raspberry Pi Zero is that it arrives with no GPIO header pins installed. The missing pins reduce the price of the little computer, as well as its shipping volume. A task facing most new Pi Zero owners has therefore been to solder a set of pins into the holes, and indeed many suppliers will sell you the pins alongside your new Zero.

The British Pi accessories supplier Pimoroni think they may have a solution to this problem, with a set of solderless pins that the user is expected to fit by tapping both pins and Pi with a hammer. Each pin is designed to deform under pressure, and grip the through-plated walls of the hole in the PCB. In reality they are push-fit pins designed to be fitted with a press or a special tool, but since the average Zero buyer will have neither they supply a small laser-cut jig and give instructions to tap carefully with a pin hammer or similar. They have a demonstration as part of their regular Bilge Tank podcast, which we’ve included below the break.

Pins like these can be quite reliable when installed with the proper tools. They are often used in military and aerospace systems. In this case though, we expect that a chorus of you will be limbering up to comment that it would be far better to solder the connector, and we can’t help agreeing with you. Of course this product isn’t really marketed at Hackaday readers. Instead, the target market of a board like the Zero are children. For them soldering may well be a step too far. We can’t help wondering though whether hammer installation will deliver a reliable enough contact, and whether we’ll see a horde of youngsters whose Pi HATs don’t work due to dodgy connectors. Aside from the ones who’ve broken their Zeros with hammering that was a bit enthusiastic, that is.

Continue reading “Give Your Raspberry Pi A Good Hammering”

Appliance Monitor Is Kinda Shaky

Lots of people set out to build appliance monitors, whether it be for the fridge, the garage door, or the washing machine. Often, it’s nicer not to cut into an appliance to make direct electrical connections, especially when mains power or water is involved. But how else can we know what the appliance is doing?

[Drew Dormann] wanted to smarten up his old washing machine, so designed a system that uses a vibration sensor to monitor appliances. It’s a simple build, pairing the 801s vibration sensor with a Raspberry Pi Zero. Naturally, adapter boards are readily available to make hooking things up easy. Then it’s just a matter of tying it all together with a simple Python script which sends notifications using Twitter & PushBullet.

It’s important to note that this approach isn’t just limited to washing machines – there’s a whole laundry list of home appliances that vibrate enough to be monitored in this way! It’s likely you could even spy on a communal microwave in this way, though you might struggle with WiFi dropouts due to interference. Build it and let us know.

[Drew]’s build is a great example of what you can put together in a few hours with parts off the shelf. For those that consider the Pi Zero overkill for this application, consider this vibration-based laundry monitor based on the ESP8266. Think you can do better? Show us what you’ve got on Hackaday.io!

Mechano-Robotic Flute Made From An Old Shotgun

If you take an object and turn it into something else, does that constitute a hack?  Can a musical robot call to question the ethics of firearms exports? If you take a disabled shotgun and turn it into a flute, does it become an art piece? Deep questions indeed — and deliberately posed by [Constantine Zlatev] along with his collaborators [Kostadin Ilov] and [Velina Ruseva].

The Last Gun — a mechano-robotic flute, as [Zlatev] calls it — is built from recovered industrial parts, played using compressed air, and controlled by an Arduino and Raspberry Pi. After graphing the annual arms exports from the United States, the installation plays a mournful tune for each year that they rise, and a jubilant theme for each year they fall.

Continue reading “Mechano-Robotic Flute Made From An Old Shotgun”

Improving Raspberry Pi Disk Performance

Usually, you think of solid state storage as faster than a rotating hard drive. However, in the case of the Raspberry Pi, the solid state “disk drive” is a memory card that uses a serial interface. So while a 7200 RPM SATA drive might get speeds in excess of 100MB/s, the Pi’s performance is significantly less.

[Rusher] uses the Gluster distributed file system and Docker on his Raspberry Pi. He measured write performance to be a sluggish 1MB/s (and the root file system was clocking in at just over 40MB/s).

There are an endless number of settings you could tweak, but [Rusher] heuristically picked a few he thought would have an impact. After some experimentation, he managed 5MB/s on Gluster and increased the normal file system to 46 MB/s.

Continue reading “Improving Raspberry Pi Disk Performance”

Raspberry Pi Software Comes To PC, Mac

The Raspberry Pi Foundation has put a lot of work into their software stack. You need only look at a few of the Allwinnner-based Pi clones for the best evidence of this, but the Pi Foundation’s dedication to a clean and smooth software setup can also be found in Noobs, their support for the Pi Hardware, and to a more limited extent, their open source GPU driver offerings.

Now the Pi Foundation is doing something a bit weird. They’re offering their default Raspberry Pi installation for the Mac and PC. Instead of Flashing an SD card, you can burn a DVD and try out the latest the Pi ecosystem has to offer.

A few months ago, PIXEL became default distribution for the Raspberry Pi. This very lightweight distribution is effectively the Knoppix of 2016 – it doesn’t take up a lot of resources, it provides enough software to do basic productivity tasks, and it’s easy to use.

Now PIXEL is available as a live CD for anything that has i386 written somewhere under the hood. The PC/Mac distribution is the same as the Pi version; Minecraft and Wolfram Mathematica aren’t included due to licensing constraints. Other than that, this is the full Pi experience running on x86 hardware.

One feature that hasn’t been overlooked by a singular decade-old laptop in the Pi Foundation is Pixel’s ability to run on really old hardware. This is, after all, a lightweight distribution for the Raspberry Pi, so you shouldn’t be surprised to see this run on a Pentium II machine. This is great for a school in need of upgrading a lab, but the most interesting thing is that we now have a new standard in Linux live CDs and Flash drives.

Raspberry Pi Camera Flash

The Raspberry Pi Camera is a great tool; it allows projects that require a camera to be put together quickly and on a budget. Plus, having a Linux back end for a little processing never hurt anybody. What can be difficult however, is imaging in low light conditions. Most smartphones have an LED flash built in for this purpose. [Wim Van Gool] decided to follow suit and build an LED flash for the Raspberry Pi.

The project consists of a custom PCB with surface-mount LEDs in an attractive concentric layout. This is a good way to get a nice even distribution of light, particularly when taking photos close up. The board is designed around the Texas Instruments TPS61169 LED driver, which is controlled by a PWM signal from the Raspberry Pi. The flash mounts as a Raspberry Pi HAT, and there’s a hole routed in the centre to allow the camera to fit in nice and snug when using standard 11mm standoffs. It might seem simple, but it’s an impressively tidy piece of engineering and a testament to [Wim]’s abilities.

The Raspberry Pi Camera turns up in all sorts of projects — like these far-seeing PiNoculars.

An Eye-Catching Raspberry Pi Smart Speaker

[curcuz]’s BoomBeastic mini is a Raspberry Pi based smart connected speaker. But don’t dis it as just another media center kind of project. His blog post is more of a How-To guide on setting up container software, enabling OTA updates and such, and can be a good learning project for some. Besides, the design is quite elegant and nice.

boombeastic_02The hardware is simple. There’s the Raspberry-Pi — he’s got instructions on making it work with the Pi2, Pi2+, Pi3 or the Pi0. Since the Pi’s have limited audio capabilities, he’s using a DAC, the Adafruit I2S 3W Class D Amplifier Breakout for the MAX98357A, to drive the Speaker. The I2S used by that part is Inter-IC Sound — a 3 wire peer to peer audio bus — and not to be confused with I2C. For some basic visual feedback, he’s added an 8×8 LED matrix with I2C interface. A Speaker rounds out the BoM. The enclosure is inspired by the Pimoroni PiBow which is a stack of laser cut MDF sheets. The case design went through four iterations, but the final result looks very polished.

On the software side, the project uses Mopidy — a Python application that runs in a terminal or in the background on devices that have network connectivity and audio output. Out of the box, it is an MPD and HTTP server. Additional front-ends for controlling Mopidy can be installed from extensions, enabling Spotify, Soundcloud and Google Music support, for example. To allow over-the-air programming, [curcuz] is using resin.io which helps streamline management of devices that are hard to reach physically. The whole thing is containerized using Docker. Additional instructions on setting up all of the software and libraries are posted on his blog post, and the code is hosted on GitHub.

There’s a couple of “To-Do’s” on his list which would make this even more interesting. Synced audio being one: in a multi-device environment, have the possibility to sync them and reproduce the same audio. The other would be to add an Emoji and Equalizer display mode for the LED matrix. Let [curcuz] know if you have any suggestions.

Continue reading “An Eye-Catching Raspberry Pi Smart Speaker”