Building A GPS With Bug Eyes And Ancient Wisdom

The Global Positioning System (GPS) is so ingrained into our modern life that it’s easy to forget the system was created for, and is still operated by, the United States military. While there are competing technologies, such as GLONASS and Galileo, they are still operated by the governments of their respective countries. So what do you do if you want to know your position on the globe without relying on any government-operated infrastructure?

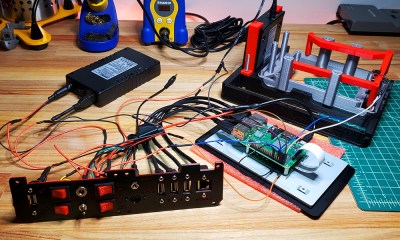
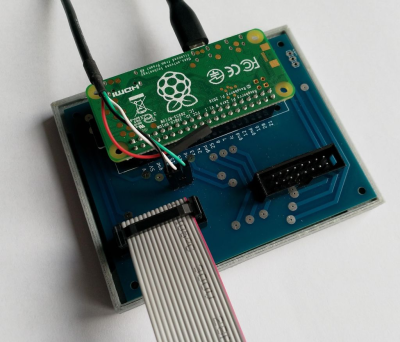
According to the team behind [Aweigh], all you have to do is take a cue from ancient mariners and insects and look up. Using two light polarization sensors, a compass, and a bit of math, their device can calculate your latitude and longitude by looking at the daytime sky. With their custom Raspberry Pi shield and open source Python 3 software, the team envisions a future where fully-independent global positioning can be tacked onto all sorts of projects.

The concept relies on the Rayleigh model, which is essentially a polarization map of the sky. As light from the sun is scattered in the Earth’s atmosphere, it creates bands of polarization which can be identified from the ground. Essentially it’s the same principle that makes the sky appear blue when viewed with human eyes, but if you have two light sensors looking at the proper wavelengths, you can use the effect to figure out where the sun is; which the team says is precisely how some insects navigate. Once the position of the sun is known, [Aweigh] operates like a modernized, automatic, sextant.

Naturally, this is not an ideal solution in all possible situations. In an urban environment, a clear view of the sky isn’t always possible, and of course the system won’t work at all once the sun goes down. In theory you could switch over to navigating by stars at night, but then you run into the same problems in urban areas. Still, it’s a fascinating project and one that we’re eager to see develop further.

Incidentally, we’ve seen automated sextants before, if you’re looking for a similar solution that still retains that Horatio Hornblower vibe.

PCIe Multiplier Expands Raspberry Pi 4 Possibilities

It probably goes without saying that hardware hackers were excited when the Raspberry Pi 4 was announced, but it wasn’t just because there was a new entry into everyone’s favorite line of Linux SBCs. The new Pi offered a number of compelling hardware upgrades, including an onboard PCI-Express interface. The only problem was that the PCIe interface was dedicated to the USB 3.0 controller; but that’s nothing a hot-air rework station couldn’t fix.

We’ve previously seen steady-handed hackers remove the USB 3.0 controller on the Pi 4 to connect various PCIe devices with somewhat mixed results, but [Colin Riley] has raised the bar by successfully getting a PCIe multiplier board working with the diminutive Linux computer. While there are still some software kinks to work out, the results are very promising and he already has  a few devices working.

Getting that first PCIe port added to the Pi 4 is already fairly well understood, so [Colin] just had to follow the example set by hackers such as [Tomasz Mloduchowski]. Sure enough, when he plugged the port multiplier board in (after a bit of what he refers to as “professional wiggling”), the appropriate entry showed up in lspci.

But there was a problem. While the port multiplier board was recognized by the kernel, nothing he plugged into it showed up. Checking the kernel logs, he found messages relating to bus conflicts, and one that seemed especially important: “devices behind bridge are unusable because [bus 02] cannot be assigned for them“. To make a long story short, it turns out that the Raspbian kernel is specifically configured to only allow a single PCI bus.

Fortunately, it’s an easy fix once you know what the problem is. Using the “Device Tree Compiler” tool, [Colin] was able to edit the Raspbian Device Tree file and change the PCI “bus-range” variable from <0x0 0x1> to <0x0 0xff>. From there, it was just a matter of plugging in different devices and seeing what works. Simple things such as USB controllers were no problem, but getting ARM Linux support for the NVIDIA GTX 1060 he tried will have to be a topic for another day.

[Thanks to Paulie for the tip.]

Pegleg: Raspberry Pi Implanted Below The Skin (Not Coming To A Store Near You)

Earlier this month, a group of biohackers installed two Rasberry Pis in their legs. While that sounds like the bleeding edge, those computers were already v2 of a project called PegLeg. I was fortunate enough to see both versions in the flesh, so to speak. The first version was scarily large — a mainboard donated by a wifi router roughly the size of an Altoids tin. It’s a reminder that the line between technology’s cutting edge and bleeding edge is moving ever onward and this one was firmly on the bleeding edge.

How does that line end up moving? Sometimes it’s just a matter of what intelligent people can accomplish in a long week. Back in May, during a three-day biohacker convention called Grindfest, someone said something along the lines of, “Wouldn’t it be cool if…” Anyone who has spent an hour in a maker space or hacker convention knows how those conversations go. Rather than ending with a laugh, things progressed at a fever pitch.

The router shed all non-vital components. USB ports: ground off. Plastic case: recycled. Battery: repurposed. Amazon’s fastest delivery brought a Qi wireless coil to power the implant from outside the body and the smallest USB stick with 64 GB on the silicon. The only recipient of PegLeg version 1.0 was [Lepht Anonym], who uses the pronoun ‘it’. [Lepht] has a well-earned reputation among biohackers who focus on technological implants who often use the term “grinder,” not to be confused with the dating app or power tool.

Continue reading “Pegleg: Raspberry Pi Implanted Below The Skin (Not Coming To A Store Near You)”

Fixing A Cheap UPS HAT For Your Raspberry Pi With A Tiny Daemon

An uninterruptible power supply (UPS) isn’t something solely to have hooked up to your desktop PC. Your Raspberry Pi SBC might also benefit from it. Yet the available options aren’t too great, or are too expensive. This leads folk including [Joachim Baumann] to modify cheerfully cheap Chinese UPS HAT boards such as the Geekworm UPS HAT to fix its myriad of issues and missing features.

Inspired by a number of other hacks on this board which fixed things like needing to push a button on the UPS to boot the Raspberry Pi, [Joachim] set out to make a similar ATtiny-based solution that would address all issues, above all the fact that this Geekworm UPS does not detect when the connected SBC has turned off and will happily run the lithium battery pack dry. Finding a blog post by Simon who had reverse-engineered the board previously was immensely helpful. Continue reading “Fixing A Cheap UPS HAT For Your Raspberry Pi With A Tiny Daemon”

Vintage Car Radio Now Plays Games And Chiptunes

[MisterM] seems to specialize in squeezing new electronics into old but good-looking technology. His latest creation focuses on a space-age specimen: an interesting car radio from 1963 that could be pulled out from the dashboard and taken along wherever. The beat goes on, thanks to a shiny built-in speaker on the bottom.

He replaced the non-working radio guts with a Raspberry Pi 3 running RetroPie and a Picade controller board. A Pimoroni Blinkt LED strip behind the radio dial glows a different color for each emulated console, which we think is a nice touch. [MisterM] built this console to play in his workshop, and even made a dock for it. But in a lovely homage to the original radio, it’s self-contained and can be taken to the living room or to a friend’s house. There’s also a USB port for whenever player two is ready to enter. For [MisterM]’s next trick, he’ll be converting an 80s joystick.

We love that [MisterM] repurposed the dials as housings for start and select buttons. As he points out, this keeps them out of the way while he’s wildly working the controls. Just enter the Konami Code to unlock the build video below.

Do you dream of playing Donkey Kong absolutely everywhere? Check out the ultraportable mintyPi 2.0.

Continue reading “Vintage Car Radio Now Plays Games And Chiptunes”

Build A Fungus Foraging App With Machine Learning

As the 2019 mushroom foraging season approaches it’s timely to combine my thirst for knowledge about low level machine learning (ML) with a popular pastime that we enjoy here where I live. Just for the record, I’m not an expert on ML, and I’m simply inviting readers to follow me back down some rabbit holes that I recently explored.

But mushrooms, I do know a little bit about, so firstly, a bit about health and safety:

  • The app created should be used with extreme caution and results always confirmed by a fungus expert.
  • Always test the fungus by initially only eating a very small piece and waiting for several hours to check there is no ill effect.
  • Always wear gloves  – It’s surprisingly easy to absorb toxins through fingers.

Since this is very much an introduction to ML, there won’t be too much terminology and the emphasis will be on having fun rather than going on a deep dive. The system that I stumbled upon is called XGBoost (XGB). One of the XGB demos is for binary classification, and the data was drawn from The Audubon Society Field Guide to North American Mushrooms. Binary means that the app spits out a probability of ‘yes’ or ‘no’ and in this case it tends to give about 95% probability that a common edible mushroom (Agaricus campestris) is actually edible. 

The app asks the user 22 questions about their specimen and collates the data inputted as a series of letters separated by commas. At the end of the questionnaire, this data line is written to a file called ‘fungusFile.data’ for further processing.

XGB can not accept letters as data so they have to be mapped into ‘classic LibSVM format’ which looks like this: ‘3:218’, for each letter. Next, this XGB friendly data is split into two parts for training a model and then subsequently testing that model.

Installing XGB is relatively easy compared to higher level deep learning systems and runs well on both Linux Ubuntu 16.04 and on a Raspberry Pi. I wrote the deployment app in bash so there should not be any additional software to install. Before getting any deeper into the ML side of things, I highly advise installing XGB, running the app, and having a bit of a play with it.

Training and testing is carried out by running bash runexp.sh in the terminal and it takes less than one second to process the 8124 lines of fungal data. At the end, bash spits out a set of statistics to represent the accuracy of the training and also attempts to ‘draw’ the decision tree that XGB has devised. If we have a quick look in directory ~/xgboost/demo/binary_classification, there should now be a 0002.model file in it ready for deployment with the questionnaire.

I was interested to explore the decision tree a bit further and look at the way XGB weighted different characteristics of the fungi. I eventually got some rough visualisations working on a Python based Jupyter Notebook script:


Obviously this app is not going to win any Kaggle competitions since the various parameters within the software need to be carefully tuned with the help of all the different software tools available. A good place to start is to tweak the maximum depth of the tree and the number or trees used. Depth = 4 and number = 4 seems to work well for this data. Other parameters include the feature importance type, for example: gain, weight, cover, total_gain or total_cover. These can be tuned using tools such as SHAP.

Finally, this app could easily be adapted to other questionnaire based systems such as diagnosing a particular disease, or deciding whether to buy a particular stock or share in the market place.

An even more basic introduction to ML goes into the baseline theory in a bit more detail – well worth a quick look.

DIY Gimbal For The Raspberry Pi Camera

If one wants a stabilized video feed from a drone, a gimbal setup is the way to go. However, the cheaper offerings are all rather similar, suited to a certain size and type of drone. [Jean] was building a smaller craft, so set out to create his own design specifically fit for purpose.

The build begins in the CAD suite, with a series of 3D printed parts designed to link together with a pair of brushless motors to make a 2-axis set up. After printing, the gimbal arms are bolted together with the motors and the camera and IMU are installed, with everything being wired up to a GLB MiniSTorM32 brushless gimbal controller. These controllers make the process of building a gimbal easy, meaning that individual makers don’t have to go to the trouble of designing motor controller circuitry again and again.

The final result is a compact gimbal sized perfectly for the Raspberry Pi camera in [Jean]’s design. If you’re very particular about your gimbal’s performance, building your own doesn’t hurt. Video after the break.

Continue reading “DIY Gimbal For The Raspberry Pi Camera”