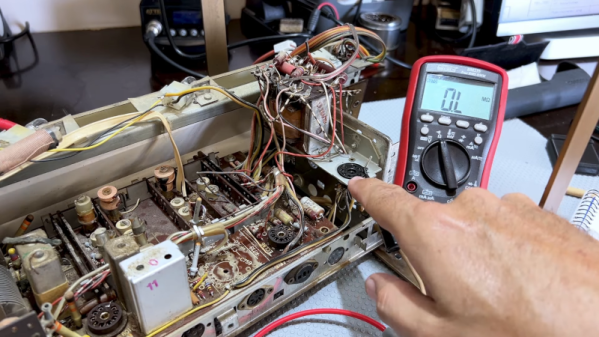
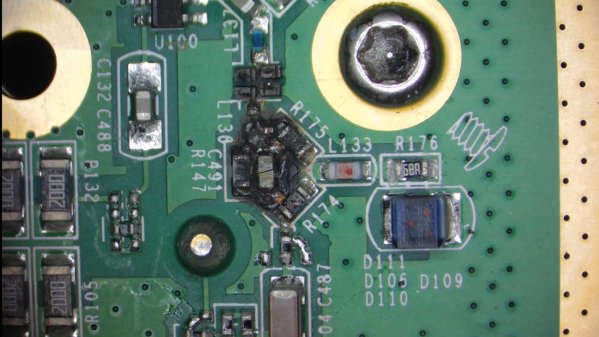
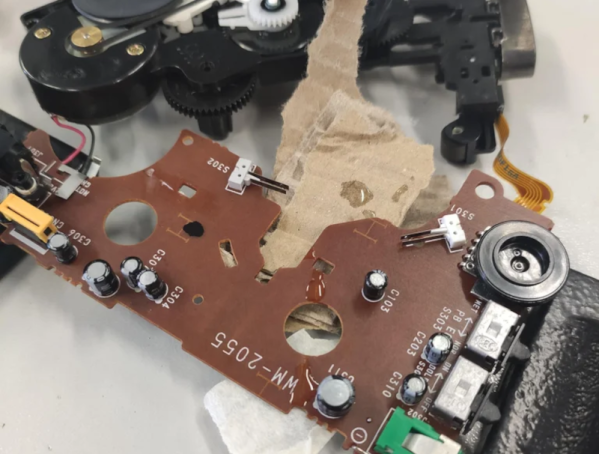
Is Your Device Actually USB 3.0, Or Is The Connector Just Blue?

Discount (or even grey market) electronics can be economical ways to get a job done, but one usually pays in other ways. [Majenko] ran into this when a need to capture some HDMI video output ended up with rather less than was expected.

Faced with two similar choices of discount HDMI capture device, [Majenko] opted for the fancier-looking USB 3.0 version over the cheaper USB 2.0 version, reasoning that the higher bandwidth available to a USB 3.0 version would avoiding the kind of compression necessary to shove high resolution HDMI video over a more limited USB 2.0 connection.

The device worked fine, but [Majenko] quickly noticed compression artifacts, and interrogating the “USB 3.0” device with lsusb -t revealed it was not running at the expected speeds. A peek at the connector itself revealed a sad truth: the device wasn’t USB 3.0 at all — it didn’t even have the right number of pins!

A normal USB 3.0 connector is blue inside, and has both sets of pins for backward compatibility (five in the rear, four in the front) like the one shown here.

A USB 3.0 connection requires five conductors, and the connectors are blue in color. Backward compatibility is typically provided by including four additional conductors, as shown in the image here. The connector on [Majenko]’s “USB 3.0” HDMI capture device clearly shows it is not USB 3.0, it’s just colored blue.

Most of us are willing to deal with the occasional glitch or dud in exchange for low prices, but when something isn’t (and never could be) what it is sold as, that’s something else. [Majenko] certainly knows that as well as anyone, having picked apart a defective power bank module to uncover a pretty serious flaw.

A beige 1960s radio receiver, inset with vacuum tubes

Busted 1960s Vacuum Tube Radio Sings Again

Restoring a vintage radio receiver has the potential to be a fun weekend project, but it pays to know what you’re up against. Especially in the case of vacuum tube electronics, running down gremlins in the circuits isn’t always a straightforward process (also, please mind the high voltage that is present in old vacuum tube equipment). [Mr Carlson] has a knack for getting old radios humming once again, and his repair of a 1960s General Electric barn find radio receiver is a thorough masterclass in vintage electronics servicing.

Seriously, if you’ve got a spare ninety minutes, the video (after the break) is a thorough and unabridged start-to-finish diagnosis and repair of a vintage radio, and an absolute must for anyone interested in doing the same. This barn find radio was certainly showing its age, and it wasn’t long before in-circuit testing found an open filament in one of several vacuum tubes, but the radio was still stubbornly silent. Further testing revealed that the IF transformers were out of spec, requiring servicing and alignment. After fine tuning both the IF and RF sections of the radio, things were definitely looking (and sounding) better.

Fine tuning the various components in the radio went a long way to living up to its “long range” claims, and by the end of the video, it’s almost impossible to find dead air on the AM dial of this radio. If you’ve never had to make fine adjustments to a receiver, especially of this vintage, this video has all the details you’ll need. With the board exposed, [Mr Carlson] also took care of some preventative maintenance, including replacing the original filter capacitor with newer components, as well as replacing the mains safety capacitor with an even safer modern alternative.

We can’t get enough of these restorations, so make sure to check out our detailed write-up of restoring a WWII aircraft radio.

Continue reading “Busted 1960s Vacuum Tube Radio Sings Again”

Rural Hacker De-Crufts And Rebuilds Hydroelectric Generator

YouTuber [Linguoer] has a knack, and it’s one that we don’t often see on the pages of Hackaday: rewinding and rebuilding dilapidated motors and generators. In the video below, you’ll see [Lin] take a hydroelectric turbine and generator that looks like it’s been sitting at the bottom of a lake, and turn it into a working unit, all while wearing her trademark blue and yellow denim jumpsuit.

Where as most makers would have used a MIG or TIG welder, [Linguoer] uses a simple (probably A/C) stick welder. Generator windings are calculated and wound by hand, and the carcass of what used to be the generator is sandblasted out in the open. Missing parts are fabricated from scratch using nothing more than an angle grinder. “Simple” is the order of the day.

[Linguoer] often refers to herself as “Village Girl”. Whatever specialty tools she uses, they are elementary. And whatever methods she uses, they are manual. You will get the idea very quickly that [Linguoer] isn’t just a person with a skill, but a person with a passion for getting things done no matter the circumstances. [Linguoer] is a hacker if there ever was one!

If hydroelectric hacks spin your pelton wheel, give this Impressive Off-Grid Hydroelectric Plant a whirl.

Continue reading “Rural Hacker De-Crufts And Rebuilds Hydroelectric Generator”

The hairclip-embedded tool being used on a Tiger 99x game console, clipped onto a spot where the plastic ribbon meets the LCD panel itself, heating it up

World’s Smallest Hair Straightener For Fixing Old LCD Ribbons

[Stephen] writes to us about an LCD repair tool he has created. We’ve all seen old devices with monochrome LCDs connected by thin film, where connections between the PCB and the LCD have deteriorated and the LCD would no longer show parts of the picture. This is a connection heating gadget, that [Stephen] affectionately dubs as World’s Smallest Hair Straightener, made specifically to bring cool old tech back to life.

A resin-printed mold houses a coil of Kanthal wire, easy to source and simple to make. He reuses a hair clip as a housing for the heating element, which also provides pressure needed to squish the film-printed conductive traces into the LCD as the adhesive melts. High-temperature epoxy brings the two together, and with a variable power supply, this tool successfully brought an old Tiger 99x handheld back to life.

This hack was made possible, in part, because of [JohnDevin Duncan] in Hackaday comment section sharing his experience on repairing LCD ribbons back in 2015, giving valuable insights on the problem that we initially thought would be solve-able with a soldering iron. The knowledge shared was distilled by [Stephen] into a tool that we all can now use when we encounter a device we really, really want to revive.

Last time we covered this topic, quite a few hackers popped up with their stories and suggestions. Old game console fix stories are a staple here on Hackaday, a few pop to mind – this high-effort trace repair of a water-damaged GameBoy cartridge, a badly designed NES cartridge socket reinvention, and this GameBoy LCD sunburn damage restoration guide.

retro breadboard

Retro Breadboard Gives Up Its 1960s Secrets

When we see [Ken Shirriff] reverse engineering something, it tends to be on the microscopic level. His usual forte is looking at die photos of strange and obsolete chips and figuring out how they work. And while we love those efforts, it’s nice to see him in the macro world this time with a teardown and repair of a 1960s-era solderless breadboard system.

If you’d swear the “Elite 2 Circuit Design Test System” featured in [Ken]’s post looks familiar, it’s probably because you caught his partner-in-crime [CuriousMarc]’s video on the very same unit, an eBay score that arrived in non-working condition. The breadboard, which retailed for $1,300 in 1969 — an eye-watering $10,000 today — was clearly not aimed at the hobbyist market. Truth be told, we didn’t even know that solderless breadboards were a thing until the mid-70s, but live and learn. This unit has all the bells and whistles, including three variable power supplies, an array of switches, buttons, indicator lamps, and jacks for external connections, and a pulse generator as well as a legit function generator.

Legit, that would be, if it actually worked. [Ken]’s contribution to the repair was a thorough teardown of the device followed by reverse-engineering the design. Seeing how this thing was designed around the constraints of 1969 technology is a real treat; the metal can transistor and ICs and the neat and tidy PCB layout are worth the price of admission alone. And the fact that neon lamps and their drivers were cheaper and easier to use than LEDs says a lot about the state of the art at the time.

As for the necessary repairs, [Marc]’s video leaves off before getting there. That’s fine, we’re sure he’ll put [Ken]’s analysis to good use, and we always enjoy [Marc]’s video series anyway. The Apollo flight comms series was a great one, too. Continue reading “Retro Breadboard Gives Up Its 1960s Secrets”

Clock Testing Sans Oscilloscope?

Like many people who repair stuff, [Learn Electronics Repair] has an oscilloscope. But after using it to test a motherboard crystal oscillator, he started thinking about how people who don’t own a scope might do the same kind of test. He picked up a frequency counter/crystal tester kit that was quite inexpensive — under $10. He built it, and then tried it to see how well it would work in-circuit.

The kit has an unusual use of 7-segment displays to sort-of display words for menus. There is a socket to plug in a crystal for testing, but that won’t work for the intended application. He made a small extender to simplify connecting crystals even if they are surface mount. He eventually added a BNC socket to the counter input, but at first just wired some test leads directly in.

Continue reading “Clock Testing Sans Oscilloscope?”

Vintage Multimeter Gets An LCD Transplant

Hackers are often of the sentimental type, falling in love with the look and feel of quality old hardware. Of course, sometimes that older hardware needs a little TLC to keep it running in the modern world. [Lex] had a beautiful vintage multimeter that sadly had a broken screen, and set about a nifty repair to restore it to working condition. 

It’s a handsome thing.

The HSN Avometer DA116 is a handsome thing, controlled with two dials and featuring a clean two-tone aesthetic. Even the font on the PCB’s silkscreen is gloriously pretty (can anyone ID that?). However, the original LCD was non-functional. A direct replacement part was sadly unavailable. Instead, to rectify this, [Lex] first hunted down another segmented LCD screen that had the same segment layout.

However, the new screen had a completely different pinout to the original part. Thus, after taking some notes and figuring out what all the pins did, [Lex] whipped up an adapter board to carry the new screen. With some protoboard, some pin headers, and a bunch of point-to-point wiring, the new screen worked just fine, and [Lex] had a functioning vintage meter once again!

The story actually came to us on Twitter, where we invited discussion about the best bodge wiring jobs out there. Feel free to contribute your own stories to the conversation! If you’re in the market for more LCD hacking, be sure to check out the excellent talk [Joey Castillo] gave at the 2021 Remoticon.