Two circuit boards with bright seven segment displays

Retro Stereo SID Synth Looks And Sounds Sensational

Over the years, plenty of work has gone into emulating the Commodore 64 6581 SID chip, but as [SlipperySeal] puts it, nothing beats the real thing. His take on the MIDI SID-based synth not only sounds fantastic, but looks the business.

The 6581 SID arguably blessed the Commodore 64 with some of the best sound capabilities of any home computer in the 8-bit era (make sure to ‘sound off’ in the comments if you disagree). The 6581 was a three-voice analog synth with a dizzying array of settings. This was at a time when most home computers could just about manage a ‘beep’ of varying lengths and frequencies.

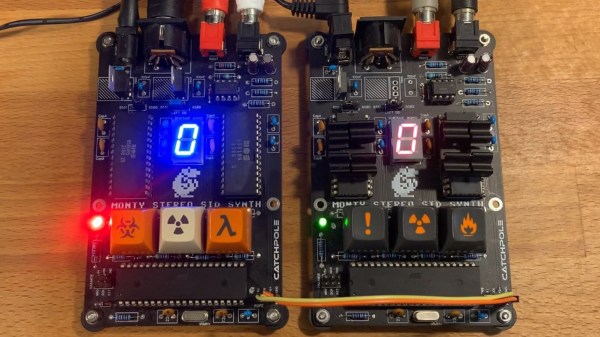
When you mix MIDI with the capabilities of the SID, you get something like [SlipperySeal]’s awesome looking synth, known as ‘Monty’. While the road to this point unfortunately resulted in several blown-up SID chips, the sacrifice seems to have paid off.

Realizing the limitations of having ‘just’ three voices, Monty is designed to use two SID chips in parallel, for a total of six voices in pleasing stereo sound. MIDI commands are transferred to the dual SIDs by way of an ATmega1284p microcontroller. The SID is well understood by this point, and [SlipperySeal] goes into great detail explaining the fundamentals of SID programming over on GitHub.

This isn’t the first MIDI synth that is based around the C64 SID chip, but [SlipperySeal] made sure that his stood out from the crowd. The seven-segment display centered on the board makes for a delightfully simple visualizer, an effect that looks even better when running two Monty boards at once, each responding to alternate MIDI channels (check out the video below). Naturally, we’re also fans of projects that include ominous, cryptic keyswitches.

Continue reading “Retro Stereo SID Synth Looks And Sounds Sensational”

Books You Should Read: Bil Herd’s Back Into The Storm

It’s a morning ritual that we guess most of you share with us; before whatever work a new day will bring to sit down with a coffee and catch up with the tech news of the moment on Hackaday and other sites. Most of us don’t do many exciting things in our everyday lives, so reading about the coolest projects and the most fascinating new developments provides us with interest and motivation. Imagine just for a moment then that by a twist of fate you found yourself taking a job at the epicentre of the tech that is changing the world,  producing the objects of desire and pushing the boundaries, the place you’d give anything to work at.

This is the premise behind our Hackaday colleague Bil Herd’s autobiographical chronicle of time in the mid 1980s during which he worked at Commodore, maker of some of the most iconic home computers of the day. We follow him through the three years from 1983 to 1986 as hardware lead on the “TED” series of computers including the Commodore 16 and Plus/4, and then the Commodore 128, a dual-processor powerhouse which was arguably the last of the big-selling 8-bit home computers.

It’s an intertwined set of narratives peppered with personal anecdotes; of the slightly crazy high-pressure world of consumer videogames and computing, the fine details of designing a range of 8-bit machines, and a fascinating insight into how the culture at Commodore changed in the period following the departure of its founder Jack Tramiel.

Continue reading “Books You Should Read: Bil Herd’s Back Into The Storm”

Original Commodore 64 ad

Love Letter To Commodore 64 Ads Takes Us Down Memory Lane

If you shop, you can get a pretty nice laptop for around $595. Maybe not the top of the line, but still pretty nice with multiple cores, a large hard drive, and a big color screen. But in the 1980s, the Commodore 64 bragged that for $595, they’d give you more than anyone else at twice the price. After all, 64K of RAM! Graphics with 16 whole colors! [Lunduke] dug up a bunch of these ads and has some thoughts on them and we really enjoyed the trip down memory lane.

If you look at other contemporary computers, they did cost more although sometimes it wasn’t a fair comparison. The TRS80 III, for example, cost $999 with 16K of RAM but it also had its own monitor — not color, though.

It is amazing to think that we’ve gone from where 16K was a reasonable amount of RAM in a personal computer to where it isn’t even worth having a flash drive with that capacity. We also can’t help but note that while computing power per dollar is through the roof now, computers aren’t actually that much more fun. We enjoyed interfacing a teletype to our 1802 ELF and working out a 300 baud modem for our TRS-80. Sure, we didn’t have Skyrim or HD movies, but we still have fun.

If you want to relive these exciting days, it is easy enough to build your own C64 with varying degrees of fidelity. It is trivial to emulate the thing on any kind of modern hardware, too.

Pi Pico Emulates ROM For Speedy Retro Hacking

If you’ve ever worked on a system that loads its software from a ROM or EPROM, you know how much of a hassle it can be to make frequent changes to the code. Pulling the chip, flashing it, and sticking it back into the socket each time you change a line isn’t anyone’s idea of a good time. Which is why [Nick Bild] has come up with the PicoROM, a way to emulate a ROM chip using the Raspberry Pi Pico.

With the Pi Pico standing in for the original ROM, updating firmware takes a fraction of the time and doesn’t require you to actually disconnect any of the hardware. [Nick] had done something similar with FPGAs in the past, but the far cheaper and easier to work with Pi Pico makes this version particularly appealing. The secret to getting it to work is the overclocking potential of the Pico, which he says has been pushed to 400 MHz for this particular application.

PicoROM on a breadboard.

The downside is that you can’t access the Pico’s onboard flash when the chip is running that fast. To get around that limitation, all of the code is loaded into the microcontroller’s RAM. With a healthy 264 KB of memory this isn’t really a problem when emulating 32 KB chips, but [Nick] says his method would quickly fall apart for larger ROMs.

Beyond the Pi Pico itself, [Nick] is using a trio of 74LVC245AN 8-bit logic level shifters so the chip can talk to the 5 V logic of his homebrew 6502 computer. With everything wired up on a simple breadboard, PicoROM has no trouble serving up the operating system as it hums along at 2 MHz.

Of course, a modern high-performance microcontroller isn’t strictly necessary. In the past we’ve covered devices that could emulate an EPROM using 1990s era silicon.

People's Computer Company logo, drawn in a 1970's artistic style

Perusing The People’s Computing Company

If you are a certain age, you might recall the People’s Computing Company (PCC) from the 1970s. It was not really a company, but rather a folksy computer newsletter in the visual style of the times. In the first issue, published in October 1972, founders Dennis Allison, Bob Albrecht and George Firedrake explained their reasons for starting the newsletter:

Computers are mostly used against people instead of for people, used to control people instead of to free them; time to change all that — we need a … People’s Computer Company

The Computer History Museum (CHM) in Mountain View CA has a print collection of these issues donated by [Jim Warren], spanning its ten-year publication run (it changed name to Recreational Computing in 1979). Despite the museum being closed to the public these days over Covid concerns, CHM supporter [Bob Zeidman] has scanned all the issues and they are available at the CHM collections archive.

It’s really fun to browse through these old issues, and see the kinds of topics which were of interest back then. Many would still be of interest today, and many others have become obsolete by advances in technology (but are still fun to read if you have an interest in retro-computing). For example, in the first issue you can read about why you might use different lenses on your Bell & Howell film projector, a comparison of DEC and HP computers as used in educational settings, and how to save money on your teleprinter maintenance contracts and consumables like TTY paper, ribbons, and punched paper tape. If you have some time to kill, check out these archives and take yourself back to a time when desktop publishing meant literally typing and drawing freehand with metal styli on special stencils which were mounted on drums in your mimeograph machine one page at a time.

The PCC was an early supporter of copyright-free software, teaching computer programming, using computer games as a learning tool, and encouraging computer literacy for everyone. They did this not only via the newsletter, but educational books, an organization called ComputerTown USA! for teaching kids, and spin-off periodicals like DragonSmoke and Dr. Dobb’s Journal of Computer Calisthenics & Orthodontia (edited by [Jim Warren] mentioned above) which went on to become the popular computer magazine Dr. Dobb’s Journal which stayed in publication until 2014. We wrote a piece a few years ago about a software-defined radio project from the PCC back in 1975. Do you have any favorite old journal archives that you like to peruse from time to time?


Upgrade Board Adds GPIO Pins To Your Replica PDP-11

Like many Hackaday readers, [Steven Stallion] has had his eyes on the replica PDP-11 created by [Oscar Vermeulen] for some time now, and this summer he finally got the opportunity to build one himself. But while most owners might be content to just watch the Raspberry Pi based faux-retro computer blink away on a shelf, he wanted to explore putting the machine to more practical use. The end result is the PiDP-11 I/O Expander,  an add-on that lets the modern minicomputer interact with the world around it.

Developed after some discussion with [Oscar] himself, the Microchip MCP23016 based expander board fits neatly onto the PiDP-11 PCB, and [Steven] has made sure his installation guide meshes well with the replica’s documentation. The Pi’s I2C bus is actually broken out on the original PCB, so you just need to solder a header on and run some jumpers to where the expander is mounted. You’ll need to pull 5 V as well, and the installation guide has a few tips on convenient connection points.

The installed PiDP-11 I/O Expander

Each expander board gives you 16 GPIO pins which can be accessed over I2C, including support for interrupts which has been connected to GPIO 19 on the Raspberry Pi. [Steven] notes that you should be able to stack multiples of his expander up should you need even more free pins, though some fiddling with pull-up resistors and I2C addresses will likely be necessary.

The PCBs for the expander have been released under the two clause BSD license, so you’re free to spin up your own copies however you see fit. But if you’d like to save some time, [Steven] is offering assembled boards on Tindie.

Since [Oscar] first teased it at the 2015 Hackaday Supercon, we’ve been enamored with his fantastic PDP-11 replica. We’re always glad to see when somebody has picked up one of these wonderful kits, and doubly so when they’ve figured out a way to expand it in unexpected ways.

MC68k SBC with a monitor, keyboard and mouse

Motorola 68000 SBC Runs Again With A Raspberry Pi On Top

Single-board computers have been around a long time: today you might be using a Raspberry Pi, an Arduino, or an ESP32, but three decades ago you might find yourself programming a KIM-1, an Intel SDK-85, or a Motorola 68000 Educational Computer Board. These kind of boards were usually made by processor manufacturers to show off their latest chips and to train engineers who might use these chips in their designs.

[Adam Podstawczyński] found himself trying to operate one of these Motorola ECBs from 1981. This board contains a 68000 CPU (as used in several Macintoshes and Amigas), 32 kB of RAM, and a ROM program called TUTOR. Lacking any keyboard or monitor connections, the only way to communicate with this system is a pair of serial ports. [Adam] decided to make the board more accessible by adding a Raspberry Pi extended with an RS232 Hat. This add-on board comes with two serial ports supporting the +/- 12 V signal levels used in older equipment.

It took several hours of experimenting, debugging, and reading the extensive ECB documentation to set up a reliable connection; as it turns out, the serial ports can operate in different modes depending on the state of the handshake lines. When the Pi’s serial ports were finally set up in the right mode, the old computer started to respond to commands entered in the terminal window. The audio interface, meant for recording programs on tape, proved more difficult to operate reliably, possibly due to deteriorating capacitors. This was not a great issue, because the ECB’s second serial port could also be used to save and load programs directly into its memory.

With the serial connections working, [Adam] then turned to the aesthetics of his setup and decided to make a simple case out of laser-cut acrylic and metal spacers. Custom ribbon cables for the serial ports and an ATX break-out board for power connections completed the project, and the 40-year-old educational computer is now ready to educate its new owner on all the finer points of 68000 programming. In the video (embedded after the break) he shows the whole process of getting the ECB up and running.

[Adam] made a similarly clever setup with a Commodore 64 and an Arduino earlier. [Jeff Tranter] recreated a similar 68000 development board from scratch. And a few years ago we even featured our own custom-built 68k computer.

Continue reading “Motorola 68000 SBC Runs Again With A Raspberry Pi On Top”