Sometimes you might need to use assembly sometime to reach your project objectives. Previously I’ve focused more on embedding assembly within gcc or another compiler. But just like some people want to hunt with a bow, or make bread by hand, or do many other things that are no longer absolutely necessary, some people like writing in assembly language.
In the old days of DOS, it was fairly easy to write in assembly language. Good thing, because on the restricted resources available on those machines it might have been the only way to get things to fit. These days, under Windows or Linux or even on a Raspberry Pi, it is hard to get oriented on how to get an assembly language off the ground.
If you’re like us, it’s hard to walk through an Ikea without mentally hacking everything there into something else. The salad bowl? Parabolic antenna. Drawer slides? Linear motion rails. Storage containers? Etching tank. We admit that we still haven’t figured out what to do with that 1,000-pack of tea lights.
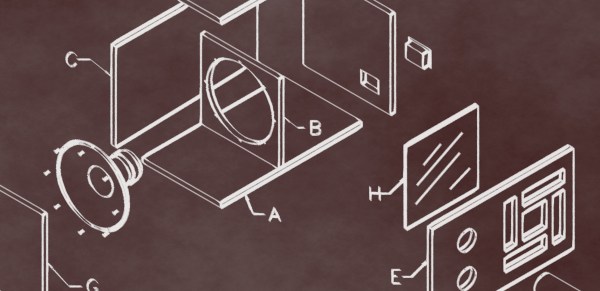
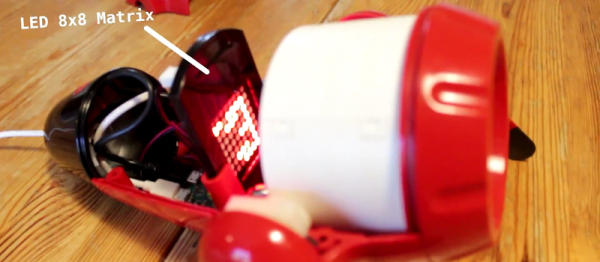
[Alain Mauer] pulled off an Ikea hack that we’ve always dreamed about. In particular, he took the Sprida projector lamp and wedged an 8×8 LED matrix and Raspberry Pi Zero into it.
The lamp in question is essentially a slide projector for kids. Before [Alain] got to it, it had an LED in the back, a mount for a slide in the middle, and a focusing lens on the front. His mod is simplicity itself: remove the LED and transparency, and place the LED matrix in the focal plane where the slide used to be. Reverse images on the LED in software to compensate for the lens, and you’re done.
The video says “Raspberry Pi Zero with WiFi” and the project title promises “IoT”, but we don’t see the WiFi in the build. We’re guessing that [Alain] will get around to it — it’s easily doable. (Doh! There’s a tiny USB WiFi dongle providing the obligatory wireless connection.) Anyway, the point is the projection, and we love it, and we’d be lying if we said it didn’t make us think about RGB matrices.
2016 is the year of the consumer 3D printer. Yes, the hype over 3D printing has died down since 2012. There were too many 3D printers at Maker Faire three years ago. Nevertheless, sales of 3D printers have never been stronger, the industry is growing, and the low-end machines are getting very, very good.
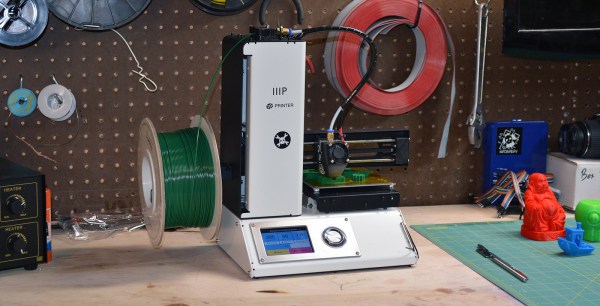
Printers are also getting cheap. At CES last January, Monoprice, the same company you buy Ethernet and HDMI cables from, introduced a line of 3D printers that would be released this year. While the $300 resin-based printer has been canned, Monoprice has released their MP Select Mini 3D printer for $200. This printer appeared on Monoprice late last month.
My curiosity was worth more than $200, so Hackaday readers get a review of the MP Select Mini 3D printer. The bottom line? There are some problems with this printer, but nothing that wouldn’t be found in printers that cost three times as much. This is a game-changing machine, and proof 2016 is the year of the entry-level consumer 3D printer.
As buzzwords go, the “Internet of Things” is pretty clever, and at the same time pretty loathsome, and both for the same reason. “IoT” can mean basically anything, so it’s a big-tent, inclusive trend. Every company, from Mattel to Fiat Chrysler, needs an IoT business strategy these days. But at the same time, “IoT” is vacuous — a name that applies to everything fails to clarify anything.
That’s a problem because “IoT Security” is everywhere in the news these days. Above and beyond the buzz, there are some truly good-hearted security professionals who are making valiant attempts to prevent what they see as a repeat of 1990s PC security fiascos. And I applaud them.
But I’m going to claim that a one-size-fits-all “IoT Security” policy is doomed to failure. OK, that’s a straw-man argument; any one-size-fits-all security policy is bound for the scrap heap. More seriously, I think that the term “IoT” is doing more harm than good by lumping entirely different devices and different connection modes together, and creating an implicit suggestion that they can all be treated similarly. “Internet of Things Security” is a thing, but the problem is that it’s everything, and that means that it’s useful for nothing.
What’s wrong with the phrase “Internet of Things” from a security perspective? Only two words: “Internet” and “Things”.
There are a ton of applications that we use that can benefit from keyboard shortcuts, and we use ’em religiously. Indeed, there are some tasks that we do so often that they warrant their own physical button. And the only thing cooler than custom keyboards are custom keyboards that you’ve made yourself.
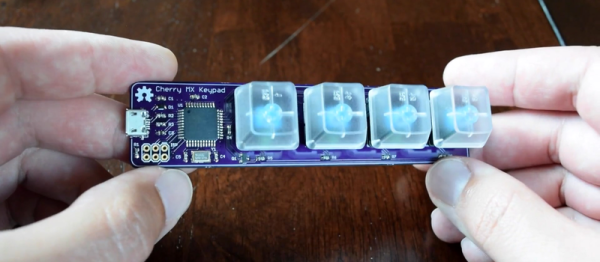
Which brings us to [Dan]’s four-button Cherry MX USB keypad. It’s not really all that much more than four keyswitch footprints and an AVR ATmega32u4, but that plus some software is all you really need. He programs the Arduino bootloader into the chip, and then he’s using the Arduino Leonardo keyboard libraries. Bam! Check out the video below.
Looking for a more unique living experience, [Zach Both] converted a 2003 Chevy Express Van he picked up from Craigslist into a gorgeous mobile home.
The van had 200,000 miles when he bought it. The body and frame were a bit rusty, but he saw the potential. First step was gutting the entire van, and getting rid of any surface rust with an angle grinder. It was a long and tedious process, but once it was done he had a blank slate to work with. Continue reading “From Rusty Cargo Van To Mobile Studio”→
Makerbot is in the gutter, 3D Systems and Stratasys stock is only a shadow of their 2014 glory, but this is the best year 3D printing has ever had. Machines are now good and cheap, there’s a variety of various thermoplastic filaments, and printing useful objects – instead of just plastic trinkets – is becoming commonplace.
The standard rectilinear infill from Slic3r
There’s one area of 3D printing that hasn’t seen as much progress, and it’s the software stack. Slicing, the process of turning a 3D object into a Gcode file for a printer has been basically the same for the last few years. Dual extrusion is still a mess, and automated bed leveling is still in its infancy.
One aspect of slicing that has been severely overlooked is infill. Obviously, you don’t want to print plastic trinkets completely solid – only the outside surface matters, and a part with 100% infill is just a waste of plastic. Different slicers have come up with different ways of filling the inside of a print, usually with a grid of squares, triangles, or hexagons.
While the most popular methods of filling in a 3D printed objects do the job of adding a little bit of strength to a print and supporting the top layers of a print, it’s not an ideal solution. The desired strength of the finished part is never taken into account, print artifacts are sometimes visible through the side of a print, and the spacing of the infill grid is completely arbitrary. You can only set a percentage of infill, and telling a slicer to make an internal support grid with 10mm spacing is impossible.
Type A Machines just changed all of this. With the release of their public beta of Cura Type A, the infill for a 3D printed part is also 3D. The dimensions of the infill are predictable, opening the door to stronger and better looking parts.
From the Type A press literature and white paper, this new type of ‘infill’ isn’t; it’s more properly referred to as ‘internal structure’, with proper dimensions between infill features. Instead of a grid of squares or triangles stacked one layer on top of each other, it’s a true structure, with the infill following the perimeter of the 3D printed object.
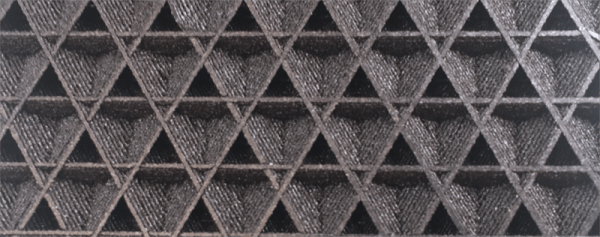
Generating 3D Infill
Infill generated from Type A Machine’s Cura beta. Note the 3D structure of the infill.
Right now, infill is generated in a slicer by specifying a percentage. Zero percent infill means a hollow object, and 100% infill is a completely solid part. These two edge cases are easy, but anything else means the slicer must fill the part with filament in a grid of tessellating shapes, either rectangles, triangles, or hexagons. With current slicers, the dimensions of this internal structure are, for all practical purposes, random. Printing an object with 20% infill might mean a grid of squares with 5mm or 2mm spacing. Telling the slicer to infill a part with a grid of squares spaced 10mm apart is impossible.
Type A Machine’s latest Cura release changes all of this, allowing a designer to set a precise distance between rows and columns of infill. By defining infill in absolute dimensions, this allows for stronger parts using less infill.
Absolute dimensioning is only one feature of the Type A Machine’s latest release of Cura. Even more exciting is the development of 3D internal structure. Instead of stacking layers of squares, triangles, or hexagons on top of each other, Type A Machine’s Cura uses an infill of cubes turned on their side. While each individual layer of infill looks like a series of triangles and irregular hexagons, when assembled into a printed 3D object, this infill forms a true 3D structure.
The closest comparison to this sort of structure is the difference between graphite and diamond. Both of these materials are made out of the same element, carbon. The physical structure of graphite is just, 1-atom-thick layers of graphene, producing a relatively weak material. Diamond, on the other hand, has a true 3D structure and is one of the hardest materials known to man. While adding 3D structure to the infill of 3D printed objects won’t make the objects any stronger, it will drastically reduce delamination, and be much more resistant to stresses in all three dimensions.
While Type A Machines has done some great work here, it does mean there’s yet another version of Cura to deal with. Type A Machine’s Cura, in addition to the LulzBot edition and the original are now the defacto standard for turning 3D objects into printed parts. Having an open source solution is great, but forking the development this much surely can’t be ideal.