Raspberry Pi Wind Measurement

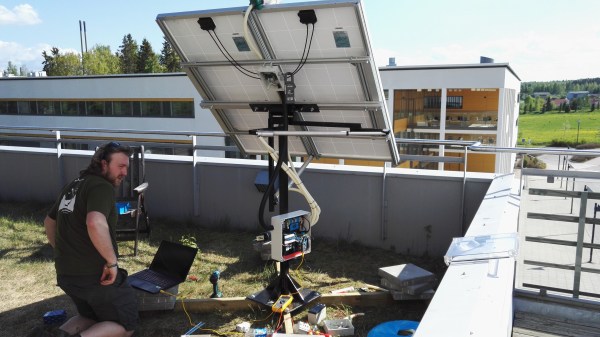
A well organized approach to a project is a delight to see. [Pavel Gesyuk] takes just that approach with the experiments on his blog. Experiment 13 is a multi-part series using a Raspberry Pi as the heart of a weather station. [Pavel] is looking at wind speed and direction, and temperature measurement, plus solar power for the station. One of his videos, there are many, is after the break.

electrical_02_tThe anemometer and direction sensors are stock units wired to a Raspberry Pi A+ using an analog to digital daughter board. The data from the temperature sensor is acquired using I2C. During one part of the experiment he uses an EDIMAX WiFi adapter for collecting the data.

Python is [Pavel’s’ language of choice for development and freely shares his code for others to see. The code collects the data and displays it on a monitor connected to the Pi. The experiment also attempts to use solar power to charge batteries so the station is not dependent on mains power.

The mechanical assembly shows attention to detail commensurate with his project presentation and we respect how well organized the work is.

Continue reading “Raspberry Pi Wind Measurement”

32C3: So You Want To Build A Satellite?

[INCO] gave this extremely informative talk on building a CubeSat. CubeSats are small satellites that piggyback on the launches of larger satellites, and although getting a 10 cm3 brick into orbit is cheap, making it functional takes an amazing attention to detail and redundant design.

[INCO] somehow talks through the entire hour-long presentation at a tremendous speed, all the while remaining intelligible. At the end of the talk, you’ve got a good appreciation for the myriad pitfalls that go along with designing a satellite, and a lot of this material is relevant, although often in a simpler form, for high altitude balloon experiments.

satellite_2-shot0002CubeSats must be powered down during launch, with no radio emissions or anything else that might interfere with the rocket that’s carrying them. The satellites are then packed into a box with a spring, and you never see or hear from them again until the hatch is opened and they’re pushed out into space.

[INCO] said that 50% of CubeSats fail on deployment, and to avoid being one of the statistics, you need to thoroughly test your deployment mechanisms. Test after shaking, being heated and cooled, subject to low battery levels, and in a vacuum. Communication with the satellite is of course crucial, and [INCO] suggests sending out a beacon shortly after launch to help you locate the satellite at all.

satellite_2-shot0003Because your satellite is floating out in space, even tiny little forces can throw it off course. Examples include radiation pressure from the sun, and anything magnetic in your satellite that will create a torque with respect to the Earth’s magnetic field. And of course, the deployment itself may leave your satellite tumbling slightly, so you’re going to need to control your satellite’s attitude.

Power is of course crucial, and in space that means solar cells. Managing solar cells, charging lithium batteries, and smoothing out the power cycles as the satellite enters the earth’s shadow or tumbles around out of control in space. Frequent charging and discharging of the battery is tough on it, so you’ll want to keep your charge/discharge cycles under 20% of the battery’s nominal capacity.

mpv-shot0001In outer space, your satellite will be bombarded by heavy ions that can short-circuit the transistors inside any IC. Sometimes, these transistors get stuck shorted, and the only way to fix the latch-up condition is to kill power for a little bit. For that reason, you’ll want to include latch-up detectors in the power supply to reset the satellite automatically when this happens. But this means that your code needs to expect occasional unscheduled resets, which in turn means that you need to think about how to save state and re-synchronize your timing, etc.

In short, there are a ridiculous amount of details that you have to attend to and think through before building your own CubeSat. We’ve just scratched the surface of [INCO]’s advice, but if we had to put the talk in a Tweet, we’d write “test everything, and have a plan B whenever possible”. This is, after all, rocket science.

DARE To Fly: Live Coverage Of A 50KM Rocket Launch

We wrote about the Delft Aerospace Rocket Engineering (DARE) project recently: a group of students at Delft Technical University who are trying to launch a rocket to 50kM, breaking the European amateur rocketry record. Now, the group is close to their latest launch attempt, which is scheduled to take place from their launch base in Spain between the 14th and the 20th of October.

Launch preparations are underway, with the team working through a 10,000 point pre-launch checklist. Last year, their launch failed because of a leaking valve, but the amateur engineers have just successfully completed a pressure test using inert gas, so they are confident that this problem won’t happen again. They are offering a live video feed of the launch (embedded below), and will be regularly updating their twitter feed as they prepare. We wish them the best of luck.

Continue reading “DARE To Fly: Live Coverage Of A 50KM Rocket Launch”

Maximizing A Solar Panel

Solar panels seem like simple devices: light in and electricity out, right? If you don’t care about efficiency, it might be that simple, but generally you do care about efficiency. If you are, say, charging a battery, you’d like to get every watt out of the panel. The problem is that the battery may not draw all the available current, basically leaving capacity on the table.

The solution is a technique called MPPT (Maximum Power Point Tracking). Despite sounding like a Microsoft presentation add on, MPPT uses a DC to DC converter to present a maximum load to the solar cell while providing the desired current and voltage to the load. MPPT is what [Abid Jamal] implemented to manage his solar charger.

Continue reading “Maximizing A Solar Panel”

Two-Axis Solar Tracker

Solar panels are an amazing piece of engineering, but without exactly the right conditions they can be pretty fickle. One of the most important conditions is that the panel be pointed at the sun, and precise aiming of the panel can be done with a solar tracker. Solar trackers can improve the energy harvesting ability of a solar panel by a substantial margin, and now [Jay] has a two-axis tracker that is also portable.

The core of the project is a Raspberry Pi, chosen after [Jay] found that an Arduino didn’t have enough memory for all of the functionality that he wanted. The Pi and the motor control electronics were stuffed into a Pelican case for weatherproofing. The actual solar tracking is done entirely in software, only requiring a latitude and longitude in order to know where the sun is. This is much easier (and cheaper) than relying on GPS or an optical system for information about the location of the sun.

Be sure to check out the video below of the solar tracker in action. Even without the panel (or the sun, for that matter) the tracker is able to precisely locate the panel for maximum energy efficiency. And, if you’d like to get even MORE power from your solar panel, you should check out a maximum power point tracking system as well.

Continue reading “Two-Axis Solar Tracker”

Camera Light Meter

Upgrading An Old Camera With A New Light Meter

[Marc] has an old Voigtländer Vito CLR film camera. The camera originally came with an analog light meter built-in. The meter consisted of a type of solar panel hooked up to a coil and a needle. As more light reached the solar panel, the coil became energized more and more, which moved the needle farther and farther. It was a simple way of doing things, but it has a down side. The photo panels stop working over time. That’s why [Marc] decided to build a custom light meter using newer technology.

[Marc] had to work within the confines of the tiny space inside of the camera. He chose to use a LM3914 bar display driver IC as the primary component. This chip can sense an input voltage against a reference voltage and then display the result by illuminating a single LED from a row of ten LEDs.

[Marc] used a photo cell from an old calculator to detect the ambient light. This acts as a current source, but he needed a voltage source. He designed a transimpedence amplifier into his circuit to convert the current into a voltage. The circuit is powered with two 3V coil cell batteries, regulated to 5V. The 5V acts as his reference voltage for the display driver. With that in mind, [Marc] had to amplify this signal further.

It didn’t end there, though. [Marc] discovered that when sampling natural light, the system worked as intended. When he sampled light from incandescent light bulbs, he did not get the expected output. This turned out to be caused by the fact that incandescent lights flicker at a rate of 50/60 Hz. His sensor was picking this up and the sinusoidal output was causing problems in his circuit. He remedied this by adding two filtering capacitors.

The whole circuit fits on a tiny PCB that slides right into position where the original light meter used to be. It’s impressive how perfectly it fits considering everything that is happening in this circuit.

[Thanks Mojay]

Using The Sun To Beat The Heat

It’s practically May, and that means the sweltering heat of summer is nearly upon us. Soon you’ll be sitting outside somewhere, perhaps by a lake, or fishing from a canoe, or atop a blanket spread out on the grass at a music festival, all the while wishing you had built yourself a solar-powered personal air conditioner.

[Nords] created his from a large insulated beverage vessel. The imbibing spout offers a pre-made path to the depths of said vessel and the heart of this build, the ice water refrigerant. [Nords] fashioned a coil out of copper tubing to use as a heat exchanger and strapped it to the fan that performed best in a noise-benefit analysis.

A small USB-powered submersible pump moves the ice water up through the copper tubing. Both the pump and the fan run off of a 5V solar panel and are connected with a USB Y cable, eliminating the need for soldering. Even if you spend the summer inside, you could still find yourself uncomfortably warm. Provided you have access to ice, you could make this really cool desktop air conditioner.

[via Embedded Lab]