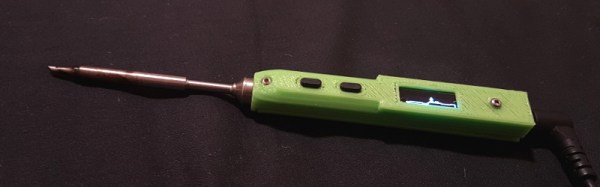
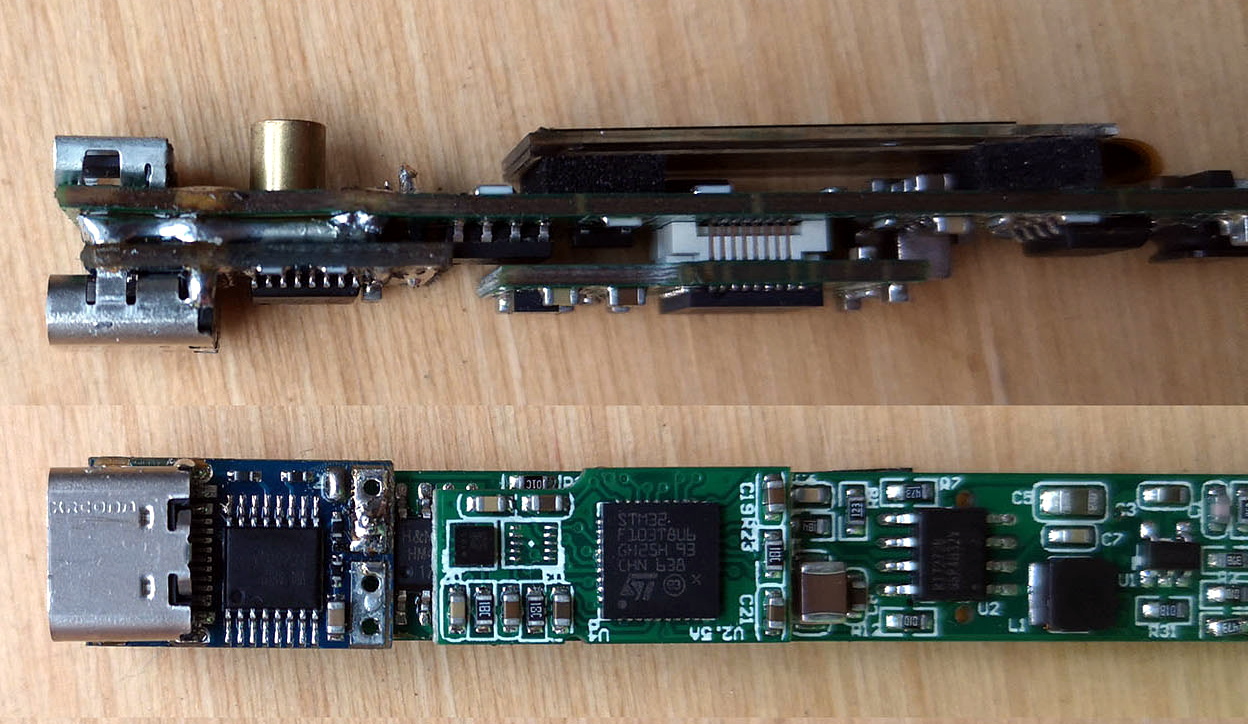
The TS100 is a popular entry into the new breed of small temperature-controlled soldering irons that, at least for some of us, have started to replace the bulky soldering stations of old. Unfortunately, one downside of this particular model is the need to plug it into a fairly ungainly laptop-style power supply, which certainly hinders its otherwise portable nature. But [Dennis Schneider] has come up with a very slick solution to that problem by adding a USB-PD module to his TS100.
The idea here is very simple: just remove the original DC barrel connector, and in its place install a USB-PD trigger module. In practice it took more than a little fiddling, cutting, persuasion, and creative soldering (ironically, with a soldering station), but the end result does look quite professional.
It helps that the USB-PD module [Dennis] used was almost the exact same width as the TS100 PCB, meaning that the modified iron could go back into its original case. Though as we saw not so long ago, there’s a growing community of 3D printed replacement cases should you select a trigger module that doesn’t so neatly fit the footprint of the original board. Or if you didn’t want to modify the iron at all, you could always just make an external adapter.
Those that have some experience with these irons might be wondering what the point of modifying the TS100 to take USB-C is when we already have the TS80. As it turns out, while the TS80 is using a USB-C connector it doesn’t actually use USB-PD, so its not taking advantage of the enhanced power delivery capabilities. We know, it’s all kind of confusing.
Just because something is newer than something else doesn’t automatically make it better. Of course the opposite is also true, but when it comes to displays on bench multimeters, a fancy LCD display is no guarantee of legibility. Take the Hewlett Packard HP 3478A multimeter; the stock transflective display with its 14-segment characters is so hard to read that people usually have to add a backlight to use it.
That wasn’t good enough for [cyclotronboy], though, who chose to completely replace the stock 3478A display with Nixie tubes. He noticed that with a little modification, six IN-17 tubes just fit in the window vacated by the LCD. He sniffed out the serial data stream going to the display with a collection of XOR gates and flip-flops, which let him write the code for a PIC18F4550. The finished display adds a trio of rectangular LEDs for the + and – indicators, and an HDLO-1414 four-character alphanumeric display to indicate units and the like. And the decimal points? Tiny neon bulbs. It already looks miles better than the stock display, and with the addition of a red filter, it should look even better.
If you’re stuck with a lame LCD multimeter but Nixies don’t quite do it for you, worry not – an LED conversion is possible too.
As hackers, we’re well accustomed to working with what we have on hand. That’s the name of the game, really. A large majority of the projects that have graced these pages are the direct result of trying to coerce a piece of hardware or software into doing something it was never designed to do, for better or for worse.
But even still, attempting to build a functional lathe using scrap pieces from granite countertops is a new one for us. [Nonsense Creativity] has spent the last several months working on this build, and as of his latest video, it’s finally getting to the point at which the casual observer might recognise where he’s going with it.
We won’t even hazard a guess as to the suitability of thick pieces of granite for building tools, but we’re willing to bet that it will be plenty heavy enough. Then again, his choice of building material might not be completely without precedent. After all, we once saw a lathe built out of concrete.
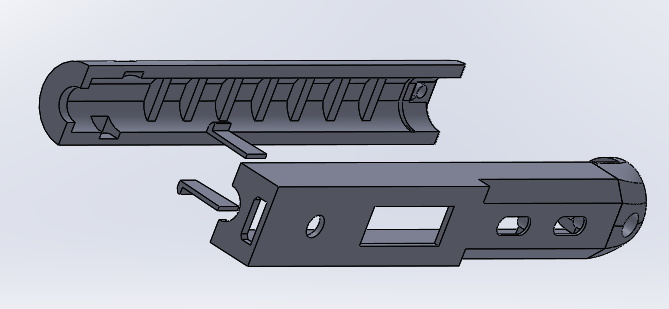
About a year back, [BogdanTheGeek] found himself in need of a new case for this TS100 soldering iron. Unfortunately, while the product is often billed as being open source friendly (at least in the firmware sense), he was surprised to discover that he couldn’t find the detailed dimensions required to 3D print his own replacement case. So he took it upon himself to document the case design and try to kick off a community around custom enclosures for the popular portable iron.
The main goals while designing the replacement case was to make it printable without support, and usable without additional hardware. He also wanted it to be stronger than the original version, and feature a somewhat blockier design that he personally finds more comfortable. The case was designed with PLA in mind, and he says he’s had no problems with the lower-temperature plastic. But if you’re still concerned about the heat, PETG would be an ideal material to print yours in.
It took him many attempts to get the design to where it is today, and still, there are improvements he’d like to make. For one, there’s no protective cover over the iron’s OLED screen. He’d also like to make the switch from SolidWorks over to FreeCAD so the project is a bit more accessible, and says he’d appreciate anyone who wants to chip in. We’re excited to see what develops once the hacking world realizes that there are accurate open source CAD files for the TS100 floating around out there.
Our very own [Jenny List] put the TS100 through its paces not so long ago, and found a decidedly solid little tool. While it won’t replace your high-end soldering station, it’s very convenient for quick repairs and simple tasks, especially if you find yourself away from the workbench proper.
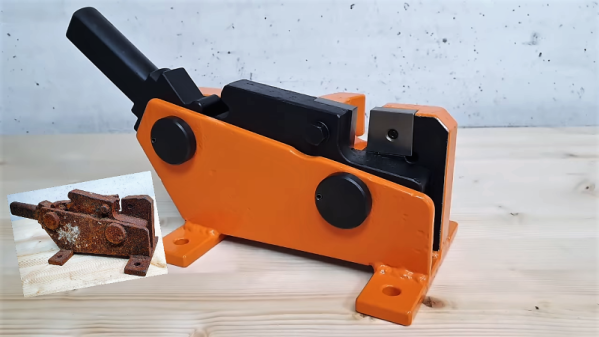
We’ve all probably come across hunks of junk that used to be tools, long-neglected and chemically welded into a useless mass of solid rust. Such items are available for a pittance at the local flea market, or more likely found in an old barn or rotting on a junk pile. They appear to be far beyond salvage, but with the proper application of elbow grease and penetrating lubricants, even a nasty old seized-up rebar cutter can live again.
We honestly almost passed up on the video below when it came across our feed. After all, a rebar cutter is a dead-simple device, and half the fun of restoration videos like those made by [my mechanics] is seeing all the parts removed, restored, and replaced. But it ended up being far more interesting than we expected, and far more challenging too.
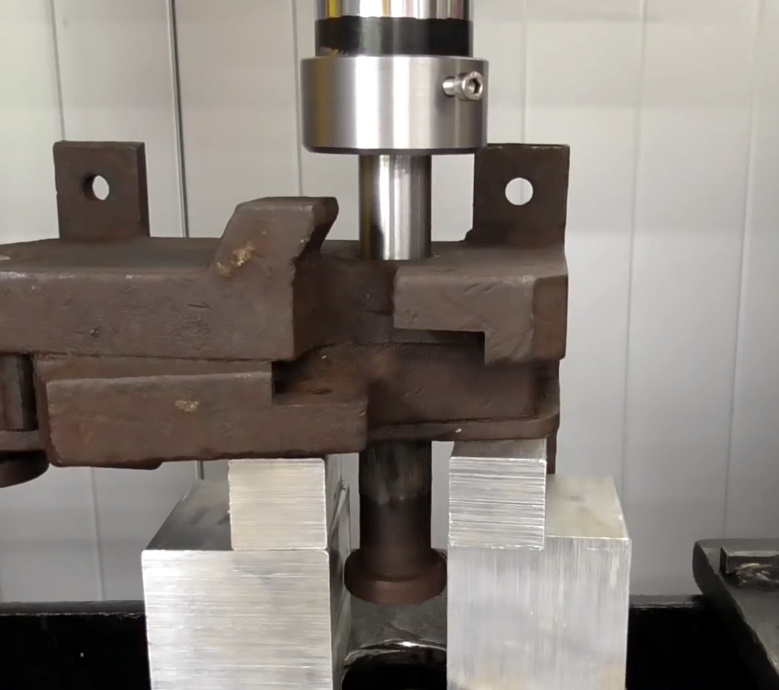
The cutter was missing its original handle and looked for all the world like it had been cast from a solid piece of iron oxide. [my mechanics] was able to get the main pivot bolts free with a combination of leverage, liberal application of penetrating oil, drilling, and the gentle persuasion of a hydraulic press.
These efforts proved destructive to both bolts, so new ones were made on the lathe, as were a number of other parts beyond saving. New cutters were fabricated from tool steel and a new handle was built; before anyone comments on anyone’s welding skills, please read [Jenny]’s recent article on the subject.
The finished product is strikingly dissimilar to the starting lump of oxidized junk, so there’s going to to be some debate in calling this a “restoration” in the classical sense. The end result of a [my mechanics] video is invariably a tool or piece of gear that looks far better than it did the day it was made, and any one of them would get a place of honor on our shelf. That said, he’d probably be swiftly shown the door if he worked at the Smithsonian.
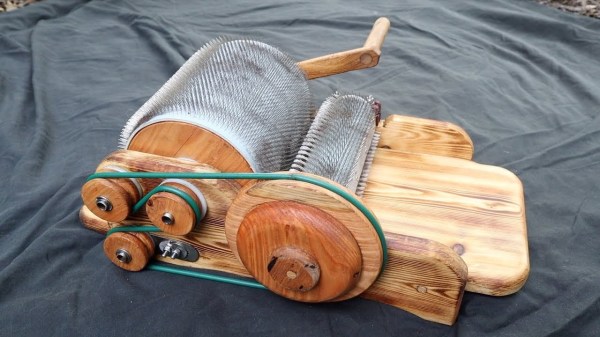
Making a natural fiber like wool into something useful like a sweater involves a lot of steps. We might be familiar with shearing the sheep, spinning the wool into yarn, or knitting and weaving, but between shearing and spinning there’s another unfamiliar process you’ll have to go through. Known as carding, it helps align the fibers so they are able to be spun, and of course it requires either an expensive tool, or one you build on your own.
This drum carder is exactly what it sounds like. It uses two drums covered in a metal mesh, spinning at different speeds, which pull the fibers into an orderly shape. Small drum carders like this can run around $600 but with some quality wood and a lathe you can easily make one for a fraction. Making the series of drums is fairly straightforward with a lathe, and from there you need to make sure they are connected with a quality belt or chain and then covered in the appropriate metal mesh.
[kris] notes in the reddit comments section that he’d like for a second version to spin a little faster and be a little more durable, but this is a great working carder nonetheless. From there you’ll want to move on to spinning the wool into yarn, which you can do with either a wheel or an electric motor.
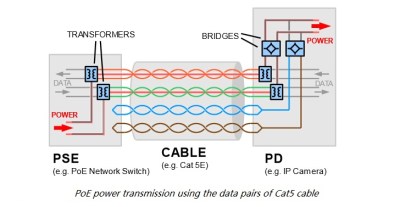
A remote Ethernet device needs two things: power and Ethernet. You might think that this also means two cables, a beefy one to carry the current needed to run the thing, and thin little twisted pairs for the data. But no!
Power over Ethernet (PoE) allows you to transmit power and data over to network devices. It does this through a twisted pair Ethernet cabling, which allows a single cable to drive the two connections. The main advantage of using PoE as opposed to having separate lines for power and data is to simplify the process of installation – there’s fewer cables to keep track of and purchase. For smaller offices, the hassle of having to wire new circuits or a transformer for converted AC to DC can be annoying.
PoE can also be an advantage in cases where power is not easily accessible or where additional wiring simply is not an option. Ethernet cables are often run in the ceiling, while power runs near the floor. Furthermore, PoE is protected from overload, short circuiting, and delivers power safely. No additional power supplies are necessary since the power is supplied centrally, and scaling the power delivery becomes a lot easier.
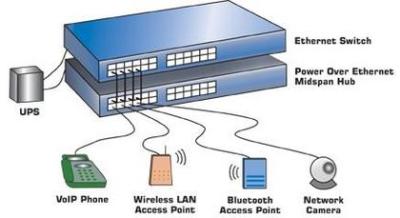
Devices Using PoE
[via PowerOverEthernet.com]VoIP phones are becoming increasingly prevalent as offices are opting to provide power for phones from a central supply rather than hosting smaller power supplies to supply separate phones. Smart cameras – or IP cameras – already use Ethernet to deliver video data, so using PoE simplifies the installation process. Wireless access points can be easily connected to Ethernet through a main router, which is more convenient than seeking out separate power supplies.
Other devices that use PoE include RFID readers, IPTV decoders, access control systems, and occasionally even wall clocks. If it already uses Ethernet, and it doesn’t draw too much power, it’s a good candidate for PoE.
On the supply side, given that the majority of devices that use PoE are in some form networking devices, it makes sense that the main device to provide power to a PoE system would be the Ethernet switch. Another option is to use a PoE injector, which works with non-PoE switches to ensure that the device is able to receive power from another source than the switch.
How it Works
Historically, PoE was implemented by simply hooking extra lines up to a DC power supply. Early power injectors did not provide any intelligent protocol, simply injecting power into a system. The most common method was to power a pair of wires not utilized by 100Base-TX Ethernet. This could easily destroy devices not designed to accept power, however. The IEEE 802.3 working group started their first official PoE project in 1999, titled the IEE 802.3af.
[via Fiber Optic Communication]This standard delivered up to 13 W to a powered device, utilizing two of the four twisted pairs in Ethernet cabling. This was adequate power for VoIP phones, IP cameras, door access control units, and other devices. In 2009, the IEEE 802.3 working group released the second PoE standard, IEEE 802.3at. This added a power class that could deliver up to 25.5 W, allowing for pan and tilt cameras to use the technology.
While further standards haven’t been released, proprietary technologies have used the PoE term to describe their methods of power delivery. A new project from the IEEE 802.3 working group was the 2018 released IEEE 802.3bt standard that utilizes all four twisted pairs to deliver up to 71 W to a powered device.
But this power comes at a cost: Ethernet cables simply don’t have the conductive cross-section that power cables do, and resistive losses are higher. Because power loss in a cable is proportional to the squared current, PoE systems minimize the current by using higher voltages, from 40 V to 60 V, which is then converted down in the receiving device. Even so, PoE specs allow for 15% power loss in the cable itself. For instance, your 12 W remote device might draw 14 W at the wall, with the remaining 2 W heating up your crawlspace. The proposed 70 W IEEE 802.3bt standard can put as much as 30 W of heat into the wires.
The bigger problem is typically insufficient power. The 802.4af PoE standard maximum power output is below 15.4 W (13 W delivered), which is enough to provide power for most networking devices. For higher power consumption devices, such as network PTZ cameras, this isn’t the case.
Although maximum power supply is specified in the standards, having a supply that supplied more power is necessary will not affect the performance of the device. The device will draw as much current as necessary to operate, so there is no risk of overload, just hot wires.
So PoE isn’t without its tradeoffs. Nevertheless, there’s certainly a lot of advantages to accepting PoE for devices, and of course we welcome a world with fewer wires. It’s fantastic for routers, phones, and their friends. But when your power-hungry devices are keeping you warm at night, it’s probably time to plug them into the wall.

 The idea here is very simple: just remove the original DC barrel connector, and in its place install a USB-PD trigger module. In practice it took more than a little fiddling, cutting, persuasion, and creative soldering (ironically, with a soldering station), but the end result does look quite professional.