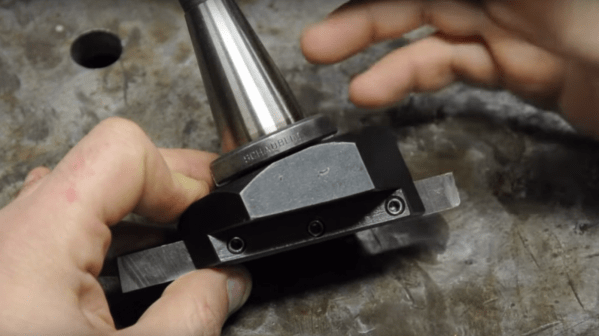
So, You’re Scared Of Surface Mount

If you are lucky enough to encounter a piece of homebrew electronics from the 1950s, the chances are that under the covers the components will be assembled on solder tags, each component with long leads, and chassis-mounted sockets for tubes. Easy to assemble with the most agricultural of soldering irons.

Open up a home build from the 1960s or early 1970s, and you might find the same passive components alongside germanium transistors mounted through holes in a curious widely spaced stripboard or even a home-made PCB with chunky wide tracks.

By the late 1970s and early 1980s you would find a more familiar sight. Dual-in-line ICs through-hole on 0.1″ spaced stripboard, and home-made PCBs starting to appear on fibreglass board. Easy to use, easy to solder. Familiar. Safe. Exactly what you’ll see on your breadboard nearly forty years later, and still what you’ll see from a lot of kit manufacturers.

Nice and familiar, a through-hole Arduino. By Nicholas Zambetti - http://www.arduino.cc/, CC BY-SA 3.0
Nice and familiar, a through-hole Arduino.
By Nicholas Zambetti CC BY-SA 3.0

But we all know that progress in the world of electronic components has not stood still. Surface-mount components have a history going back to the 1960s, and started to appear in consumer equipment from the end of the 1980s. More components per square inch, smaller, cheaper devices. Nowadays they are ubiquitous, and increasingly these new components are not offered in through-hole versions. Not a problem if your experiments are limited to the 741 and the 555, but something that rather cramps your style if your tastes extend to novel sensors for a microcontroller, or RF work.

This development has elicited a range of reactions. Many people have embraced the newer medium with pleasure, and the Hackaday.io project pages are full of really clever SMD projects as a result. But a significant number have not been able to make the jump to SMD, maybe they are put off by the smaller size of SMD components, the special tools they might require, or even the new skills they’d have to learn. When you sell a kit with SMD components these are the reactions you will hear from people who like the kit but wish it was available in through-hole, so this article is for them. To demystify working with SMDs, and to demonstrate that SMD work should be within the grasp of almost anyone who can wield a soldering iron.

But They’re So Tiny!

Tiny SMDs - fortunately most of which you will not have to worry about.
Tiny SMDs – fortunately most of which you will not have to worry about.

It’s likely to be the first reaction from a lifelong through-hole solderer. SMD parts are often very small indeed, and even those with larger packages can have leads that seem as numerous and thin as the hairs on a cat when seen with the rabbit-in-the-headlights panic of the uninitiated.

But it is important to take a step back and understand that not all SMDs are created equal. Some of them are grain-of-sand tiny and only hand-solderable by those with God-like powers, but plenty of devices are available in SMD packages large enough for mere mortals.

So don’t worry when you look at a board covered with grain-of-dust-sized components. Very few people could attempt that level of construction, your scribe certainly can’t. (We await commenters claiming to routinely hand-solder thousand-pin BGAs and 01005 chip components with anticipation, however such claims are useless without proof.)

Instead, concentrate on the SMD packages you can handle. SMD chip component packages are refered to by a number that relates to their dimension. Confusingly there are both metric and imperial versions of the scheme, but the format is the same: length followed by width.

Consider the picture above with the PCB and the tape measure, it’s the underside of a Raspberry Pi model B+, and will have been assembled by a robotic pick-and-place machine. The majority of the components are very tiny indeed, but you will notice L3 as the black component towards the bottom left that looks huge compared to its neighbours. That package is a “1008”, 0.1 inches long by 0.08 inches wide. It’s still tiny, but imagine picking it up with a pair of tweezers under a magnifying glass. Not so bad, is it. You’ve probably handled plenty of things in that size range before, do SMD parts seem so scary now? The larger components – 0805, 1008, and 1206 – are surprisingly within the grasp of the average maker.

But I need all sorts of special tools!

Retro Populator, a homebrew pick-and-place machine we featured back in 2014

In a commercial environment an SMD device will be assembled by machine. Glue or solder paste will be printed in the relevant parts of the board, and a robotic pick-and-place machine will retrieve components from their tape packaging and automatically place them in their correct orientations. The board will then be soldered all-at once, either in a reflow oven or by a wave soldering machine.

If you’re new to SMDs you are unlikely to have any of this kit just lying around on your bench. There are self-built pick-and-place machines and a host of self-built reflow ovens, but it’s safe to say they’re still quite an advanced thing to have.

You’ll also see all manner of commercial kit aimed at the bench-top SMD constructor. Hot air soldering stations or SMD bits for conventional irons, all of which are very useful but come with a hefty price tag.

The good news is that you don’t need any of these special tools to dip your toe into the SMD water. You almost certainly already have everything you need, and if you don’t then very little of what you lack is specifically for SMD work. If you have the following items then you are good to go:

A basic SMD soldering toolkit

A good light source. Even the larger SMDs are still pretty small. Plenty of light ensures you will be able to see them clearly. A good downward pointing desk lamp should suffice. A clear high-contrast surface. Because SMDs can be difficult to see, it helps if they are manipulated over a bright white surface. A fresh sheet of white printer paper on a desk makes a suitable working area. Good hands-free magnification. Unless you are fortunate enough to have amazing eyesight, you will need a decent magnifier to work with surface-mount components. The “Helping hands” type on a stand are suitable. A very small flat-blade screwdriver. You will need this to hold surface-mount components down while you solder them. A good-quality set of precision metal tweezers. You will need these for picking up, manipulating, and turning over surface-mount devices. A fine-tipped soldering iron. If you have a standard fine tipped iron suitable for use with conventional 0.1” pitch through-hole components then you should be well-equipped.

That said there is one special tool that might be worth your consideration. Holding an SMD device while soldering it can sometimes seem like a task that needs three hands, so one or two tools can be found to help. Fortunately this is something you can build yourself. Take a look at the SMD Beak, a weighted arm for example, or your scribe’s spring clamp third hand.

I’m sorry, this is just beyond my soldering skill level

Desolder braid and plenty of flux are your friends.

It is easy to imagine when you are looking at an SMD integrated circuit that its pins are just too small and too close together, you couldn’t possibly solder them by hand. The answer is that of course you can, you simply need to view how you solder them in a different way.

With a through-hole IC you solder each 0.1″ pitch pin individually. It is something of a disaster if you manage to put a solder bridge between two pins, and you race for your desolder pump or braid.

With a surface-mount IC by comparison there is little chance that you as a mere mortal could solder each pin individually, so you don’t even try. Instead you solder an entire row at once with an excess of solder, and remove the resulting huge solder bridge with desolder braid to leave a very tidy and professional-looking job. Surface tension and plenty of flux are your friends, and there is very little soldering skill required that you do not already have if you are an experienced through-hole solderer.

If you can hold it down onto the board and see it clearly with your magnifier if necessary, then it doesn’t matter what the component is, you can solder it. Give it a try, you’ll surprise yourself!

What next?

1206 chip discrete components hand-soldered to a PCB

So we hope we’ve convinced you as an SMD doubter, that you have the ability to work with SMDs yourself. What next?

Start by reading up on the subject. Your favourite search engine should deliver, tutorials can be found from Sparkfun, from Adafruit, or from Instructables among many others. And look for videos, YouTube has a huge number of SMD soldering guides.

But there is no substitute for practice. Find a scrap board populated with reasonably-sized surface-mount components, and have a go at reworking it. Desoldering its components may be a bit difficult, but you should easily be able to rework the solder joints. Slather an integrated circuit’s pins with flux, and try running a blob of molten solder along them, then removing the excess with desolder braid. The great thing about a scrap board is that it doesn’t matter if you damage it, so you can practice these techniques to your heart’s content until you are satisfied with your new-found skill.

So you’re ready to move forward, and make your first SMD project. Well done! What you do next is up to you. Design your own circuit and get a PCB made, buy a kit, or find an SMD project you like on Hackaday.io with downloadable PCB files and order your own.

Whatever you do, be happy that you’ve conquered your SMD fears, and resolve to be first in the queue to try any new technology in the future!

KiCAD BOM Management

KiCAD remains a popular tool for designing PCBs and other circuits, and with good reason: it’s versatile and it’s got pretty much everything needed to build any type of circuit board you’d want. It also comes with a pretty steep learning curve, though, and [Jeff] was especially frustrated with the bill of materials (BOM) features in KiCAD. After applying some Python and Kivy, [Jeff] now has a BOM manager that makes up for some of KiCAD’s shortcomings.

Currently, the tool handles schematic import, like-component consolidation, and a user-managed parts database that can be used to store and retrieve commonly used parts for the future. All of the changes can be saved back to the original schematic. [Jeff] hopes that his tool will save some time for anyone who makes more than one PCB a year and has to deal with the lack of BOM features native to KiCAD.

[Jeff] still has some features he’d like to add such as unit tests, a user guide, and a cleaner user interface. What other features are you anxious to see added to KiCAD?

This script is a great tool for anyone who has had similar frustrations. KiCAD is popular to modify and expand, too: there have been tools for mechanical CAD export, a parts-generator and cost-tracker, and an Eagle to KiCAD converter if you’re thinking of making the switch.

SDRAM Logic Analyzer Uses An AVR And A Dirty Trick

We often see “logic analyzer” projects which are little more than microcontrollers reading data as fast as they can, sending it to a PC, and then plotting the results. Depending on how fast the microcontroller is, these projects range from adequate to not very useful.

At first glance, [esot.eric’s] logic analyzer project has an AVR in it, so it ought to be on the low end of the scale. Then you look at the specs: 32 channels at 30 megasamples per second. How does that work with an AVR in it?

The answer lies in the selection of components. The analyzer uses a 128MB SDRAM DIMM (like an older PC might use for main memory). That makes sense; the Arduino can’t store much data internally. However, it isn’t the storage capacity that makes this choice critical. It seems [esot.eric] has a way to make the RAM “free run”.

The idea is to use the Arduino (or other host microcontroller) to set up the memory. Some of the memory’s output bits feedback to the address and data lines. Then the microcontroller steps aside and the SDRAM clocks samples into its memory by itself at the prevailing clock rate for the memory.

Continue reading “SDRAM Logic Analyzer Uses An AVR And A Dirty Trick”

Tools Of The Trade – Solder Paste Dispensing

The general process of circuit board assembly goes like this: You order your PCBs. You also order your components. For surface mount components, you apply solder paste to the pads, put the components on top, and then heat the board up so the solder paste flows and makes a bond. Then for through hole components you put the leads through the holes, and solder them with an iron or a solder wave or dip. Then you do an inspection for defects, program any microcontrollers, and finally test the completed board to make sure everything runs.

The tricky part is in volumes. If you’re only doing a few boards, it’s usually easiest to assemble them by hand. In the thousands you usually outsource. But new tools, and cheap hacked tools, have made it easier to automate small batches, and scale up into the thousands before outsourcing assembly.

In this new series which we’re calling Tools of the Trade we’ll be covering a variety of tools used for building products, and we’re starting with circuit board assembly. Let’s investigate our tools of the trade: solder paste dispensing. Continue reading “Tools Of The Trade – Solder Paste Dispensing”

Tindie Opens A Flea Market For Tools, Components, And Other Gear

We like to pop into electronics flea markets and swap meets at every chance we get. Last month [Brian] made it to the ham swap meet at Northrup Grumman held in Redondo Beach. I had a great time a couple of years back at the Electronics Flea Market held at De Anza College. Physical proximity to one of these nearly-mythical events is, unfortunately, required. If only the Internet offered a solution to this problem…

The fact that you’re reading Hackaday puts you into one of three categories: you wish you had a lot more tools, you’re on the way to a well-stocked workshop, or you’re trying to pass on your shop surplus to someone who will love it like you do. There’s now a perfect solution for the buy-upgrade-horde cycle we all inevitably fall into: the Tindie Flea Market. If you use something to make hardware, this is going to be the place to buy or sell it.

tindie-flea-market-thumbHas that starter scope been collecting dust since you picked up not one, but two better models? We know you can’t part with it unless you know it’s not going to be thrown out, and this is the chance to find not just a good home, but an owner that will use and cherish it. This goes for all kinds of great tools. After all, how do you find someone to take that pick and place off of your hands?

At launch, the Tindie Flea Market categories will include Adapters and Cables, Audio and Video, Batteries and Power, Bulk Components, Equipment, Fasteners, RC, and Small Tools. Maybe I’ll finally be able to find a home for that tube of power transistors I ordered years ago in the wrong package — and maybe even that long tape of EEPROM that I ordered in 1.8v instead of 3.3v. Time to start my listings and keep good stuff out of the landfill. Yet another great reason we were so happy to welcome Tindie to the Hackaday family.

Arduino RF Network Analyzer

What do you get when you combine a direct digital synthesis (DDS) chip, a power detector, and an Arduino? [Brett Killion] did make that combination and wound up with a practical network analyzer.

The project uses an Analog Devices AD9851 DDS chip clocked at 180 MHz which will output a sine wave at any frequency from 0 Hz and 72 MHz. A Butterworth low pass filter processes the DDS signal and then feeds a two-transistor amplifier. The circuit will output about 0dBm into 50 ohms. The power detector is an Analog Devices AD8307 along with a 50-ohm input load. There is no filtering on the power detector so it can measure from very low frequencies to 500MHz.

Continue reading “Arduino RF Network Analyzer”

Dual UART/I2C Breakout Goes Both Ways

[Jesus Echavarria] sent us a link to this cute little tool that he’s built. It’s a dual USB-to-I2C-or-UART adapter, with a few more oddball features thrown in for good measure. If you were electronics Batman, you’d have this on your utility belt.

[Jesus] originally designed the board because he wanted to sniff a bi-directional UART conversation using his computer, and get it all done in inexpensive hardware with minimal fuss. So he looked to the Microchip MCP2221 chip, which is an inexpensive USB to serial and I2C chip, but with some extras. In particular, it’s got four GPIOs, a ten-bit ADC and a five-bit DAC with selectable reference voltage, and it’s all controllable over USB. And [Jesus]’s board has two of them.

Implementing USB on a microcontroller isn’t always that much fun, so we can see why he took the straight-ahead hardware approach. And as a side benefit, he gets all the other kooky functionalities that the chip brings. And we have been introduced to what looks like a neat chip to use in USB and microcontroller projects. We’re going to put one in our next random chip order.