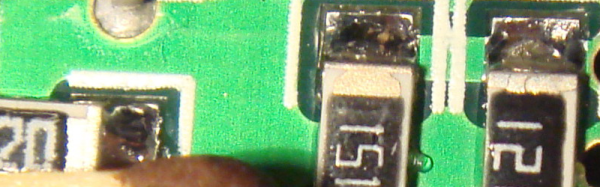
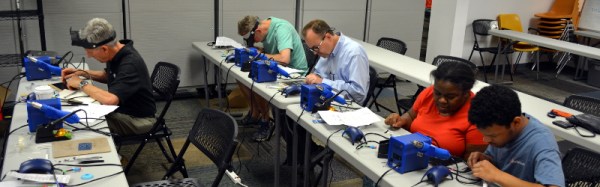
DIY Parts Tumbler Cleans Your Parts Good

Part tumbling is a method of deburring and cleaning relatively small objects. This is done by capturing the parts and media inside a rotating container. The agitation continually moves the media around all surfaces and corners of the part, smoothing them out resulting in a uniform finish. The media can be anything from specialty ceramic shapes to ball bearings to even sand. This process can be done in either a wet or dry condition. Think about the beach, the rocks there are smooth. This is due to the waves repetitively rubbing together the sand and stones which result in smooth round shapes.

[imp22b] recently got into ammo reloading and needed a way to clean his used shell casings. The casings are brass and after a little research online, [imp22b] found that a wet tumbling process with stainless steel pins for media was a DIY proven method for this casing material. He then went on to find a commercially available tumbler to model his build after, in this case a Thumler Model B. There is certainly no need to re-invent the wheel here.

As you can see in the photo, aluminum extrusion was used as the frame. Mounted to the frame are 4 pillow block bearings with shafts between each pair. A motor drives one of the bearing-mounted rods which in turn rotates a container resting on the rods. [imp22b] started with a 1/15 hp motor that he had kicking around but that wasn’t powerful enough so he did have to step up to a 1/3 hp unit. The container is made from off the shelf PVC pipe pieces and holds the media and casings along with some water. A bit of Lemon Shine and Dawn detergents are also added and help clean the parts. After a few hours of tumbling, the casings look pretty darn good.

DIY Parts Tumbler

If you’re interested making your own simpler tumbler, check out this one that uses a hand drill or this one that uses a coffee can.

R/C Wheel Loader Clears Snow, Lifts People

For some people, R/C cars just aren’t enough. [djMedic2008] has gotten his hands on a monstrous 1/5 scale wheel loader. The loader weighs in at 500lbs, and can lift up to 250 lbs. It was built several years ago as a prototype by [Richard] at Tiny Titan Earth Movers.

The design is based upon huge machines made by companies like Caterpillar and Komatsu. The 4WD system is driven a DC motor through a worm gear reduction. Bucket operation and steering are both operated by a hydraulic system driven by an electric pump. Just like the full-scale machines, the mini loader uses an articulated steering system. The front wheels are locked in place while the entire chassis bends at the middle pivot point. This allows for a much stronger solid front axle.

loader-gearAfter several years of hard life, the loader came to [djMedic] in need of some TLC. The biggest issue was that the rear axle bevel gear had lost several teeth. This gear is under enormous loads when the loader is turning. A gear made of harder steel was the easy answer. Thankfully, you can order high carbon steel bevel gears from Amazon. The repair video gives us a look at the design of the loader. The main components of the machine are welded up from steel sheet and tube stock. This means that [djMedic] won’t have a hard time finding spare parts for his machine once he puts it to work clearing snow, dirt, or anything else that gets in its way!

Click past the break to see the loader in action!

Continue reading “R/C Wheel Loader Clears Snow, Lifts People”

A New Handle For An Old Soldering Station

About 20 years ago, [Simon] spent a few week’s pay on a soldering station, a Micron W/2172. It served him well for the past few decades, but lately he hasn’t been able to find a supply of new tips for it. The Micron went into a cupboard and he upgraded to a newer Hakko soldering station.

The old Micron was still sitting in the cupboard when [Simon] realized both stations use a 24V supply for the heater, and you can buy replacement Hakko handle for a few bucks. Having two soldering stations would be handy, so [Simon] set out to convert the old Micron station to accept Hakko handles.

The only technical challenge for this modification was to figure out how the old circuit board in the Micron would read the thermistor  in the new handle. The original circuit used a dual op-amp, with one side used to amplify the thermocouple and the other to compare it to the temperature set point. After measuring the set point and a bit of Excel, [Simon] had a small circuit board that would replace the old op-amp. After that it was only a matter of wiring the new handle into the old station, calibrating the temperature settings, and enjoying the utility of two soldering stations.

Measuring The Planck Constant With Lego

For nearly 130 years, the kilogram has been defined by a small platinum and iridium cylinder sitting in a vault outside Paris. Every other unit of measurement is defined by reproducible physical phenomenon; the second is a precise number of oscillations of a cesium atom, and a meter is the length light travels in 1/299792458th of a second. Only the kilogram is defined by an actual object, until NIST and the International Committee of Weights and Measures defines it as a function of the Planck constant. How do you measure the Planck constant? With a Watt balance. How do you build a Watt balance? With Lego, of course.

A Watt balance looks like a double-armed scale where one weight can be compared to another weight of known mass. Instead of using two arms, a Watt balance only has one arm, brought into balance by a current flowing through a coil. The mechanical power in the balance – brought about by whatever is on the balance plate – can then be compared to the electrical power, and eventually the Planck constant. This will soon be part of the formal definition of the kilogram, and yes, a machine to measure this can be made out of Lego.

The only major non-Lego parts in the Lego Watt balance are a few coils of wire wound around a PVC pipe and a few neodymium magnets. These are placed on both arms of the balance, and a pair of lasers are used to make sure both arms of the balance are level. Data are collected by measuring the coils through a few analog pins on a Labjack and a Phidget. Once the voltage and current induced in each coil is measured, the Wattage can be calculated, then the Planck constant, and finally how close the mass on the balance pan is to a real, idealized kilogram. Despite being made out of Lego, this system can measure a gram mass to 1% uncertainty.

The authors have included a list of Lego parts, most of which could be found in any giant tub of Lego in an 8-year-old’s closet. The only really expensive item on the BOM is a 16-bit USB DAQ; apart from that, it’s something anyone can build.

Thanks [Matt] for the tip.

Arduino CNC Sewing Machine

Arduino Controlled Sewing Machine Increases Stitch Options

[Andrew] is bringing his old mechanical sewing machine into the 21st century by adding an Arduino control module. Originally, his Alfa sewing machine could only do a straight stitch or a zig-zag of varying widths. Since this was an old sewing machine, all of the controls were knobs and levers. RC car servos were installed in the sewing machine and now are solely responsible for controlling, in real time, the horizontal movement of the needle and the amount of stroke of the feed dogs (the metal components responsible for advancing the fabric through the sewing machine). There is also a switch on the needle bar that feeds back to the Arduino when the needle is in the full-up position.

With full control of the stitch width and fabric advance, it is possible to come up with some awesome stitch patterns that were not possible on this machine before. Each of the stitch patterns are pre-programmed in the Arduino. Right now it is possible to control the sewing machine over the Arduino’s serial USB connection but the workflow for such an operation is in its infancy. [Andrew] plans on making this sewing machine fully automatic so that he can embroider letters and numbers.

Although the project is still a work in progress, [Andrew] has made his preliminary Arduino code available for folks who want to further his accomplishments. To continue reading about hacked sewing machines, check out this one converted to an embroidering machine.

Continue reading “Arduino Controlled Sewing Machine Increases Stitch Options”

Dremel Light Ring

Light Ring Allows Precise Dremeling

Whether you are working at home, in the office or in the shop, proper lighting is pretty important. Not having proper lighting is a contributor to fatigue and visual discomforts. Prolonged straining of the eyes can result in headaches, eye twitching, blurred vision and even neck pain. [pinomelean] likes to make chemically etched PCB boards and he was having a hard time seeing while drilling those boards for the through-hole components. So, he did what any good hacker would do and came up with a solution: a light ring for his Dremel.

Yes, [pinomelean] does prefer to drill his PCB holes by hand with a Dremel. Since he was already a competent PCB board maker, he decided that it would be an appropriate method to make a light ring. The light ring itself is round with a center hole just over 0.750″ in diameter. This hole slides over the 3/4-12 threaded end that most Dremels have for attaching accessories. The stock Dremel decorative  ‘nut’ secures the light ring PCB to the tool. There are pads for 9 surface mount LEDs and through holes for a current-limiting resistor and pins to connect a power supply, which in this case is an old phone charger. In the end the project worked out great and [pinomelean] can clearly see where those holes are being drilled!

If you’re interested in making one of these light rings, [pinomelean] graciously made his board layout available in his Instructable. If you think one would go well with a soldering iron, check this out.

Trinket EDC Contest: USB Calipers

[Lou]’s entry for the Trinket EDC Contest is a great addition to the ubiquitous digital calipers found on workbenches and eBay resellers the world over. It translates the value displayed on the calipers to a USB HID interface for logging all those tricky measurements at the push of a button.

Most of the digital calipers you’ll find at Harbor Freight or on eBay are pretty much the same. There are two pads on the caliper’s PCB that give any microcontroller the ability to read what is being measured. It’s done with a 24-bit encoding scheme, where each bit is a nearly-BCD measurement in units of 1/1000 of an inch or 1/100 of a millimeter. After decoding the value, [Lou]’s trinket sends a few numbers to a computer over a USB HID interface.

Simply sending a measurement to a computer over USB wasn’t enough for [Lou]. He added three buttons to the project for typing multiple characters. The first button just sends Enter to the computer, the second sends a comma, and the third sends “/2 (Enter)”, exactly what you need to input the radius of something when measuring the diameter.

This was a project for the Trinket EDC Contest that ended a few hours ago. Nobody knows who the winner is, but there are some pretty cool prizes up for grabs including the new Rigol scope, a Fluke 179, and a soldering station.