If you’ve ever found yourself wondering how those tool magnetizer/demagnetizer gadgets worked, [Electromagnetic Videos] has produced a pretty succinct and informative video on the subject.
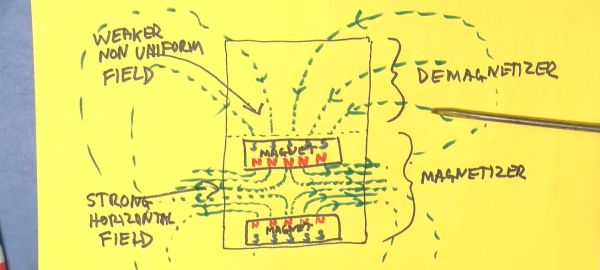
While the magnetizing step is quite straightforward and can be demonstrated even by just putting any old magnet against the screwdriver’s metal, it is the demagnetization step that doesn’t make intuitively sense, as the field lines of the magnets are supposed to align the (usually ferromagnetic) material’s magnetic dipole moments and thus create an ordered magnetic field within the screwdriver.
This is only part of the story, however, as the magnetic field outside of a magnet is termed the demagnetizing field (also ‘stray field’). A property of this field is that it acts upon the magnetization of e.g. ferromagnetic material in a way that reduces its magnetic moment, effectively ‘scrambling’ any existing magnetization.
By repeatedly moving a metal tool through this stray field, each time further and further away from the magnet, the magnetic moment reduces until any magnetization has effectively vanished. It is the kind of simple demonstration of magnetism that really should be part of any physics class thanks to its myriad of real-world uses, as this one toolbox gadget shows.
Continue reading “Tool Demagnetizers And The Magnetic Stray Field”