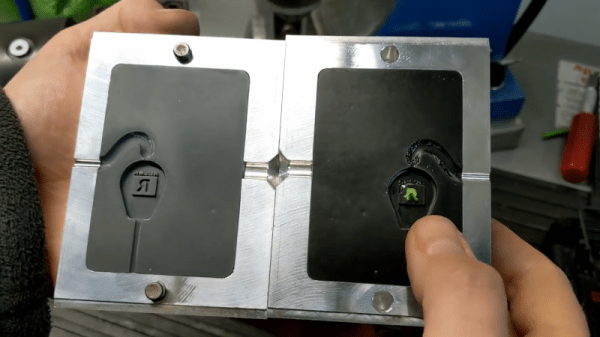
The HP3458A: King Of Multimeters For Three Decades

[Marco] looks at a lot of meters. However, he considers the HP3458A the best even though they were introduced more than 30 years earlier in 1989. Someone donated one to [Marco] but it presented some error messages on startup and exhibited erratic behavior, so he had some repairs to do.

The error codes hinted there were issues with the multislope analog to digital converter and that’s what sets the meter apart, according to [Marco]. The meter has 8.5 digits, so a normal conversion stage won’t cut it.

Continue reading “The HP3458A: King Of Multimeters For Three Decades”

caliper jaw tools

Printable Caliper Jaws Increase Precision, Deflect Derision

If you’ve watched as many machining videos as we have, no doubt you’ve seen someone commit the cardinal sin of metalworking: using caliper jaws to scratch a mark into metal. Even if it’s a cheap Harbor Freight caliper rather than an expensive Starrett or Mitutoyo tool being abused, derision and scorn predictably rain down upon the hapless sinner’s head.

The criticism is not without its merit, of course. Recognizing this, [Nelson Stoldt] came up with these clamp-on nosepieces designed to turn calipers into a better marking tool. Using stock calipers as marking gauges always introduces some error, since the jaws are equal lengths and thus have to be held at a slight angle to the workpiece in order to make a mark. The caliper jaws correct for this admittedly negligible error by extending one jaw, allowing it to ride on a reference face while the other jaw remains perpendicular to the workpiece. As a bonus, the short jaw has a slot to mount a steel marking knife, saving the caliper jaws from damage.

[Nelson] chose to 3D-print his caliper jaws, but they could just as easily be milled from solid stock to make them a little more durable. Then again, you could always 3D-print the calipers in the first place, and integrate these jaws right into them.

Vise Tripod Lets You Put The Tool Where You Need It

Vises are useful things for holding whatever you’re working on, but too often they’re stuck to a bench. [seamster] has experienced the glory of having a more portable solution, however, and has shared his design for a heavy duty vise tripod that provides just that.

The trick is that to be useful, the design must be heavy and stout enough to hold the vise without tipping over. For this build, [seamster] selected a fat steel pipe with 1/4″ thick walls, some solid bars and some 3/8″ thick plate. Legs and arms where then fabbed up from the bar material and welded up to form the tripod. A stout plate for the vise was then welded on top of the pipe, and the vise mounted pride of place on top.

It’s not a particularly difficult build, but it’s a smart idea that gets you a vise you can easily drag to where it’s needed. If you don’t have the vise itself, consider this hydraulic build. Meanwhile, if you’ve been whipping up your own useful workshop hacks, let us know!

parser drill

Machining Wood Inlays, No CNC Required

It’s almost hard to remember a time when the obvious answer to most questions about manufacturing wasn’t “Throw it on the CNC.” CNC machines have become so entrenched that the acronym has become a verb; few people would misunderstand a statement like “Let’s just CNC that.”

But before CNC machines became so ubiquitous, there were plenty of clever tricks for cutting material in a controlled fashion, as [Pask] shows us with this tool to machine wood for inlays. The tool is called a parser (or passer) drill, and is designed for use in conjunction with a steel template. [Pask]’s version seems pretty easy to make; a pair of mild steel bars are forged flat into spade shapes before having a cutting surface ground into them. The two halves of the drill are welded together and ground down to fit in the chuck of a hand drill, a modern nod to the fact that few people will want to use the traditional bow and breastplate that drove the original parser drills.

In use, a steel template that determines the shape of the inlay is affixed to the workpiece. The cutting edges of the bits are plunged into the template cutout to machine out the wood; the overhangs of the bits act as depth stop and guide. It only takes a few seconds to make a neat, CNC-free inlay. The video below shows the tool being made and in action.

It’s nice to see what can be accomplished without the need for fancy CNC machines. Not that we have anything against them, of course, but when the same results can be had with some scraps of steel and a little ingenuity, it’s pretty impressive. Looking for something between manual tools and CNC for woodworking? The pantorouter might be just your speed.

Continue reading “Machining Wood Inlays, No CNC Required”

Jet tools air scrubber

It’s A Hack: Air Scrubber Controlled Using The Room Lighting

Some products just seem to be designed to be annoying. [hardmar] discovered the air filtration system installed in his son’s basement woodshop was orientated for the best airflow, but rather poorly positioned to actually turning the thing on and off. For some reason the unit has its single line-of-sight IR receiver on one side, which when mounted in some positions, forces the user to be the completely wrong position to use the supplied remote.

We find it a little unhelpful sometimes that devices specifically designed to be mounted with varying orientations don’t come fitted with IR receivers in different locations to ensure good controllability. It would get annoying really fast to have to contort oneself into some specific position just to turn something on, and some people just might not bother at all.

Proper control of dust is paramount for continued good health, and essential in any workspace or shared area. When you work wood, it produces a lot of dust. It cannot be avoided and gets into everything, your lungs included. PPE is not enough.  Even in your own shop you still really should manage dust production as best you can. Options are varied from centralised extraction, per machine solutions, and often augmented with air scrubbers mounted on the ceiling to grab those fine particulates.

Instead of solving the IR placement issue, [hardmar] wanted to have the unit tied to the lighting system so that it would power on as soon as someone turned on the appropriate light and would then stay on for a fixed amount of time after the user left in order to continue scrubbing the air some more. His simple hack was to first record and analyse the IR protocol used by the remote, and program an Arduino to be able to send it on/off commands. Next, he hooked up a phototransistor aimed at the light, in order to provide the necessary ‘user present’ trigger to tell the Arduino when to activate the scrubber. Super simple and effective. We love this non-invasive approach of adapting off-the-shelf equipment to our specific requirements, without even showing it a screwdriver.

As [hardmar] admits, the hack is not elegantly implemented, it’s just enough to make it work, and that’s just fine, sometimes you just have a job to do and no more.

IBM Cheese Cutter Restoration

For a while now, Mac Pro towers have had the nickname “cheese grater” because of their superficial resemblance to this kitchen appliance. Apple has only been a company since the 70s, though, and is much newer than one of its historic rivals, IBM. In fact, IBM is old enough to have made actual cheese-related computers as far back as the 1910s, and [Hand Tool Rescue] recently obtained one of these antique machines for a complete restoration.

The tool arrived to the restoration workshop in a state so poor that it was difficult to tell what many of the parts on the machine did except for the large cleaver at the top. The build starts with a teardown to its individual parts, cleaning and restoring them to their original luster, machining new ones where needed, and then putting it all back together. The real mystery of this build was what the levers on the underside of the machine were supposed to do, but after the refurbishment it was discovered that these are the way that portions the cheese wheel would be accurately sized and priced before a cut was made.

By placing a section of a wheel of cheese on the machine and inputting its original weight with one of the levers, the second lever is adjusted to the weight of cheese that the customer requested, which rotates the wheel of cheese to the correct position before a cut is made. To us who are spoiled with a world full of electronic devices, a mechanical computer like this seems almost magical, especially with how accurate it is, but if your business in the 1910s involved cheese, this would have been quite normal. In fact, it would be 50 more years before IBM created the machines that they’re more commonly known for.

Thanks to [Jasper Jans] for the tip!

Continue reading “IBM Cheese Cutter Restoration”

Handheld Bandsaw Gets Standup Conversion With Scrap Lumber

Handheld band saws exist, and can be highly useful tools. However, they lack some of the finesse and precision of the more traditional upright units, particularly for with smaller workpieces. [Honus] set about rectifying this, building a stand for their DeWalt handheld bandsaw out of scrap lumber.

The stand consists of some hefty wooden beams sawn to length and screwed together to make a support for the bandsaw. A nice 1/4″ thick aluminium plate is installed as a baseplate for cutting.

Then, the handheld bandsaw itself is attached to the rig, held in place with a bolt and a large zip tie. The zip tie is fastened around the trigger, holding it down all the time. Then, a switched powerboard is used to turn the saw on and off as needed. Importantly, simply cutting a ziptie and removing a bolt is enough to restore the handheld saw to its original purpose.

It’s a tidy build and one that makes an existing tool more useful for minimal extra cost. We’ve actually seen bandsaws built from scratch, too. If you’re cooking up your own great hacks in the home shop, be sure to let us know!