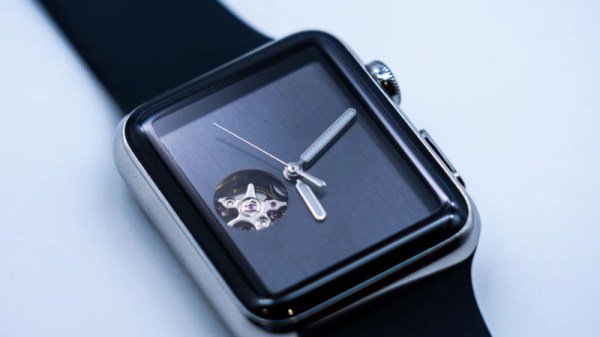
Respiratory rate measuring device attached to volunteer's abdomen along with automated antidote injection system

Researchers Use Wearable To Detect And Reverse Opioid Overdoses In Real-Time

Opioid overdose-related deaths have unfortunately been increasing over the last few decades, with the COVID-19 pandemic exacerbating this public health crisis even further. As a result, many scientists, healthcare professionals, and government officials have been working tirelessly to end this deadly epidemic. Researchers at the University of Washington are one such group and have recently unveiled a wearable to both detect opioid overdose and deliver an antidote, in real-time, restoring normal bodily function.

As the researchers describe in their paper, opioid overdose causes respiratory rate depression which will lead to hypoxia (insufficient oxygen in the blood) and ultimately death. Fortunately, opioid overdose can be readily reversed using naloxone, a compound that binds to receptors in the brain, outcompeting the opiates themselves, and restoring normal breathing. Unfortunately, if someone is overdosing, they are unable to self-administer the antidote and with many opioid overdoses occurring when the victim is alone (51.8%), it is necessary to develop an automated system to deliver the antidote when an overdose is detected.

The researchers begin by describing their process for measuring respiration, of which there are several options. You could use photoplethysmography in much of the same way we measure heart rate. Or you could measure the changing impedance of the chest cavity during breathing or even use an intraoral sensor that measures airflow in the mouth. Instead, the researchers opt to measure respiration by attaching accelerometers to the patient’s abdomen and measuring the movement of the abdominal cavity during breathing. They admit their technique becomes problematic when the patient is not stationary, but argue that in the case of a drug overdose, the patient is likely to be immobilized and the device would be able to measure respiration with ease. They tested their device across dozens of healthy, human volunteers, and even some opiate users themselves, and showed their technique had good agreement with a reference respiratory belt placed around the volunteers’ chests.

The cool part about this paper is that they demonstrated a “closed-loop” feedback system in which their device measured respiration, detected cessation in breathing (indicating an overdose), and delivered the antidote. To deliver naloxone, they leveraged an existing, commercially-available drug delivery system that requires a user to manually activate the device by pressing a button. They hacked the device a bit such that the trigger could be actuated using a servo motor properly positioned to depress the button when an opioid overdose is detected. They simulated an overdose by asking the healthy, human volunteers to hold their breath for a period greater than 15 seconds. They were able to successfully deliver the antidote to 100% of their volunteer group, indicating the device could potentially work in real-world settings.

Now, the form factor of the device undoubtedly needs to improve in order to deploy this device into the field, but we imagine those are improvements are underway and patients have shown willingness to wear such devices already. Also, there’s still a bit of a question of whether or not accelerometer-based breathing detection is optimal since some drug overdoses cause seizures. Nevertheless, this is an important step in combating the alarming rise in opioid overdose-related deaths and we hope to see many more advances in patient monitoring technologies in this field.

PiGlass V2 Embraces The New Raspberry Pi Zero 2

Well, that certainly didn’t take long. It’s been just about a month since the Raspberry Pi Zero 2 hit the market, and we’re already seeing folks revisit old projects to reap the benefits of the drop-in upgrade that provides five times the computational power in the same form factor.

Take for example the PiGlass v2 that [Matt] has been working on. He originally put the Pi Zero wearable together back in 2018, and while it featured plenty of bells and whistles like a VuFine+ display, 5 MP camera, and bone conduction audio, the rather anemic hardware of the original Zero kept it from reaching its true potential.

But thanks to the newly released Pi Zero 2, slapping quad-core power onto the existing rig was as easy as unplugging a couple cables and swapping out the board. With the increased performance of the new Pi, he’s able to play multimedia content through Kodi, emulate classic games with RetroPie, and even stream live video to YouTube. Using the custom menu seen in the video below, a small off-the-shelf Bluetooth controller from 8BitDo is all he needs to control the wearable’s various functions without getting bogged down with a full keyboard and mouse.

Although it might not have the punch of its larger siblings, the new Pi Zero 2 is definitely a very exciting platform. The highly efficient board delivers performance on par with the old Pi 3, while still being well positioned for battery powered projects like this one. We’re eager to see what develops as the new SBC finds its way into the hands of more hackers and makers in the coming months.

Continue reading “PiGlass V2 Embraces The New Raspberry Pi Zero 2”

This beaded QR code tells a story when scanned.

Beaded QR Code Bracelets Weave A Storytelling Interface

For centuries, people have been using patterns to communicate information in an eye-catching way. QR codes are no different, although they require a barcode scanner to decode rather than a knowledge of Navajo Native American history.

November is National Native American Heritage Month, and as part of their celebration, [ngaskins] and their students are making seed bead bracelets with QR codes. When scanned, each QR triggers a story written by the student in the form of an audio file, a video clip, or an animation. [ngaskins] says that this project was inspired by eyeDazzler, a beadwork tapestry made with software that generates Navajo weaving patterns.

The students started by designing their bracelets on graph paper, software, or a virtual loom before getting the seed beads and the tweezers out, and decided whether they would use a static or dynamic QR code. Aside from the aesthetics of beadwork, the bead loom is good for teaching math and computational ideas because the beads are laid out in rows and columns. It’s also a good tool for teaching lines of symmetry.

QR codes can hold quite a bit of information. In fact, there’s enough room in a version 40 QR for an executable version of Snake.

UV sensing amulet

Tiny Talisman Warns Wearer About UV Exposure

Given how important our Sun is, our ancestors can be forgiven for seeing it as a god. And even now that we know what it actually is and how it works, it’s not much of a reach to think that the Sun pours forth evil spirits that can visit disease and death on those who bask too long in its rays. So an amulet of protection against the evil UV rays is a totally reasonable project, right?

As is often the case with [mitxela]’s projects, especially the more bedazzled ones, this one is approximately equal parts electronics and fine metalworking. The bulk of the video below focuses on the metalwork, which is pretty fascinating stuff. The case for the amulet was made from brass and sized to fit a CR2032 coin cell. The back of the amulet is threaded to act as a battery cover, and some fancy lathe work was needed there. The case was also electroplated in gold to prevent tarnishing, and lends a nice look when paired up with the black solder mask of the PCB.

On the electronics side, [mitxela] took pains to keep battery drain as low as possible and to make the best use of the available space, choosing an ATtiny84 to support a TTP223 capacitive sensing chip and a VEML6075 UV sensor. The touch sensor allows the wearer to wake the amulet and cycles through UV modes, which [mitxela] learned were not exactly what the sensor datasheet said they were. This required a few software hacks, but in the end, the amulet does a decent job of reporting the UV index and looks fantastic while doing it.

Continue reading “Tiny Talisman Warns Wearer About UV Exposure”

This Smart Watch Keeps An Eye On Ambient CO2 Levels

Human respiration takes in oxygen and in turn, we exhale carbon dioxide. Thus, an uptick of carbon dioxide levels around us can indicate we’re in the presence of other humans, and also, perhaps, the pathogens they carry. To explore this phenomenon, [C Scott Ananian] developed a mod for the Watchy open-source smartwatch, which lets it detect carbon dioxide.

The idea behind the build is simple. If you’re around increased CO2 levels, it may be because you’re surrounded by people, and thus more likely to be exposed to COVID-19. To detect CO2, the watch relies on a Sensiron SCD40 or SCD41 sensor. This is read by the Watchy’s ESP32 microcontroller, and results are graphed on the watch’s e-Paper display. The Watchy is also given a nice new aluminum case to fit the additional hardware.

It’s cool having a graph on your wrist of the ambient concentration of CO2, and at the very least, it could make a good talking point next time you’re at a particularly boring party. You’ll also be more than ready to advise other partygoers if the carbon dioxide level is reaching dangerous levels.

We’ve seen similar builds before, which are useful not only for pandemic safety but also for monitoring if you have any leaks from CO2 storage in the house. If you’ve been working on your own ways to track dangerous gases, be sure to drop us a line!

Several frames from Bad Apple

PineTime Smartwatch And Good Code Play Bad Apple

PineTime is the open smartwatch from our friends at Pine64. [TT-392] wanted to prove the hardware can play a full-motion music video, and they are correct, to a point. When you watch the video below, you should notice the monochromatic animation maintaining a healthy framerate, and there lies all the hard work. Without any modifications, video would top out at approximately eight frames per second.

To convert an MP4, you need to break it down into images, which will strip out the sound. Next, you load them into the Linux-only video processor, which looks for clusters of pixels that need changing and ignores the static ones. Relevant pixel selection takes some of the load off the data running to the display and boosts the fps since you don’t waste time reminding it that a block of black pixels should stay the way they are. Lastly, the process will compress everything to fit it into the watch’s onboard memory. Even though it is a few minutes of black and white pictures, compiling can take a couple of hours.

You will need access to the watch’s innards, so hopefully, you have the developer kit or don’t mind cracking the seal. Who are we kidding, you aren’t here for intact warranties. The video resides in the flash chip and you have to transfer blocks one at a time. Bad Apple needs fourteen, so you may want to practice on a shorter video. Lastly, the core memory needs some updating to play correctly. Now you can sit back and…watch.

Pine64 had a rough start with the single-board computers, but they’re earning our trust with things like soldering irons and Google-less Linux mobile phones.

Continue reading “PineTime Smartwatch And Good Code Play Bad Apple”

Several shirts side by side, each with a custom design

3D Print A Custom T-Shirt Design, Step-by-Step

Want to make a t-shirt with a custom design printed on it? It’s possible to use a 3D printer, and Prusa Research have a well-documented blog post and video detailing two different ways to use 3D printing to create colorful t-shirt designs. One method uses a thin 3D print as an iron-on, the other prints directly onto the fabric. It turns out that a very thin PLA print makes a dandy iron-on that can survive a few washes before peeling, but printing flexible filament directly onto the fabric — while more complicated — yields a much more permanent result. Not sure how to turn a graphic into a 3D printable model in the first place? No problem, they cover that as well.

Making an iron-on is fairly straightforward, and the method can be adapted to just about any printer type. One simply secures a sheet of baking paper (better known as parchment paper in North America) to the print bed with some binder clips, then applies glue stick so that the print can adhere. A one- or two-layer thick 3D print will stick to the sheet, which can then be laid print-side down onto a t-shirt and transferred to the fabric by ironing it at maximum temperature. PLA seems to work best for iron-ons, as it preserves details better. The results look good, and the method is fairly simple.

Direct printing to the fabric with flexible filament can yield much better (and more permanent) results, but the process is more involved and requires 3D printing a raised bed adapter for a Prusa printer, and fiddling quite a few print settings. But the results speak for themselves: printed designs look sharp and won’t come loose even after multiple washings. So be certain to have a few old shirts around for practice, because mistakes can’t be undone.

That 3D printers can be used to embed designs directly onto fabric is something many have known for years, but it’s always nice to see a process not just demonstrated as a concept, but documented as a step-by-step workflow. A video demonstration of everything, from turning a graphic into a 3D model to printing on a t-shirt with both methods is all in the short video embedded below, so give it a watch.

Continue reading “3D Print A Custom T-Shirt Design, Step-by-Step”