Snapshot of topology analysis

Designing PLA To Hold Over A Metric Ton

There’s never been such a thing as being “too competitive” when it comes to competition. This is something that [Tom Stanton] from “Tim Station”, [Tom]’s 2nd channel, took to heart for Polymaker’s 3D design challenge. The goal was simple: a single 3D printed part to hold as much weight as possible.

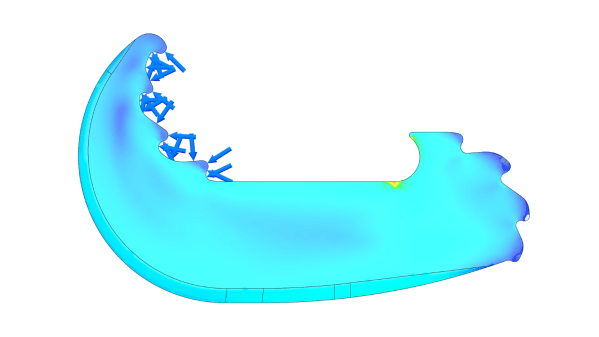
While seemingly simple, when considering the requirements, including a single print in addition to being able to open up for the mounts, the challenge gets exponentially more complicated. While the simplest and strongest joint would be a simple oval for uniform stress, this isn’t possible when considering the opening requirements. This creates a need for slightly more creativity.

[Tom] starts out with two flat C-shaped geometries to test his design. The design includes teeth specially placed to allow the forces to increase their own strength as force is applied. Flat features have the unfortunate quality of being able to slide across each other rather easily, which was the case during testing; however, the actual structures held up rather well. Moving onto the final design, including a hollow cavity and a much thicker depth, showed good promise early on in the competition, leading up to the finals. In fact, the design won out over anything else, getting over double the max strength of the runner up. Over an entire metric ton, the piece of plastic proved its abilities far past anything us here at Hackaday would expect from a small piece of PLA.

Design can be an absolute rabbit hole when it comes to even the simplest of things, as shown with this competition. [Tom] clearly showed some personal passion for this project; however, if you haven’t had the chance to dive this deep into CADing, keep sure to try out something like TinkerCAD to get your feet wet. TinkerCAD started out simple as can be but has exploded into quite the formidable suite!

Continue reading “Designing PLA To Hold Over A Metric Ton”

Rare Filament Makes Weird Benchies

[Zack], in addition to being a snappy dresser, has a thing for strange 3D printing filament. How strange? Well, in a recent video, he looks at filaments that require 445 C. Even the build plate has to be super hot. He also looks at filament that seems like iron, one that makes you think it is rubber, and a bunch of others.

As you might expect, he’s not using a conventional 3D printer. Although you might be able to get your more conventional printer to handle some of these, especially with some hacking. There is filament with carbon fiber, glass fiber, and more exotic add-ons.

Most of the filaments need special code to get everything working. While you might think you can’t print these engineering filaments, it stands to reason that hobby-grade printers are going to get better over time (as they already have). If the day is coming when folks will be able to print any of these on their out-of-the-box printer, we might as well start researching them now.

If you fancy a drinking game, have a shot every time he changes shots and a double when the Hackaday Prize T-shirt shows up.

Continue reading “Rare Filament Makes Weird Benchies”

Casting Metal Tools With Kitchen Appliances

Perhaps the biggest hurdle to starting a home blacksmithing operating is the forge. There’s really no way around having a forge; somehow the metal has to get hot enough to work. Although we might be imagining huge charcoal- or gas-fired monstrosities, [Shake the Future] has figured out how to use an unmodified, standard microwave oven to get iron hot enough to melt and is using it in his latest video to cast real, working tools with it. (Also available to view on Reddit)

In the past, [Shake the Future] has made a few other things with this setup like an aluminum pencil with a graphite core. This time, though, he’s stepping up the complexity a bit with a working tool. He’s decided to build a miniature bench vice, which uses a screw to move the jaws. He didn’t cast the screw, instead using a standard size screw and nut, but did cast the two other parts of the vice. He first 3D prints the parts in order to make a mold that will withstand the high temperatures of the molten metal. With the mold made he can heat up the iron in the microwave and then pour it, and then with some finish work he has a working tool on his hands.

A microwave isn’t the only kitchen appliance [Shake the Future] has repurposed for his small metalworking shop. He also uses a standard air fryer in order to dry parts quickly. He works almost entirely from the balcony of his apartment so he needs to keep his neighbors in mind while working, and occasionally goes to a nearby parking garage when he has to do something noisy. It’s impressive to see what can be built in such a small space, though. For some of his other work be sure to check out how he makes the crucibles meant for his microwave.

Continue reading “Casting Metal Tools With Kitchen Appliances”

Small camera with greyscale image

Camera Capabilities Unlocked From A Mouse

There is a point where taking technology for granted hides some of the incredible capabilities of seemingly simple devices. Optical mice are a great example of this principle, using what are more or less entirely self-contained cameras just for moving the cursor across your screen. Don’t believe us? Check out this camera made from an old optical mouse from [Dycus]!

For those unfamiliar with optical mice, the sensor used for tracking movement, like a camera, is just an array of photosensitive sensors. This allows a simple on-board microcontroller to convert the small changes from the visual sensor into acceleration/movement information to be sent to the computer.

Proving how capable these sensors can truly be, [Dycus]’s camera manages a whole 30×30 array of picture quality. Along with glorious greyscale, the pictures achieved from such a camera are more than recognizable. Putting together the camera didn’t even require anything crazy beyond the sensor itself. What appears to be a Teensy LC board, basic buttons, and a small screen are essentially everything required to replicate the camera’s functionality. Pictures, both standard and “panoramic”, can be viewed in a variety of color palettes stored on board. Along with a surprisingly impressive feature set, the idea is impressive.

Limitations are often the mother of innovation, no matter if self-imposed or not, as seen here. However, [Dycus] still had a whole 30×30 array to photograph. What about a single pixel? Let’s make it even harder; we can’t look directly at the subject! This is exactly what was done here in this impressive demonstration of clever engineering.

Thanks to JohnU and Thinkerer for the tip!

Print in place pump being used next to ladder

Print In Place Pump Pushes Limits Of Printing

3D printing has taken off into the hands of almost anyone with a knack for wanting something quick and easy. No more messing around with machining or complex assembly. However, with the general hands-off nature of most 3D prints, what could be possible with a little more intervention during the printing process? [Ben] from Designed to Make represents this perfectly with an entire centrifugal pump printed all at once.

This project may not entirely fit into the most strict sense of “print in place”; however, the entire pump is printed as one print file. The catch is the steps taken during printing, where a bearing is placed and a couple of filament changes are made to allow dissolvable supports to be printed. Once these supports are dissolved away, the body is coated with epoxy to prevent any leakage.

Testing done by [Ben] showed more than impressive numbers from the experimental device. Compared to previous designs made to test impeller features, the all in one pump could stand its own against in most categories.

One of the greatest parts of the open source 3D printing world is the absolute freedom and ingenuity that comes out of it, and this project is no exception. For more innovations, check out this DIY full color 3D printing!

Continue reading “Print In Place Pump Pushes Limits Of Printing”

DIY Pinball Machine Uses Every Skill

Pinball machines have something for everyone. They’re engaging, fast-paced games available in a variety of sizes and difficulties, and legend has it that they can be played even while deaf and blind. Wizardry aside, pinball machines have a lot to offer those of us around here as well, as they’re a complex mix of analog and digital components, games, computers, and artistry. [Daniele Tartaglia] is showing off every one of his skills to build a tabletop pinball machine completely from the ground up.

Continue reading “DIY Pinball Machine Uses Every Skill”

CoreXY 3D Printer Has A Scissor-Lift Z-axis So It Folds Down!

We don’t know about you, but one of the biggest hassles of having a 3D printer at home or in the ‘shop is the space it takes up. Wouldn’t it be useful if you could fold it down? Well, you’re in luck because over on Hackaday.io, that’s precisely what [Malte Schrader] has achieved with their Portable CoreXY 3D printer.

The typical CoreXY design you find in the wild features a moving bed that starts at the top and moves downwards away from the XY gantry as the print progresses. The CoreXY kinematics take care of positioning the hotend in the XY plane with a pair of motors and some cunning pulley drives. Go check this out if you want to read more about that. Anyway, in this case, the bed is fixed to the base with a 3-point kinematic mount (to allow the hot end to be trammed) but is otherwise vertically immobile. That bed is AC-heated, allowing for a much smaller power supply to be fitted and reducing the annoying cooling fan noise that’s all too common with high-power bed heaters.

Both ends of the cable bundle are pivoted so it can fold flat inside the frame!

The XY gantry is mounted at each end on a pair of scissor lift mechanisms, which are belt-driven and geared together from a single stepper motor paired with a reduction gearbox. This hopefully will resolve any issues with X-axis tilting that [Malte] reports from a previous version.

The coarse tramming is handled by the bed mounts, with a hotend-mounted BLTouch further dialling it in and compensating for any bed distortion measured immediately before printing. Simple and effective.

As will be clear from the video below, the folding for storage is a natural consequence of the Z-axis mechanism, which we reckon is pretty elegant and well executed—check out those custom CNC machine Aluminium parts! When the Z-axis is folded flat for storage, the hotend part of the Bowden tube feed is mounted to a pivot, allowing it to fold down as well. They even added a pivot to the other end of the cable bundle / Bowden feed so the whole bundle folds down neatly inside the frame. Nice job!

If you want a little more detail about CoreXY kinematics, check out our handy guide. But what about the H-Bot we hear you ask? Fear not, we’re on it.