A Little IoT For Your PID Tea Kettle

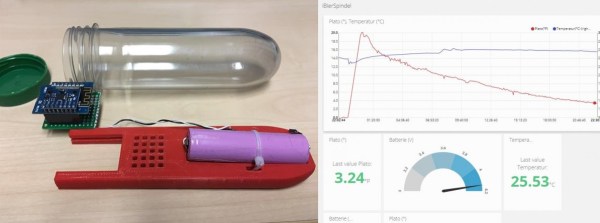
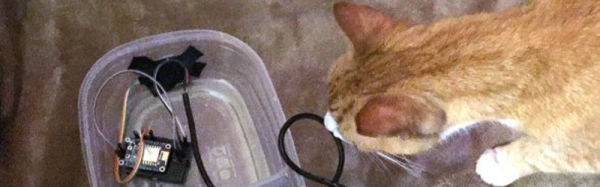
For some folks, tea is a simple pleasure – boil water, steep tea, enjoy. There are those for whom tea is a sacred ritual, though, and the precise temperature control they demand requires only the finest in water heating technology. And then there are those who take things even further by making a PID-controlled electric tea kettle an IoT device with Amazon Echo integration.

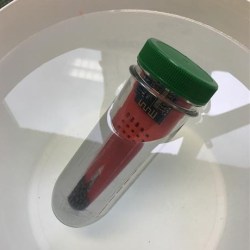
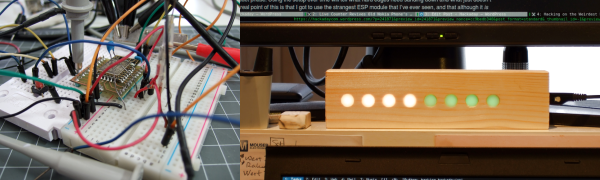
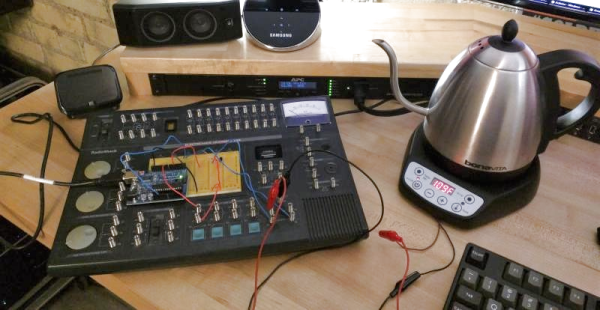
Nothing worth doing isn’t worth overdoing, and [luma] scores points for that. Extra points too for prototyping an early iteration of his design on a RadioShack Electronics Learning Lab – the one with a manual written by Forrest Mims. [luma] started out using an Arduino with a Zigbee shield but realized the resulting circuit would have to live in an external enclosure. Switching to an ESP8266, the whole package – including optoisolators, relays, and a small wall-wart – is small enough to fit inside the kettle’s base. The end result is an MQTT device that publishes its status to his SmartThings home automation system, and now responds when he tells Alexa it’s time for tea.

Projects that hack the means of caffeine are no strangers to Hackaday, whether your preferred vector is tea, coffee, or even straight up.

Continue reading “A Little IoT For Your PID Tea Kettle”

Wake Up! The Cat Came Back!

In order to get the most out of the batteries connected to your microcontroller, you’ll probably need to put it to sleep, the deeper the better. [Rgrokett] was curious about the nighttime habits of his cat, and came up with a nice little hack to get more battery life out of the ESP8266 that he was using.

[rgrokett]’s cat enters and leaves through a cat-door. He figured a PIR sensor would let him know when there was movement around the door. He could then tell if the cat was around. Leaving the PIR sensor and the ESP8266 microcontroller (an Adafruit Huzzah) on all the time drained the batteries pretty quickly, so [rgrokett] decided to try putting the Huzzah to sleep.

The trick in this build is that the PIR sensor is used to reset the Huzzah when it triggers. The Huzzah requires the reset switch to go from high to low, but the PIR trigger goes from low to high, so a transistor is used to invert the PIR sensor’s trigger signal. When the Huzzah wakes up, it connects to the WiFi network and sends [rgrokett] an email via IFTTT ([rgrokett]’s description goes over the steps to set up a secure connection to IFTTT.)

It’s a pretty simple hack, but it increases [rgrokett] system’s battery life from a couple of days to more than a month (he’s still waiting to see how long they’ll last) and all that was needed was the microcontroller, the sensor and a couple of parts. We have a couple of older hacks about putting the ESP modules into deep sleep, such as this one, and check out this tutorial on PIR sensors.

See The Weather At A Glance With This WiFi Wall Mounted Display

Whether you’re lodged in an apartment with a poor view of the sky like [Becky Stern] or are looking for an at-a-glance report of the current weather, you might consider this minimalist weather display instead of checking your computer or your phone every time you’re headed out the door.

The first order of business was to set up her Feather Huzzah ESP8266 module. [Becky] started with a blink test to ensure it was working properly. Once that was out of the way, she moved on to installing a few libraries. Temperature data fetched by an IFTTT feed is displayed on a seven-segment display, while additional feeds separately retrieve information for each basic weather type: sunny, overcast, rain, snow.

All it took to create the sleek display effect was a few pieces of cardboard inside a shadow box frame, a sheet of paper as a diffuser, and twelve Neopixel RGB LEDs hidden inside. Trimming and securing everything in place as well as notching out the back of the frame for the power cable finished the assembly. Check out the build video after the break.

Continue reading “See The Weather At A Glance With This WiFi Wall Mounted Display”

WiFi Power Bar!

Ever wanted to access a file or run some program on your computer while away from home, but the darned thing is turned off? Finding themselves occasionally working away from home and not wanting to leave their computer on for extended periods, [robotmaker]’s solution was to hack into existence a WiFi-controlled power bar!

esp8266-powerbar-thumb
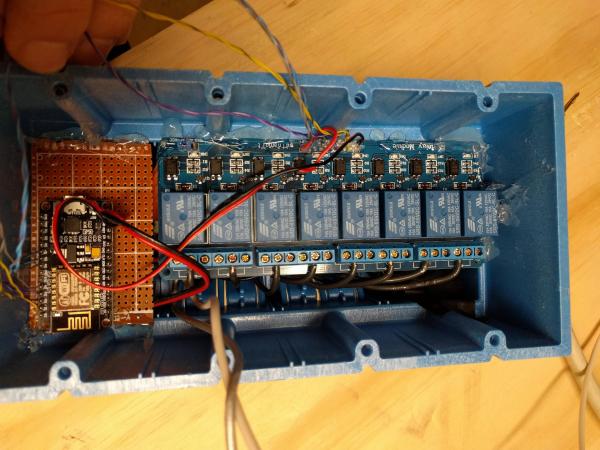
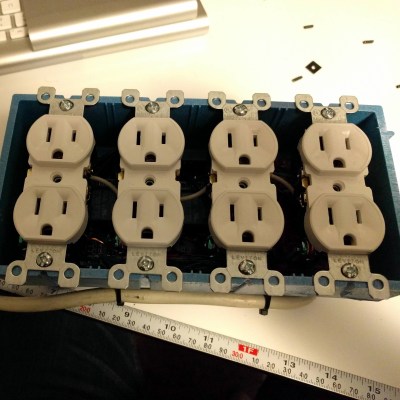
Inside the junction box, an eight-channel relay is connected to an ESP8266 module. The module uses MQTT to communicate with Home Assistant and is powered by a partially dismembered USB AC adapter — wrapped in kapon tape for safe-keeping. The entire bar is wired through a 10A fuse, while also using a fire resistant 4-gang electrical box. Once the outlets were wired in, closing it up finished up the power bar.

[robotmaker] controls the outlets via a cheap smartphone — running HADashboard — mounted to a wall with a 3D printed support. Don’t worry — they’ve set up the system to wait for the PCs to power down before cutting power, and the are also configured to boot up when the relay turns on.

The best part — the power bar only cost $25.

[via /r/homeautomation]

IoT Device Pulls Its Weight In Home Brewing

floating-square
The iSpindel floating in a test solution.

Brewing beer or making wine at home isn’t complicated but it does require an attention to detail and a willingness to measure and sanitize things multiple times, particularly when tracking the progress of fermentation. This job has gotten easier thanks to the iSpindel project; an ESP8266 based IoT device intended as a DIY alternative to a costly commercial solution.

Hydrometer [Source: grapestompers.com]

Tracking fermentation normally involves a simple yet critical piece of equipment called a hydrometer (shown left), which measures the specific gravity or relative density of a liquid. A hydrometer is used by winemakers and brewers to determine how much sugar remains in a solution, therefore indicating the progress of the fermentation process. Using a hydrometer involves first sanitizing all equipment. Then a sample is taken from the fermenting liquid, put into a tall receptacle, the hydrometer inserted and the result recorded. Then the sample is returned and everything is cleaned. [Editor (and brewer)’s note: The sample is not returned. It’s got all manner of bacteria on/in it. Throw those 20 ml away!] This process is repeated multiple times, sometimes daily. Every time the batch is opened also increases the risk of contamination. Continue reading “IoT Device Pulls Its Weight In Home Brewing”

ESP8266 BASIC Sets Up A Web Remote In No Time

One of the sticking points for us with our own Internet of Things is, ironically, the Internet part. We build hardware happily, but when it comes time to code up web frontends to drive it all, the thrill is gone and the project is only half-done.

Including some simple web-based scripting functionality along with the microcontroller basics is one of the cleverest tricks up ESP8266 BASIC’s sleeves. BASIC author [mmiscool] puts it to good use in this short demo: a complete learning IR remote control that’s driven through a web interface, written in just a few lines of BASIC.

Note that everything happens inside the ESP8266 here, from hosting the web page to interpreting and then blinking back out the IR LED codes to control the remote. This is a sophisticated “hello world”, the bare minimum to get you started. The interface could look slicker and the IR remote could increase its range with more current to the LED, but that would involve adding a transistor and some resistors, doubling the parts count.

For something like $10 in parts, though, this is a fun introduction to the ESP and BASIC. Other examples are simpler, but we think that this project has an awesome/effort ratio that’s hard to beat.

Hacking On The Weirdest ESP Module

Sometimes I see a component that’s bizarre enough that I buy it just to see if I can actually do something with it. That’s the case with today’s example, the ESP-14. At first glance, you’d ask yourself what AI Thinker, the maker of many of the more popular ESP8266 modules, was thinking.

The ESP-14 takes the phenomenally powerful ESP8266 chip and buries it underneath one of the cheapest microcontrollers around: the 8-bit STM8S003 “value line” chip. Almost all of the pins of the ESP chip are locked inside the RF cage’s metal tomb — only the power, bootloader, and serial TX/RX pins see the light of day, and the TX/RX pins are shared with the STM8S. The rest of the module’s pins are dedicated to the STM8S. Slaving the ESP8266 to an STM8S is like taking a Ferrari and wrapping it inside a VW Beetle.

I had never touched an STM8 chip before, and just wanted to see what I could do with this strange beast. In the end, ironically, I ended up doing something that wouldn’t be too far out of place on Alibaba, but with a few very Hackaday twists: a monitor for our washer and dryer that reports power usage over MQTT, programmed in Forth with a transparent WiFi serial bridge into the chip for interactive debugging without schlepping down into the basement. Everything’s open, tweakable, and the Forth implementation for the STM8S was even developed here on Hackaday.io.

It’s a weird project for the weirdest of ESP modules. I thought I’d walk you through it and see if it sparks you to come up with any alternative uses for the ESP8266-and-STM8S odd couple that is the ESP-14.

Continue reading “Hacking On The Weirdest ESP Module”