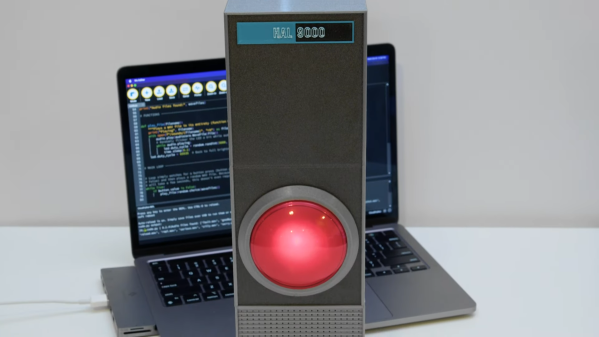
Adafruit’s PropMaker Feather is a microcontroller board designed specifically for building props with electronic features. Thus, what better way to show it off than by building a nifty replica of the most menacing AI ever to roam this solar system? That’s right, it’s the Adafruit HAL9000 build!
Following the 80/20 rule, this version is intended to be reasonably authentic while remaining affordable and easy to build. It’s built around Adafruit’s existing Massive Red Arcade Button, which looks like a decent simulacra of HAL9000’s foreboding, perceptive lens. It’s placed in a case assembled from laser-cut acrylic, with a neat inkjet-printed label on top. Where previously, sound effects were courtesy of an Arduino Uno with a Wave Shield, this version uses the PropMaker Feather, based on the RP2040, instead. It’s actually possible to assemble with zero soldering thanks to quick-connect wires and screw terminals on the PropMaker Feather.
Fundamentally, if you’re building a simple prop that needs audio or LEDs, the PropMaker Feather could be a useful tool for the job. Alternatively, consider building a HAL replica with more capability, like controlling your home. Just don’t give it too much responsibility—we all know how that ends. Video after the break.
Modern microcontrollers like the RP2040 and ESP32 are truly a marvels of engineering. For literal pocket change you can get a chip that’s got a multi-core processor running at hundreds of megahertz, plenty of RAM, and more often than not, some form of wireless connectivity. Their capabilities have been nothing short of revolutionary for the DIY crowd — on any given day, you can see projects on these pages which simply wouldn’t have been possible back when the 8-bit Arduino was all most folks had access to.
Thanks to the increased performance of these MCUs, hackers and makers now even have a choice as to which programming language they want to use. While C is still the language of choice for processor-intensive tasks, for many applications, Python is now a viable option on a wide range of hardware.
This provides a far less intimidating experience for newcomers, not just because the language is more forgiving, but because it does away with the traditional compile-flash-pray workflow. Of course, that doesn’t mean the more experienced MCU wranglers aren’t invited to the party; they might just have to broaden their horizons a bit.
To learn more about this interesting paradigm shift, we invited the fine folks at Adafruit to the Hack Chat so the community could get a chance to ask questions about CircuitPython, their in-house Python variant which today runs on more than 400 devices.
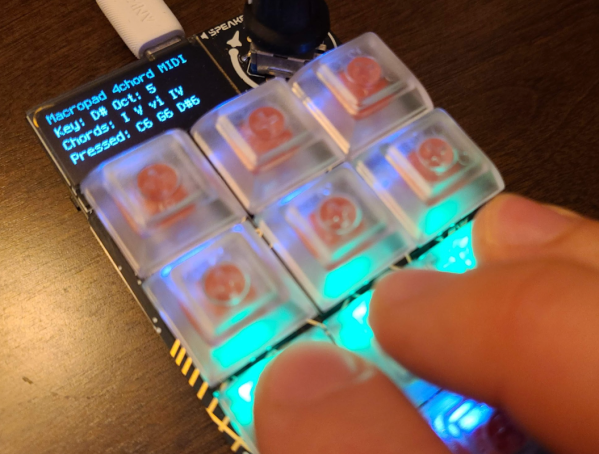
Limitations placed on any creative process often paradoxically create an environment in which creativity flourishes. A simple overview of modern pop, rock, or country music illustrates this principle quite readily. A bulk of these songs are built around a very small subset of music theory, often varying no more than the key or the lyrics. Somehow, almost all modern popular music exists within this tiny realm. [DeckerEgo] may have had this idea in mind when he created this tiny MIDI device which allows the creation of complex musical scores using a keyboard with only 12 buttons.
The instrument is based around the Adafruit MacroPad, which is itself built on the RP2040 chip. As a MIDI device, it needs to be connected to a computer running software which can support MIDI instruments, but once its assembled and given its firmware, it’s ready to rock. A musician can select one of any number of musical scales to operate within, and the 12 keys on the pad are mapped to the 12 chromatic notes within that scale. It can also be used to generate drum tracks or other backing tracks to loop before being used to create melodies as well.
[DeckerEgo] took a bit of inspiration from an even simpler macro pad we featured before which is based around the idea that a shockingly high number of songs use the same four chords. His macro pad includes creation of chord progressions as well, but expands on that idea to make more complete compositions possible. And, for those looking to build their own or expand on this project, he has also made all of the source code available on his GitHub page.
The Fisher-Price See ‘n Say was introduced back in 1964, and since then has helped teach countless children the different sounds made by farm animals. But what about our urban youth? If they’re going to navigate a concrete jungle, why not prepare them to identify the sound of a jackhammer or the chime that plays before an announcement goes out over the subway’s PA system?
That’s the idea behind this hacked See ‘n Say [John Park] put together for Adafruit. Now we should note up front that no vintage toys were sacrificed during the production of this gadget — it seems Fisher-Price (predictably) dropped the tiny record player these toys used to use for a cheap electronic board sometime in the 90s. A quick check with everyone’s favorite A-to-Z megacorp shows you can pick up one of these new-school models for around $25 USD.
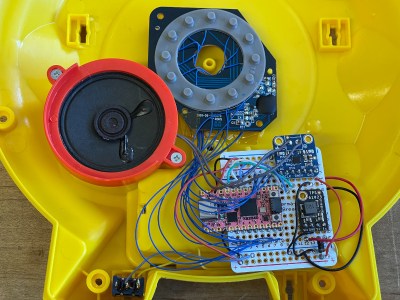
Cracking open the electronic version of the See ‘n Say reveals a circular PCB with a series of membrane buttons that are pressed by the mechanics of the spinning pointer. As it so happens, there are handy test points next to each of these buttons, which makes it simple to wire up to a microcontroller.
In this case, it’s Adafruit’s KB2040, which is connected to a MAX98357A amplifier board over I2S. A small boost converter module is used to wring 5 volts out of the toy’s pair of AA batteries. The original speaker is repurposed, though [John] adds a physical power switch to keep the boost converter from flattening the alkaline batteries when not in use.
On the software side, all you’ve got to do is load the MCU with your sounds and write a bit of code that associates them with the button being pressed on the PCB. [John] gets his city sounds from Freesound, a community-maintained database of Creative Commons Licensed sounds, and provides the CircuitPython code necessary to tie everything together.
The last step is the artwork. For this project, [Brian Kesinger] provided some swanky vintage-looking imagery that perfectly fits the See ‘n Say style. The art is available under the NonCommercial-ShareAlike Creative Commons license, so you’re free to use it in your own version. Though naturally, that assumes you’ve decided to use the same sounds as [John] — the beauty of this project is that you could easily load it up with whatever sounds you’d like Hacker Junior to learn. Possibly a well-known Australian YouTuber?
If anyone feels inclined to build a Hackaday-themed See ‘n Say based on this project, we’ve love to see it.
You might think the era of the 3.5 inch “floppy” disk is over, and of course, you’d be right. But when has that ever stopped hackers before? Just because these disks are no longer being manufactured doesn’t mean you can’t find them, or that the appropriate drives aren’t readily available. In fact, as [Ladyada] explained during this week’s Floppy Interfacing Hack Chat with Adafruit, the ongoing chip shortages mean its often easier and cheaper to track down old hardware like this than it is modern microcontrollers and other high-tech components.
What awaits the brave hacker that picks up a box of random floppies and a dusty old drive at the local thrift store? More than you might expect. As the Hack Chat goes on, it becomes increasingly obvious that these quaint pieces of antiquated technology can be rather difficult to work with. For one thing there are more formats out there than you’ve probably considered, and maddeningly, not all drives are able to read all types (even if they say they do). That means a disk which might seem like a dud on one drive could work perfectly fine in another, which is why the team at Adafruit recommend having a few on hand if you want to maximize your chances of success.
Now here comes the tricky part: unless you happen to have a 1990s vintage computer laying around, getting these drives hooked up is decidedly non-trivial. Which is why Adafruit have been researching how to interface the drives with modern microcontrollers. This includes the Adafruit_Floppy project, which aims to port the well known Greaseweazle and FluxEngine firmwares to affordable MCUs like the Raspberry Pi Pico. There’s also been promising developments with bringing native floppy support to CircuitPython, which would make reading these disks as easy as writing a few lines of code.
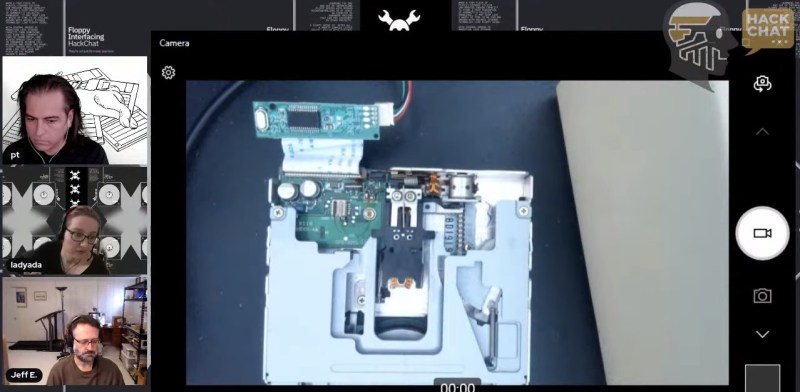
But wait, surely this is a solved problem? Why not just pick up a cheap USB floppy drive from the A to Z online retailer we all love to hate? Unfortunately, these gadgets are something of a mixed bag. [Ladyada] pulls one apart on camera to show that what you’re actually getting with one of these units is a new old stock laptop floppy drive hooked up to a dodgy purpose-built chip that connects to the original 26-pin flex cable and offers up a USB interface. That would be great, if it wasn’t for the fact that the chip is exceedingly selective about what kind of disks it will read. If you’re only worried about bog standard IBM-formatted disks they can work in a pinch, but like they say, you get what you pay for.
So is it all just academic? Is there really any reason to use a floppy disk in 2022? The fine folks at Adafruit would argue that the skills necessary to read usable data out of a stream of magnetic flux changes may very well come in handy in unexpected ways down the road. But even if not, there’s at least one good reason to cultivate the technology required to reliably read from these once ubiquitous storage devices: archiving the data stored on these disks before they invariably succumb to so-called “bit rot” and are potentially lost to history.
It’s one thing to speculate about what’s happening with the Mars helicopter Ingenuity, but it’s another to get an insider’s view on recent flight problems. As we previously reported, Ingenuity is starting to face a significant challenge, as a seasonal atmospheric pressure drop on Mars threatens to make the already rarefied air too thin to generate useful lift. Mission controllers tested the chopper at higher rotor speeds, and while that worked, later attempts to fly using that higher speed resulted in an abort. The article, written by one of the NASA/JPL engineers, is a deep dive into the problem, which occurred when Ingenuity sensed excessive wiggle in two of the servos controlling the rotor swashplate. The thought is that accumulated wear in the servos and linkages might be causing the problem; after all, Ingenuity has made thirteen flights so far, greatly exceeding the five flights originally programmed for it. Here’s hoping they can adapt and keep the helicopter flying, but whatever they do, it’ll have to wait a few weeks until Mars completes its conjunction and pops back out from behind the Sun.
With all the attention understandably paid to the recent 20th anniversary of the 9/11 terror attacks, it’s easy to forget that barely a month after that day, a series of what appeared to be follow-on attacks started: the Anthrax Attacks. Members of Congress and media outlets were targeted via the mail with highly refined anthrax spores, leading to the deaths of five people, with dozens more injured and exposed to anthrax. IEEE Spectrum has an interesting article that goes into some of the technology that was rapidly deployed in an attempt to sanitize the mail, including electron beam and X-ray irradiation to kill any spores. The article also points out how this wasn’t the first time people were afraid of the mail; outbreaks of yellow fever in 1899 led to fumigation of the mail with sulfur, after perforating it with a wicked-looking paddle.
Attention PCB-design newbies — now’s your chance to learn the entire PCB design process from the ground up, with the guidance of industry professionals. TeachMePCB is back again this year, offering to teach you everything you need to know about properly laying out a PCB design in pretty much any EDA software you want. The course requires a two- to five-hour commitment every week for two months, after which you’ll have designed a PCB for a macropad using a Raspberry Pi Pico. The course facilitator is Mark Hughes from Royal Circuits, who did a great Hack Chat with us last year on PCB finishes. This seems like a great way to get up to speed on PCB design, so if you’re interested, act soon — 460 people are already signed up, and the deadline is October 10.
Some of us really love factory tours, no matter what the factory is making. All the better when the factory makes cool electronics stuff, and better still when it’s our friends at Adafruit showing us around their New York City digs. True, it’s a virtual tour, but it has pretty much become a virtual world over the last couple of years, and it’s still a great look inside the Adafruit factory. Hackaday got an in-person tour back in 2015, but we didn’t know their building used to be a Westinghouse radio factory. In fact, the whole area was once part of the famed “Radio Row” that every major city seemed to have from the 1920s to the 1960s. It’s good to get a look inside a real manufacturing operation, especially one that’s right in the heart of a city.
And finally, those with a fear of heights might want to avoid watching this fascinating film on the change-out of a TV transmitter antenna. The tower is over 1,500′ (450 m) tall, lofting an aging antenna over the flat Florida terrain. Most of the footage comes from body-mounted cameras on the riggers working the job, including the one very brave soul who climbed up the partially unbolted antenna to connect it to the Sikorsky S64 Skycrane helicopter. It’s a strange combination of a carefully planned and slowly executed ballet, punctuated by moments of frenetic activity and sheer terror. The mishap when releasing the load line after the new antenna was placed could easily have swept the whole rigging crew off the antenna, but luckily nobody was injured.
You may have noticed that I neglected to write an introductory paragraph for the last one of these — I was just too excited to get into the keyboards and keyboard accessories, I guess. I can’t promise that I’ll always have something to say up here, but this week I definitely do: thank you for all the tips I’ve received so far! The readers are what make Hackaday great, and this little keyboard roundup column is no exception. Fabulous fodder, folks!
Kamina Chameleon
Like any keyboard enthusiast worth their soldering iron, [deʃhipu] keeps trying for the ultimate keyboard — ideally, one that runs CircuitPython and makes a great daily driver for high-speed typing.
The latest version is the Kamina, a one-piece split with a SAMD21 brain that is slim and narrow without being cramped. [deʃhipu] started by splitting the Planck layout, spreading it, adding a number row, and eventually, an extra column of Kailh Chocs on the right hand. One-piece splits are great as long as the split suits your shoulders, because everything stays in place. When you do move it around, both halves move as one and you don’t have to mess with the positioning nearly as much as with a two-piece. And of course, since he designed it himself, it fits.
The really cool thing here is the center module concept. It’s functional, it looks nice, and as long as it doesn’t get in the way of typing, seems ideal. So far, [deʃhipu] has made a couple different versions with joysticks, encoders, and buttons, and is currently working on one with a Home button made for cell phones to take advantage of their built-in optical trackpads.
Esrille NISSE Looks Nice
This is the Esrille NISSE keyboard and it comes in two sizes! Okay, the two sizes don’t look that different, but the key spacing specs say otherwise. To me, this looks like an Alice with a better and ortholinear layout. These bat-wing beauties are new to me, but they’ve been around for a few years now and are probably difficult to stumble upon outside of Japan. Although Esrille doesn’t seem to make any other keyboards, they do make a portable PC built on the Raspberry Pi compute module.
I love me a one-piece split when its done properly, and this one seems to be pretty darn close to perfect. How do I know? You can print out a paper-craft version to try out either of the two sizes. I didn’t take it quite that far, but you can bet that I opened the smaller size’s image in a new tab and put my hands all over the screen to test the layout.
I especially like the thumb clusters and the inside keys on this thing, but I think the innermost thumb keys would be too painful to use, and I would probably just use my index finger. I would totally buy one of these, but they’re a little too expensive, especially since the smaller one costs more. (What’s up with that?) The great news is that the firmware is open-source. Between that and the paper-craft models, a person could probably build their own. Check out [xahlee]’s site for a review and a lot more pictures of the NISSE and similar keebs.