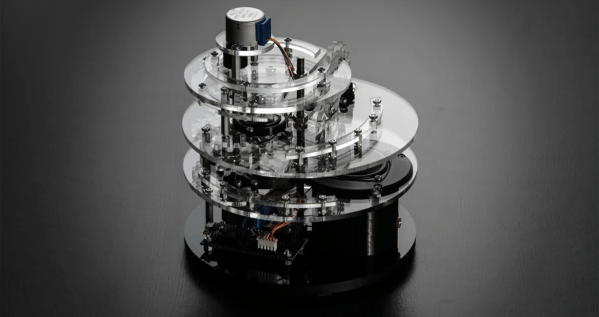
Using Excel To Manage A Commodore 64

The “save” icon for plenty of modern computer programs, including Microsoft Office, still looks like a floppy disk, despite the fact that these have been effectively obsolete for well over a decade. As fewer and fewer people recognize what this icon represents, a challenge is growing for retrocomputing enthusiasts that rely on floppy disk technology to load any programs into their machines. For some older computers that often didn’t have hard disk drives at all, like the Commodore 64, it’s one of the few ways to load programs into computer memory. And, rather than maintaining an enormous collection of floppy discs, [RaspberryPioneer] built a way to load programs on a Commodore using Microsoft Excel instead.

The Excel sheet that manages this task uses Visual Basic for Applications (VBA), an event-driven programming language built into Office, to handle the library of applications for the Commodore (or Commodore-compatible clone) including D64, PRG, and T64 files. This also includes details about the software including original cover art and any notes the user needs to make about them. Using VBA, it also communicates to an attached Arduino, which is itself programmed to act as a disk drive for the Commodore. The neceessary configuration needed to interface with the Arduino is handled within the spreadsheet as well. Some additional hardware is needed to interface the Arduino to the Commodore’s communications port but as long as the Arduino is a 5V version and not a 3.3V one, this is fairly straightforward and the code for it can be found on its GitHub project page.

With all of that built right into Excel, and with an Arduino acting as the hard drive, this is one of the easiest ways we’ve seen to manage a large software library for a retrocomputer like the Commodore 64. Of course, emulating disk drives for older machines is not uncommon, but we like that this one can be much more dynamic and simplifies the transfer of files from a modern computer to a functionally obsolete one. One of the things we like about builds like this, or this custom Game Boy cartridge, is how easy it can be to get huge amounts of storage that the original users of these machines could have only dreamed of in their time.

Hackaday Prize 2023: Building A Relay ALU

There’s much truth in the advice that, to truly understand something, you need to build it yourself from the ground up. That’s the idea behind [Christian]’s entry for the Re-engineering Education category of the 2023 Hackaday Prize. Built as an educational demonstrator, this is a complete arithmetic-logic unit (ALU) using discrete relays — and not high-density types either — these are the big honking clear-cased kind.

The design is neatly, intentionally, partitioned along functional lines, with four custom PCB designs, each board operating on 4-bits. To handle a byte-length word, boards are simply cascaded, making a total of eight. The register, adder, logic function, and multiplex boards are the heart of the build with an additional two custom boards for visualization (using an Arduino for convenience) and IO forming the interface. After all, a basic CPU is just an ALU and some control around it, the magic is really in the ALU.

The fundamental logical operations operating upon two operands, {A, B} are A, ~A, B, ~B, A or B, A and B, A xor B, can be computed from just four relays per bit. The logic outputs do need to be fed into a 7-to-1 bit selector before being fed to the output register, but that’s the job of a separate board. The adder function is the most basic, simply a pair of half-adders and an OR-gate to handle the chaining of the carry inputs and generate the carry chain output.

3D printed cable runs are a nice touch and make for a slick wiring job to tie it all together.

For a more complete relay-based CPU, you could check out the MERCIA relay computer project, not to mention this wonderfully polished build.


Electronic Connect 4 Console Doesn’t Use LCD

You might think that making your own electronic games would require some kind of LCD, but lately, [Mirko Pavleski] has been making his using inexpensive 8X8 WS2812B LED panels. This lets even a modest microcontroller easily control a 64-pixel “screen.” In this case, [Mirko] uses an Arduino Nano, 3 switches, and a buzzer along with some 3D printed components to make a good-looking game. You can see it in action in the video below.

The WS2812B panels are easy to use since the devices have a simple protocol where you only talk to the first LED. You send pulses to determine each LED’s color. The first LED changes color and then starts repeating what you send to the next LED, which, of course, does the same thing. When you pause a bit, the array decides you are done, and the next train of pulses will start back at the first LED.

It looks like the project is based on a German project from [Bernd Albrecht], but our German isn’t up to snuff, and machine translation always leaves something to be desired. Another developer added a play against the computer mode. This is a simple program and would be easy to port to the microcontroller of your choice. [Mirko]’s execution of it looks like it could be a commercial product. If you made one as a gift, we bet no one would guess you built it yourself.

Of course, you could play a real robot. You could probably repurpose this hardware for many different games, too.

Continue reading “Electronic Connect 4 Console Doesn’t Use LCD”

Automatic Coin Sorter Brings Order To Your Coin Jar

Few things hold as much promise as the old coin jar. Unfortunately, what’s generally promised is tedium, as one faces the prospect of manually sorting, counting, and rolling the accumulated change of cash transactions past. Unless, of course, you’ve got a fancy automatic coin sorter like this one.

True, many banks have automatic coin sorters, but you generally have to be a paying customer to use one. And there’s always Coinstar and similar kiosks, but they always find a way to extract a fee, one way or another. [Fraens] decided not to fall for either of those traps and roll his own machine, largely from 3D-printed parts. The basic mechanism is similar to that used in commercial coin counters, with an angled bowl rotating over an array of holes sized to fit various coins. Holes in the bottom of the feed bowl accept coins fed from a hopper and transport them up to the coin holes. The smallest coins fall out of the bowl first, followed by the bigger coins; each coin drops into a separate bin after passing through an optical sensor to count the number of each on an Arduino. Subtotals and a grand total of the haul are displayed on a small LCD screen. The video below shows the build and the sorter in operation.

[Fraens] built this sorter specifically for Euro coins, but it should be easy enough to modify the sorting slots for different currencies. It’s not the first coin sorter we’ve seen, of course, and while we applaud its design simplicity and efficient operation, it can’t hold a candle to the style of this decidedly less practical approach.

Continue reading “Automatic Coin Sorter Brings Order To Your Coin Jar”

Battery Bot Makes Sure Cordless Tool Packs Are Always Topped Up

There was a time not that long ago when every tool was cordless. But now, cordless power tools have proliferated to the point where the mere thought of using a plain old wrist-twisting screwdriver is enough to trigger a bout of sympathetic repetitive injury. And the only thing worse than that is to discover that the batteries for your tools are all dead.

As [Lance] from the “Sparks and Code” channel freely admits, the fact that his impressive collection of batteries is always dead is entirely his fault, and that’s what inspired his automatic battery charging robot. The design is pretty clever; depleted batteries go into a hopper, under which is a 3D-printed sled. Batteries drop down into the sled, which runs the battery out from under the hopper to the charging station, which is just the guts of an old manual charger attached to a lead screw to adjust the height of the charging terminals for different size batteries. When the battery is charged, the sled pushes it a little further into an outfeed hopper before going back to get another battery from the infeed side.

Of course, that all vastly understates the amount of work [Lance] had to put into this. He suffered through a lot of “integration hell” problems, like getting the charger properly connected to the Arduino running the automation. But with a lot of tweaking, he can now just dump in a bunch of depleted packs and let the battery bot handle everything. The video after the break shows all the gory details.

Of course, there’s another completely different and much simpler solution to the dead battery problem.

Continue reading “Battery Bot Makes Sure Cordless Tool Packs Are Always Topped Up”

Pill Dispenser To Keep You On Track

When forgetting to take medication on time can lead to a bad day or night, having a helper to keep you on track can greatly improve your life. [M. Bindhammer] faces this scenario every day, so he built his own robotic pill dispenser.

The core of the project is a 3D printed dispensing drum with individual pockets for morning and evening medication. It is mounted directly to a 360° winch servo, normally used for RC sailboats, while a second conventional servo opens a small sliding door to drop the pills onto the dispensing tray. The tray integrates a sensitive touch sensor which can detect when [M] picks up the pills, without being triggered by the pills themselves.

[M. Bindhammer] also included a small but loud speaker, connected to a speech synthesis module for audio reminders. The main controller is a Arduino Due with a custom breakout shield that also integrates a DS3231 real time clock. All the electronics are enclosed in a 80’s style humanoid robot-shaped body, with dispensing drum on its chest, and an OLED screen as it’s face.

The end result is a very polished build, which should make [M. Bindhammer]’s life with bipolar disorder a little bit easier, and he hopes it might help others as well.

For more medication related gadgets, take a peek at another pill dispenser and a 3D printed dosing spoon to replace an essential but discontinued commercial version.

A Guard Bot For Your Home Assistant

While fixed sensors, relays, and cameras can be helpful in monitoring your home, there are still common scenarios you need to physically go and check something. Unfortunately, this is often the case when you’re away from home. To address this challenge, [PriceLessToolkit] created a guardian bot that can be controlled through Home Assistant.

The robot’s body is made from 3D printed components designed to house the various modules neatly. The ESP32 camera module provides WiFi and video capabilities, while the Arduino Pro Mini serves as the bot’s controller. Other peripherals include a light and radar sensor, an LED ring for status display, and a speaker for issuing warnings to potential intruders. The motor controllers are salvaged from two 9-gram servos. The onboard LiPo battery can be charged wirelessly with an integrated charging coil and controller by driving the bot onto a 3D printed dock.

This build is impressive in its design and execution, especially considering how messy it can get when multiple discrete modules are wired together. The rotating caster wheels made from bearings add an elegant touch.

If you’re interested in building your own guard bot, you can find the software, CAD models, and schematics on GitHub. If you’re looking to add other gadgets to your Home Assistant setup, we’ve seen it connect to boilers, blinds, beds and 433 MHz sensors.

Continue reading “A Guard Bot For Your Home Assistant”