Morse Decoder’s Lean And Sexy Search Algorithm

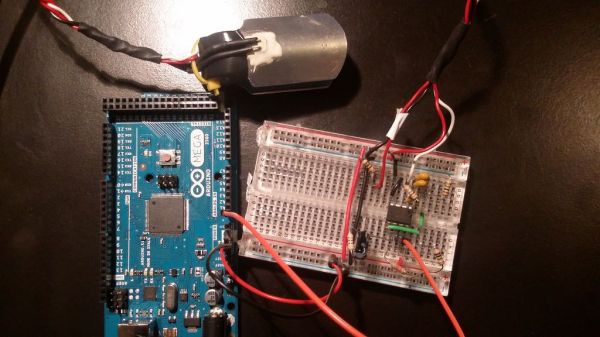
Often the Morse Code centered projects that we feature are to help you practice transmitting messages. This one takes a tack and builds an automatic decoder. We think [Nicola Cimmino’s] project is well worth featuring simply based on his explanation of the Digital Signal Processing used on the signal coming in from the microphone. Well done. But he’s really just getting warmed up.

What makes this really stand out is a brilliant algorithm that allows conversion from Morse to ASCII using a lookup table of only 64 bytes. This provides enough room for A-Z and 0-9 without chance of collision but could be expanded to allow for more characters. Below is a concise description of how the algorithm works but make sure you take the time to read [Nicola’s] project description in its entirety.

The algorithm can be decribed as follows. Have an index inside the lookup string inizialied to zero. Have an initial dash jump size of 64. At every received element (dot or dash) halve the initial dash jump and then increase by 1 the index inside the lookup string if a dot was received and by dash jump size if a dash was received. Repeat until a letter separator is reached, at that point the index inside the lookup string will point to the ASCII corresponding to the decoded morse.

Have you heard of this technique before? If so, tell us about it in the comments below. Before you jump all over this one, realize that Magic Morse uses a different technique.

Medical Tricorder Mark I

A handheld tricorder is as good a reason as any to start a project. The science-fiction-derived form factor provides an opportunity to work on a lot of different areas of hardware development like portable power, charging, communications between sensor and microcontroller. And of course you need a user interface so that the values being returned will have some meaning for the user.

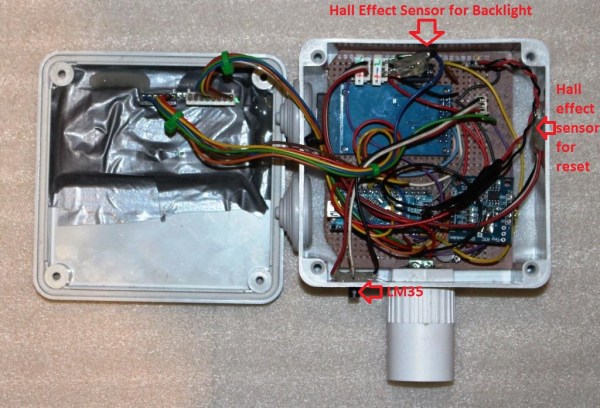
[Marcus B] has done a great job with all of this in his first version of a medical tricorder. The current design hosts two sensors, one measures skin temperature using infrared, the other is a pulse sensor.

For us it’s not the number of sensors that makes something a “tricorder” but the ability of the device to use those sensors to make a diagnosis (or to give the user enough hints to come to their own conclusion). [Marcus] shares similar views and with that in mind has designed in a real-time clock and an SD card slot. These can be used to log sensor data over time which may then be able to suggest ailments based on a known set of common diagnosis parameters.

Looking at the image above you may be wondering which chip is the microcontroller. This build is actually a shield for an Arduino hiding underneath.

There’s a demonstration video after the break. And if you find this impressive you won’t want to miss the Open Source Science Tricorder which is one of the finalists for the 2014 Hackaday Prize.

Continue reading “Medical Tricorder Mark I”

The KIM-1 Computer Minified

The KIM-1 wasn’t the first microcomputer available to computer hobbyists and other electron aficionados, but it was the first one that was cheap. It was also exceedingly simple, with just a 6502 CPU, a little more than 1k of RAM, 2k of ROM, a hexadecimal keypad and a few seven-segment displays. Still, a lot of software was written for this machine, and one of these boards can be found in every computer history museum.

[Oscar] thought the KIM-1 was far too cool to be relegated to the history books so he made his own. It’s not a direct copy – this one uses an Arduino for the brains, only breaking out some buttons, a pair of four-digit seven-segment displays, and the I2C and SPI pins on the ‘duino. The KIM-1 is emulated by the Arduino, allowing for the same interface as an original connected up to an old teletype, and [Oscar] got his hands on the original code for Microchess and the first 6502 disassembler from [Woz] and [Baum].

[Oscar] put the schematics for his version of the KIM-1 up, and has the PCBs up on SeeedStudio. If you’re looking for an awesome replica of a vintage computer and a nice weekend project, here ‘ya go.

Undershield, DIY Arduino Battery Shield

Battery Shield Mounts Underneath The Arduino

So, what do you do when your Arduino project needs to operate in a remote area or as a portable device? There are LiPo battery shields available, and although they may work well, recharging requires access to a USB port. You can also go the 9v battery route plugged into the on-board regulator of the Arduino but the low mAh rating of a 9v won’t allow your project to stay running for very long. [AI] needed a quick-change battery option for his Arduino project and came up with what he is calling the AA Undershield.

As the name implies, AA sized batteries are used in the project, two of them actually. Yes, two AA batteries at 1.5v each would equal only 3 volts when connected in series. The Arduino needs 5v so [AI] decided to use a MAX756 DC-to-DC step-up regulator to maintain a steady stream of 5v. This article has some nice graphs showing the difference in performance between a 9v battery being stepped down to 5v verses two AA’s being bumped up to 5v.

The ‘under’ in Undershield comes from this shield being mounted underneath the Arduino, unlike every other shield on the planet. Doing so allows use of a standard 0.100″-spaced prototype PCB and is an easy DIY solution to that odd-sized space between the Arduino’s Digital 7 and 8 pins. The Arduino mounts to the Undershield via its normal mounting holes with the help of some aluminum stand offs.

[AI] did a great job documenting his build with schematics and lots of photos so that anyone that is interested in making one for themselves can do so with extreme ease.

A Custom Control Surface For Audio/Video Editing

Control surfaces (input devices with sliders, encoders, buttons, etc) are often used in audio and video editing, where they provide an easy way to control editing software. Unfortunately even small control surfaces are fairly expensive. To avoid shelling out for a commercial control surface, [Victor] developed his own custom control surface that sends standard MIDI commands which can be interpreted by nearly any DAW software.

[Victor]’s control surface includes several buttons, a display, and a rotary encoder. His firmware sends MIDI commands whenever a button is pressed or the rotary encoder is turned. [Victor] plans on adding menu functionality to the currently unused LCD display which will allow the user to change the scrubbing speed and other various settings.

One advantage of making your own control surface is that you can customize it to your own needs. [Victor] has posted a model of his 3d-printed enclosure and his source code on the project page so you can easily modify his design with any button configuration you might want.

The Tale Of Two Wearable Game Boys

We’re well past the time when Halloween costume submissions stop hitting the tip line, but like ever year we’re expecting a few to trickle in until at least Thanksgiving. Remember, kids: documentation is the worst part of any project.

[Troy] sent us a link to his wearable Game Boy costume. It’s exactly what you think it is: an old-school brick Game Boy that [Troy] wore around to a few parties last weekend. This one has a twist, though. There’s a laptop in there, making this Game Boy playable.

The build started off as a large cardboard box [Troy] covered with a scaled-up image of everyone’s favorite use of AA batteries. The D-pad and buttons were printed out at a local hackerspace, secured to a piece of plywood, and connected to an Arduino Due. The screen, in all its green and black glory, was taken from an old netbook. It was a widescreen display, but with a bezel around the display the only way to tell it’s not original is from the backlight.

Loaded up with Pokemon Blue, the large-scale Game Boy works like it should, enthralling guests at wherever [Troy] ended up last Friday. It also looks like a rather quick build, and something we could easily put together when we remember it next October 30th.

[Troy] wasn’t the only person with this idea. A few hours before he sent in a link to his wearable Game Boy costume, [Shawn] sent in his completely unrelated but extremely similar project. It’s a wearable brick Game Boy, a bit bigger, playing Tetris instead of Pokemon.

[Shawn]’s build uses a cardboard box overlaid with a printout of a scaled-up Game Boy. Again, a laptop serves as the emulator and screen, input is handled by a ‘duino clone, and the buttons are slightly similar, but made out of cardboard.

Both are brilliant builds, adding a huge Game Boy to next year’s list of possible Halloween costume ideas. Videos of both below.

Continue reading “The Tale Of Two Wearable Game Boys”

Halloween Hack Night At Pololu

Have some servos and an Arduino lying around? It isn’t too late to get your freaky on! Last night, tech enthusiasts of Las Vegas gathered at Pololu Robotics to show off their hacks for a Halloween flavored edition of their bi-monthly robot club. These projects created by those in the community as well as the Pololu engineers themselves are fun and have a relatively short list of materials. So, if the examples below give you some inspiration, this is permission to Macgyver something together before your big Halloween party tonight…

roboFingersImpatient Severed Fingers – [Amanda] came up with a cute use for some mini servos and a zombie hand prop. The five severed fingers were attached to one end of a plastic rod. The other end was mounted to each of five servos which were laid out in the appropriate hand shape and attached to a fixed base. An Arduino running a basic sweep sketch animated the motors at slightly staggered intervals, creating a nice rolling effect. Even with the moving parts exposed this prop would be awesome to have on display, or set the ambiance with its continuous tapping…

deltaSpectorAngry Spectral Delta – [Nathan Bryant] made an actual costume for his delta robot from Robot Army. By attaching a small plastic skull to the end effector and draping a tattered piece of fabric over the rest of the mechanism he effectively transformed the delta into a little ghost with a sassy personality. The head swiftly bobbed about, all while staying parallel to the table… until it intermittently came unhinged and hung limply, which was a nice added effect!


exorcismBabyRobotic Exorcism Baby – This doll could turn its half skeleton, half baby face 180 degrees and then laugh at your fear. By attaching two servo motors together, [Jeremy] was able to create a pan and tilt mechanism which acted as the baby’s contorting neck and chattering jaw. The micro controller sending commands to the motors was hidden modestly under her dress.


shadowBoxStabby Animated Cardboard Shadowbox – Among the animatronic devices seen at the event was a shadowbox made by [Brandon] hidden in a dark conference room nearby. When one happened to walk past the seemingly unoccupied space, they’d glimpse the silhouette of an arm stabbing downward with a knife through a windowsill. Being lured in for further investigation you’d find that the shadow was being cast by some colored LEDs through a charmingly simple device. A cutout made from recycled card stock was attached to a single servo. This whole mechanism itself rocked back and forth slightly as the motor moved, which wasn’t intentional but added some realism to the motion of the stabby arm.

There were many interesting projects present last night ranging from remote-controlled skeletal arms to other reactive devices ready to deliver a scare. If you’re interested in knowing more, those made by the Pololu crew are documented on their blog. Since video does these projects better justice, you can check out a compilation of clips here:

Continue reading “Halloween Hack Night At Pololu”