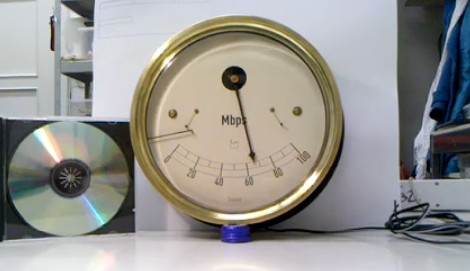
Build A Pong Gaming Console

A lot of thought went into [Patrick Mccabe’s] Pong gaming console build. He used components we’re familiar with; an Arduino as a controller, 8×8 LED modules as the display, and potentiometers (with fancy knobs) in project boxes as the controllers. But every step along the way he took care to build this cleanly and robustly. Even the MAX7219CNG drivers for the six LED modules reside on PCBs from a fab house. The finished project is something you’d be proud to pull out and play when you have friends over. Even if they’re not part of the geek elite we think they’d enjoy a game or two. Great job [Patrick]. We hope to see an internalized microcontroller and scoring in your next update!

Want to do this but the cost of the matrix drivers scared you away? Follow our tutorial to build your own display using an AVR for the multiplexing.

Paper Touchpad

If you don’t mind getting your fingers a little dirty you can replace your mouse with a piece of paper. [Dr. West] made this touchpad himself, which measures signals at the corners of the paper using four voltage dividers. The paper has been completely covered with graphite from a pencil (which we see in hacks from time to time), making it conductive. The user wears an anti-static strap that grounds their hand, allowing an Arduino to calculate contact points on two axes when a finger completes the circuit. See this controlling a cursor in the video after the break.

Continue reading “Paper Touchpad”

Playing Hacker With A Toy Vault

[Thomas Cannon] created his own hacking game by adding some circuitry to this toy vault. The original toy uses the keypad to control a solenoid keeping the door shut. He kept the mechanical setup, but replaced the original circuit board with his own ATmega328 based internals. He also added a USB port to the front. The gist of the game is that you plug-in through USB to gain access to the vault’s terminal software. If you can make your way through the various levels of admin access the loot inside will be yours.

Nixie Tubes Live In A Cool Box

This set of four Nixie tubes display the number of people following bildr on Twitter. That’s neat; it uses an Arduino and some open source driver boards. But what caught out eye is the enclosure. The image above shows only half, but when assembled it’s a nice little cube that keeps the insides safe. This was laser cut using the Ponoko service and kicks off a design contest. Come up with the best idea for using 4 Nixies, their drivers, and $50 worth of Ponoko’s services and they’ll give you the materials to make it happen.

Under-desk RGB Keyboard Lighting

[Jay Collett] was having trouble seeing his keyboard when the room was dim. But throwing a light under the desk just didn’t seem cool enough. Instead he built an RGB light board that is controlled by his desktop. The board is based around an ATmega328 with the Arduino booloader. He etched a single-sided PCB to connect it to a group of five RGB LEDs, with a programming header for an FTDI cable. The board communicates with a PC via serial connection, with a C# control application that [Jay] coded to control the color. We’ve embedded a couple of videos after the break but check his page for a package of code and hi-res pictures.

If you want something cool that’s a little bit less work to build check out the EL-wire keyboard from this links post.

Continue reading “Under-desk RGB Keyboard Lighting”

Wireless Doorbell Rings A Real Bell

Tired of hearing that flat sounding wireless doorbell when visitors happen to come by? Don’t get rid of it, improve it by adding a real bell. This hack rigs up a small hand bell to the wireless doorbell receiver. It was prototyped using LEGO pieces to shake the sound out of the bell, but the finished version uses a servo motor on a wooden frame. An Arduino monitors the wireless receiver, driving the servo when a transmission from the front door button is received.

Traditionally door bells have actually been chimes that are struck with solenoids. We appreciate this rendition because it adds an element of kinetic art to the home, laying bare the functional hardware instead of hiding it in a box. Don’t miss the demonstration after the break.

Continue reading “Wireless Doorbell Rings A Real Bell”

Home Automation Without Pulling Wires

Here’s a bit of simple home automation using hacks with which we’re become pretty familiar. [Mrx23] combined OpenWRT, a microcontroller, and a set of RF controlled outlet switches to add automation to his plug-in devices. An RF remote that controls the switched outlets has been connected to an Arduino. The router communicates with the Arduino via a serial connection. And the router is controlled by a web interface which means you can use a smartphone or other web device to control the outlets.

The best thing about this system is the power that the router wields. Since it has an underlying Linux kernel you have the option of setting CRON jobs to turn lighting on and off, and group settings can be established to set up a room’s lighting level for watching movies, hosting guests, etc. Combine this with the fact that OpenWRT can use port forwarding for Internet control and the possibilities really start to open up.

[Thanks Arpad]