TréPhonos Calls Up History In Houston

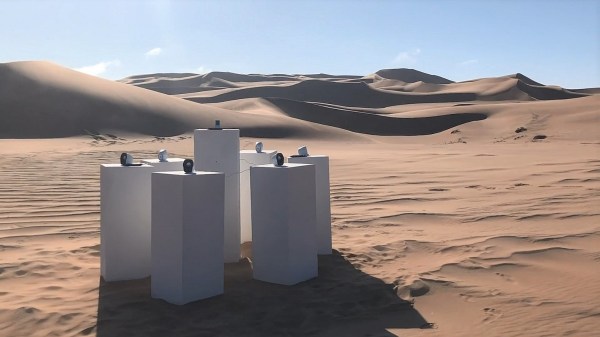
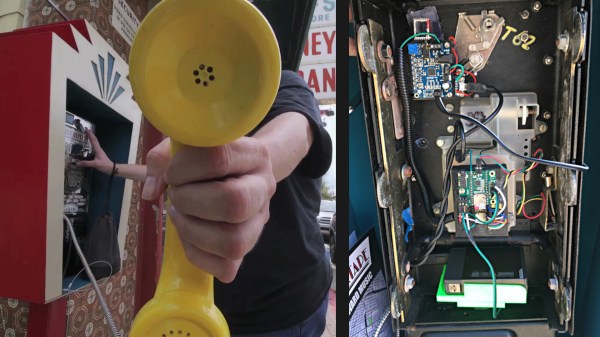
Houston’s historic third ward, aka “The Tre,” is ripe rife with history, and some of that history is digitally preserved and accessible through an art installation in the form of repurposed payphones. We love payphones for obvious reasons and seeing them alive and kicking warms our hearts. Packing them with local history checks even more boxes. Twenty-four people collaborated to rebuild the three phones which can be seen in the video after the break, including three visual artists, three ambassadors, and eighteen residents who put their efforts into making the phones relevant not only to the ward but specifically to the neighborhood. One phone plays sound clips from musicians who lived or still live in the ward, another phone has spoken word stories, and the third has field recordings from significant locations in The Tre.

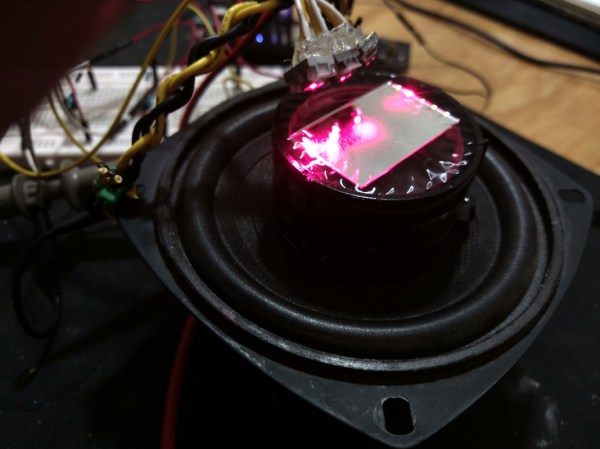
Each phone is powered by a solar cell and a USB battery pack connected to a Teensy with an audio adapter board, and a 20 watt amplifier. Buttons 1-9 play back recorded messages exclusive to each phone, star will record a message, and zero will play back the user-recorded message. Apps for smart phones are easy for young folks to figure out but the payphones ensure that these time capsules can be appreciated by people of any age, regardless of how tech savvy they are and that is wise as well as attractive. The coin return lever and coin slot also have associated sound clips unlike regular payphones so the artists get extra credit.

Did we say that we love payphones? Yes, yes we did. The very first post on Hackday was for a redbox and that got the ball rolling.

Continue reading “TréPhonos Calls Up History In Houston”

Create An Aurora Of Your Own

Throughout our day-to-day experiences, we come across or make use of many scientific principles which we might not be aware of, even if we immediately recognize them when they’re described. One such curiosity is that of caustics, which refers not only to corrosive substances, but can also refer to a behavior of light that can be observed when it passes through transparent objects. Holding up a glass to a light source will produce the effect, for example, and while this is certainly interesting, there are also ways of manipulating these patterns using lasers, which makes an aurora-like effect.

The first part of this project is finding a light source. LEDs proved to be too broad for good resolution, so [Neuromodulator] pulled the lasers out of some DVD drives for point sources. From there, the surface of the water he was using to generate the caustic patterns needed to be agitated, as the patterns don’t form when passing through a smooth surface. For this he used a small speaker and driver circuit which allows precise control of the ripples on the water.

The final part of the project was fixing the lasers to a special lens scavenged from a projector, and hooking everything up to the driver circuit for the lasers. From there, the caustic patterns can be produced and controlled, although [Neuromodulator] notes that the effects that this device has on film are quite different from the way the human eye and brain perceive them in real life. If you’re fascinated by the effect, even through the lens of the camera, there are other light-based art installations that might catch your eye as well.

Continue reading “Create An Aurora Of Your Own”

To Make Reproduction Train Whistles, The Old Ways Are Best

Late last year, artist [Steve Messam]’s project “Whistle” involved 16 steam engine whistles around Newcastle that would fire at different parts of the day over three months. The goal of the project was bring back the distinctive sound of the train whistles which used to be fixture of daily life, and to do so as authentically as possible. [Steve] has shared details on the construction and testing of the whistles, which as it turns out was a far more complex task than one might expect. The installation made use of modern technology like Raspberry Pi and cellular data networks, but when it came to manufacturing the whistles themselves the tried and true ways were best: casting in brass before machining on a lathe to finish.

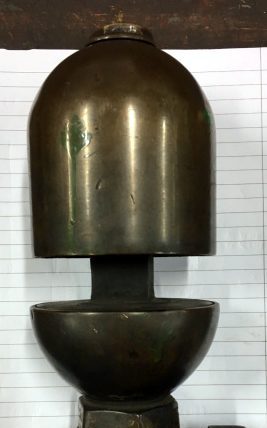
The original whistles are a peek into a different era. The bell type whistle has three major components: a large bell at the top, a cup at the base, and a central column through which steam is piped. These whistles were usually made by apprentices, as they required a range of engineering and manufacturing skills to produce correctly, but were not themselves a critical mechanical component.

In the original whistle shown here, pressurized steam comes out from within the bottom cup and exits through the thin gap (barely visible in the image, it’s very narrow) between the cup and the flat shelf-like section of the central column. That ring-shaped column of air is split by the lip of the bell above it, and the sound is created. When it comes to getting the right performance, everything matters. The pressure of the air, the size of the gap, the sharpness of the bell’s lip, the spacing between the bell and the cup, and the shape of the bell itself all play a role. As a result, while the basic design and operation of the whistles were well-understood, there was a lot of work to be done to reproduce whistles that not only operated reliably in all types of weather using compressed air instead of steam, but did so while still producing an authentic re-creation of the original sound. As [Steve] points out, “with any project that’s not been done before, you really can’t do too much testing.”

Embedded below is one such test. It’s slow-motion footage of what happens when the whistle fires after filling with rainwater. You may want to turn your speakers down for this one: locomotive whistles really were not known for their lack of volume.

Continue reading “To Make Reproduction Train Whistles, The Old Ways Are Best”

TOTO Forever Widescreen

Somewhere Down In Africa Toto Is Playing On Loop

Amidst the vast expanse of sand dunes in the Namib desert, there now exists a sound installation dedicated to pouring out the 1982 soft rock classic “Africa” by Toto. Six speakers connected to an MP3 player all powered by a few solar powered USB battery packs, and it is literally located somewhere down in Africa (see lyrics). The whole project, known as TOTO FOREVER, was the creation of film director [Max Siedentopf] who himself grew up in Namibia.

“I set up a sound installation which pays tribute to probably the most popular song of the last four decades…and the installation runs on solar batteries to keep Toto going for all eternity.”

Max Siedentopf, Creator of TOTO FOREVER

[Siedentopf] certainly chose a song that resonates with people on a number of levels. Toto’s “Africa” was one of the most streamed songs on YouTube in 2017 with over 369 million plays. The song continues to reach a new generation of fans as it has also been the subject of a number of internet memes. Though those local to the sound installation have had some less than positive things to say. [Siedentopf] told BBC, “Some [Namibians] say it’s probably the worst sound installation ever. I think that’s a great compliment.”

The idea of the installation “lasting for all eternity” will certainly be difficult to achieve since the components most certainly lack any serious IP rating. The audio player itself appears to be a RHDTShop mp3 player that according to its Amazon listing page, has three to four hours of battery life per charge. Considering the size of those solar cells the whole thing will probably be dead in a week or two (it is in a desert after all), but no one can deny the statement TOTO FOREVER makes. Below is some footage of the art piece in action taken by the artist himself.
Continue reading “Somewhere Down In Africa Toto Is Playing On Loop”

Full Color Dot Matrix Is The Art We Need

Fans of 80s-era computer printing technology are few and far between, but Apple’s ImageWriter II was a beast of a printer. This tractor feed dot-matrix printer is nigh-indestructible. The print quality was actually pretty great. It was loud as hell, which is a mark of quality electromechanical components. It could do color, and color dot-matrix art on tractor feed paper is the aesthetic we need. If you’re not convinced yet, you can also take off the perforations from tractor feed paper and make a cool little paper snake.

[Dandu] isn’t one to let things like serial printers and obsolete color dot matrix ribbons get in his way of creating ImageWriter art. A while ago, he printed off some incredible art using some obsolete equipment, and the results are better than what you would expect.

The process for creating full-color art on a dot-matrix printer was to plug the ImageWriter into an old Mac (an LC III in this case, with 12 MB of RAM). Photoshop (version 3.0!) was used to open a JPEG, and MacPallete II used to send the data to the printer. This isn’t a process that prints all the colors all at once; first the yellow is printed, and the tractor feed paper is brought back to the beginning. Then the magenta is printed, then the cyan, then the black. The single page of art took 20 minutes to print, and you can see a sped-up version of this process below.

Yes, the ImageWriter II can print in full color, but who cares about this now? A few people apparently — a company is now remanufacturing ImageWriter II color ribbons — opening the door to retro art for all. Yes, that ImageWriter in your basement still works, so let’s see what you can do with it.

Continue reading “Full Color Dot Matrix Is The Art We Need”

The Embroidered Computer

By now we’ve all seen ways to manufacture your own PCBs. There are board shops who will do small orders for one-off projects, or you can try something like the toner transfer method if you want to get really adventurous. One thing we haven’t seen is a circuit board that’s stitched together, but that’s exactly what a group of people at a Vienna arts exhibition have done.

The circuit is stitched together on a sheet of fabric using traditional gold embroidery methods for the threads, which function as the circuit’s wires. The relays are made out of magnetic beads, and the entire circuit functions as a fully programmable, although relatively rudimentary, computer. Logic operations are possible, and a functional schematic of the circuit is also provided. Visitors to the expo can program the circuit and see it in operation in real-time.

While this circuit gives new meaning to the term “wearables”, it wasn’t intended to be worn although we can’t see why something like this couldn’t be made into a functional piece of clothing. The main goal was to explore some historic techniques of this type of embroidery, and explore the relationship we have with the technology that’s all around us. To that end, there have been plenty of other pieces of functional technology used as art recently as well, but of course this isn’t the first textile computing element to grace these pages.

Thanks to [Thinkerer] for the tip!


The Very Slow Movie Player Does It With E-Ink

Most displays are looking to play things faster. We’ve got movies at 60 frames per second, and gaming displays that run at 144 fps. But what about moving in the other direction? [Bryan Boyer] wanted to try this out, so he built the VSMP, or Very Slow Movie Player. It’s a neat device that plays back a movie at about 24 fph (frames per hour) on an e-ink display to demonstrate something that [Bryan] calls Slow Seeing, which, he says “helps you see yourself against the smear of time.” A traditional epic-length movie is now going to run you greater than 8,000 hours of viewing.

Artistic considerations aside, it’s an interesting device from a technical point of view. [Bryan] built it from a 7.4-inch e-ink display from Pervasive Displays. The controller is connected to a Raspberry Pi Zero, which is running a Python script to convert a frame of the movie file into a dithered file, then send it to the display. Because the Pi Zero isn’t a very fast computer, this takes some time, and thus the slow speed of the VSMP. Originally, [Bryan] had set it up to run as fast as the system could manage, which was about 25 seconds per frame, or about 2 frames per minute. He decided to slow it down a bit further to the more attractive multiple of 24 frames per hour to contrast with the 24 frames per second of the original movie. He did this by using a CRON job that kicks of the conversion script once every 2.5 minutes and increments the frame counter. All of this is topped off with a nice 3D-printed case that has a lovely interference pattern to make a rather neat and intriguing project.

Perhaps the best part of this is see a time-lapse of the VSMP — life moves quickly around it while 2001: A Space Odyssey plays at normal speed.

Continue reading “The Very Slow Movie Player Does It With E-Ink”