BeagleBones And Teensies Become KVMs

[pmf], like most of us, I’m sure, spends most of his days on a computer. He also has a smartphone he keeps at his side, but over the years he’s grown accustomed to typing on a real keyboard. He came up with the idea of making a USB switch that would allow his keyboard to control either his computer or his phone, and hit upon a really neat way of doing it. He’s using a BeagleBone Black and a Teensy to switch his keyboard between his computer and his phone with just a press of a button.

This homebrew smart KVM uses a BeagleBone Black for most of the heavy lifting. A keyboard and mouse is connected to the USB host port of the BeagleBone, and the main computer is connected to the device port. The BeagleBone is set up to pass through the USB keyboard and mouse to the computer with the help of what Linux calls a ‘gadget’ driver. This required an update to the Linux 4.0 kernel.

With the BeagleBone capable of being a USB pass through device, the next challenge was sending keypresses to another USB device. For this, a Teensy 2.0 was connected to the UART of the BeagleBone. According to [pmf], this is one of the few examples of the Teensy serving as a composite USB device – sending both keyboard and mouse info.

There are a few neat features for [pmf]’s build: the keyboard and mouse don’t disconnect when switching, and thanks to a slight modification of the USB OTG adapter, this will also charge a phone as well as allow for the use of a keyboard. Because the BeagleBone Black has more than one UART this build can also switch keyboards and mice between more than two computers. For those of us who invest heavily in keyboards, it’s a godsend.

Hackaday Prize Entry: A BeagleBone Logic Analyzer

If you have a BeagleBone, you already have a lot of tools. We’ve seen them used in driving hundreds of LEDs at a very high frame rate, used as a video card for ancient computers, and as a software defined radio. For his entry to The Hackaday Prize, [Kumar] turned his BeagleBone into a 14-channel, 100Msps logic analyzer that’s good enough to debug just about all those hobby electronics projects you’re working on.

The BeagleBone is only able to have this sort of performance as a logic analyzer because of its PRUs, those fancy peripherals that make the Beagle great at blinking pins really, really fast. [Kumar] is using both PRUs in the BeagleBone for this project. PRU1 reads from the input probes, and PRU0 writes all the samples into DDR memory directly. From there, the samples are off to kernel modules and apps, either sigrok, dd, or something you coded up in Python.

Compared to the cheap logic analyzers we have today like the Salae Logic and the DSLogic, [Kumar]’s project is just as good as any commercial offering (provided you can live with 14 channels instead of 16), and because it’s based on a BeagleBone, the software is infinitely expandable.

UPDATE: After this post was written but before it was published, [Kumar] finished up a blog post on how he’s building a logic analyzer with the BeagleBone’s PRUs. It’s a true tutorial, with enough code demos to allow anyone to build their own 8-bit analyzer on a BeagleBone, and there are more updates coming.


The 2015 Hackaday Prize is sponsored by:

1768 LEDs, Because 96 Just Wasn’t Enough

Some people would look at a massive 6’x4′ LED matrix hanging on the wall playing animations and be happy with the outcome. But [Ben] just isn’t one of those people. The original FLED (Fantastic LED thingy) was eight rows of twelve addressable LEDs for a total of 96 pixels. This spring he upped his game and retrofitted the display with 1768 LEDs.

It wasn’t simply an issue of restlessness, the original build suffered from LEDs dying. We actually featured it for that reason as a Fail of the Week.  This is not strictly a hobby project, it’s hanging on the wall in the Supplyframe offices, so pulling it down frequently to fix broken parts is not ideal.

fled-reborn-LED-layout
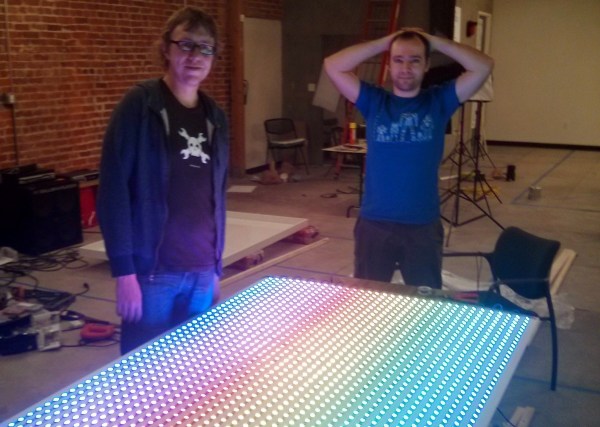
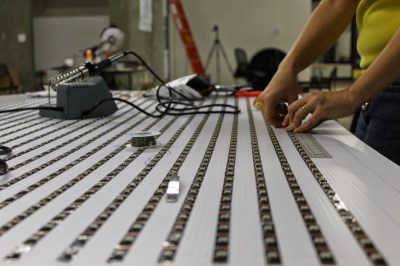
To make FLED more reliable [Ben] sourced strips of the new APA102 LEDs which we looked at back in December. They use an SPI bus instead of the bizarre timing scheme of the WS2812. At first glance you’d think this would mean easier assembly compared to soldering both sides of each of the original 96-pixels. These do come in strips, but laying out 52×34 still means soldering to the ends of each row.

A lot of love went into making sure those rows were laid out perfectly. A sheet of white foamed PVC serves as the substrate. There is grounding braid on either end of the rows, one is the voltage bus, the other is ground. It fits the original enclosure which is acrylic and does a great job of diffusing the light. I’ve seen it in person and it looks pretty much perfect!

It’s not just the physical layout of this many pixels that is a challenge. Pushing the data to all of them is much harder than it was with 96. [Ben] transitioned away from RaspberryPi. He considered using a Teensy 3.1 and ESP8266 but the WiFi of these cheap modules is far too slow to push frame information from a remote box. In the end it’s a BeagleBone Black that drives the reborn display. This is a great choice since there’s plenty of power under the hood and a traditional (and much faster) WiFi dongle can be used.

Don’t miss the animation demos found after the break.

Continue reading “1768 LEDs, Because 96 Just Wasn’t Enough”

BeagleBones At MRRF

[Jason Kridner] – the BeagleBone guy – headed out to the Midwest RepRap Festival this weekend. There are a lot of single board computers out there, but the BeagleBoard and Bone are perfectly suited for controlling printers, and motion control systems thanks to the real-time PRUs on board. It’s not the board for you if you want to play retro video games or build a media center; it’s the board for building stuff.

Of interest at the BeagleBooth were a few capes specifically designed for CNC and 3D printing work. There was the CRAMPS, a clone of the very popular RAMPS 3D printer electronics board made for the Beagle. If you’re trying to control an old mill that is only controllable through a parallel port, here’s the board for you. There are 3D printer boards with absurd layouts that work well as both printer controller boards and the reason why you should never come up with the name of something before you build it.

[Jason]’s trip out to MRRF wasn’t only about extolling the virtues of PRUs; Machinekit, a great motion control software, was also there, running on a few Beagles. The printer at the BeagleBooth was running Machinekit and apart from a few lines of GCode that sent the head crashing into the part, everything was working great.

Continue reading “BeagleBones At MRRF”

Hacklet 35 – BeagleBone Projects

The Raspberry Pi 2 is just barely a month old, and now that vintage console emulation on this new hardware has been nailed down, it’s just about time for everyone to do real work. You know, recompiling stuff to take advantage of the new CPU, figuring out how to get Android working on the Pi, and all that good stuff that makes the Pi useful.

It will come as no surprise to our regular readers that there’s another board out there that’s just as good in most cases, and in some ways better than the Pi 2. It’s the BeagleBone Black, and for this edition of the Hacklet, we’re focusing on all the cool BeagleBone projects on Hackaday.io.

lcd
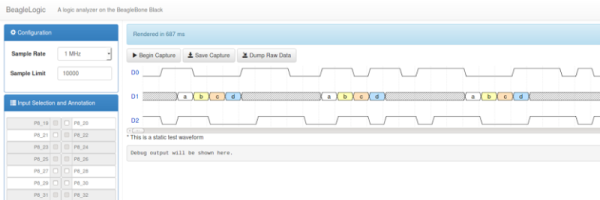
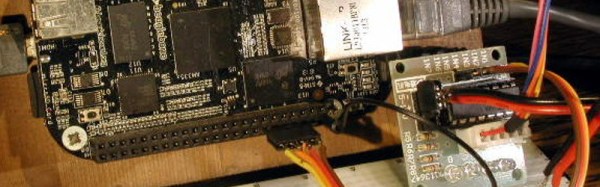
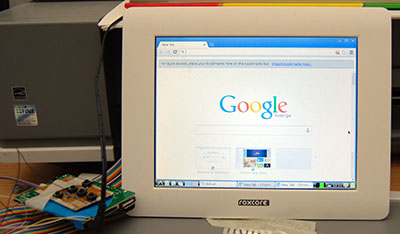
So you have a credit card sized Linux computer and a small, old LCD panel. If it doesn’t have HDMI, VGA or composite input, there’s probably no way of getting this display working, right? Nope. Not when you can make an LCD cape for $10.

[Dennis] had an old digital picture frame from a while back, and decided his BeagleBone needed a display. A few bits of wire and some FPC connectors, and [Dennis] has a custom display for his ‘Bone. It’s better than waiting for that DSI display…

bed[THX1082] is making a bed for his son. This isn’t your usual race car bed, or even a very cool locomotive bed. No, this is a spaceship bed. Is your bed a space ship? No, I didn’t think so.

Most of the work with plywood, MDF, paint, and glue is done, which means the best feature of this bed – a BeagleBone Black with an LCD, buttons, a TV, and some 3D printed parts – is what [THX] is working on right now. He’s even forking a multiplayer networked starship simulator to run in the bed. Is your bed a starship simulator?

beer

Beer. [Deric] has been working on a multi-step fermentation controller using the BeagleBone Black. For good beer you need to control temperatures and time, lest you end up with some terrible swill that I’d probably still drink.

This project controls every aspect of fermentation, from encouraging yeast growth, metabolization of sugars, and flocculation. The plan is to use two circuits – one for heating and one for cooling – and a pair of temperature sensors to ensure the beer is fermenting correctly.


If you’re looking for more BeagleBone Projects, there’s an entire list of them over on Hackaday.io with GLaDOs Glasses, Flight Computers, and Computer Vision.

Turn Your BeagleBoneBlack In To A 14-channel, 100Msps Logic Analyzer

The BeagleBoneBlack is a SoC of choice for many hackers – and quite rightly so – given its powerful features. [abhishek] is majoring in E&E from IIT-Kharagpur, India and in 2014 applied for a project at beagleboard.org via the Google Summer of Code project (GSoC). His project, BeagleLogic aims to realize a logic analyzer using the Programmable Real-Time units on board the AM335X SoC family that powers the BeagleBone and the BeagleBone Black.

The project helps create bindings of the PRU with sigrok, and also provides a web-based front-end so that the logic analyzer can be accessed in much the same way as one would use the Cloud9 IDE on the BeagleBone/BeagleBone Black to create a new application with BoneScript.

Besides it’s obvious use as a debugging tool, the logic analyzer can also be a learning tool that can be used to understand digital signals. BeagleLogic turns the BeagleBone Black into a 14-channel, 100Msps Logic Analyzer. Once loaded, it presents itself as a character device node /dev/beaglelogic. In stand-alone mode, it can do binary captures without any special client software. And when used in conjunction with the sigrok library, BeagleLogic supports software triggers and decoding for over 30 different digital protocols.

The analyzer can sample signals from 10Hz upto 100MHz, in 8 or 16 bits and up to a maximum of 14 channels. Sample depth depends on free RAM, and upto 320MB can be reserved for BeagleLogic. There’s also a web interface, which, once installed on the BeagleBone, can be accessed from port 4000 and can be used for low-volume captures (up to 3K samples).

[abhishek] recently added the BeagleLogic Cape which can be used to debug logic circuits up to 5V safely. Source files for BeagleLogic as well as the Cape are available via his github repos. [abhishek] blogged about his project on his website where there’s a lot more information and links to be found. Catch a video of BeagleLogic after the break.

Continue reading “Turn Your BeagleBoneBlack In To A 14-channel, 100Msps Logic Analyzer”

Library Upgrade To PRU Gives Fast IO On Beaglebone

The BeagleBone Black has a powerful featureset: decent clock speed, analog inputs, multiple UART, SPI and I2C channels and on-board memory, to name a few. One missing feature seems to be the lack of support for the two on-board Programmable Real-time Units (PRU’s). Each of these 32-bit processors run independently of the main processor, but are able to interface with the main processor through the use of shared RAM and some interrupts. Unfortunately, PRU’s are not supported and in the absence of information, difficult to program. Enabling the PRU’s will allow them direct access to external sensors via the GPIO pins, for example. Perhaps most enticing is the idea that the PRU’s add real-time processing capability to the BBB.

[Thomas Freiherr] is working on the libpruio project to allow PRU support on the BBB. It is “designed for easy configuration and data handling at high speed. libpruio software runs on the host (ARM) and in parallel on a Programmable Realtime Unit SubSystem (= PRUSS or just PRU) and controls the subsystems”. Additional information about the project is available on the libpruio wiki, and files can be downloaded from here (German Page).

This paper presented at inter.noise2014 (PDF) a couple of months ago has a nice comparison of various small computer/controller boards and outlines the advantages of the BBB once its PRUs are enabled. If readers come across applications of the BBB with PRUs enabled, let us know in the comments. If you want to work your way into the world of the PRU we highly recommend this tutorial series.

Thanks for sending in the tip, [Patrick]

[Image Source: libpruio stepper motor example]