MSDOS Development With GCC

It might seem odd to think about programming in MSDOS in 2018. But if you are vintage computer enthusiast or have to support some old piece of equipment with an MSDOS single board computer, it could be just the thing. The problem is, where do you get a working compiler that doesn’t have to run on the ancient DOS machine? Turns out, gcc can do the trick. [RenéRebe] offers a video demo based on a blog post by [Chris Wellons]. You can see the video, below.

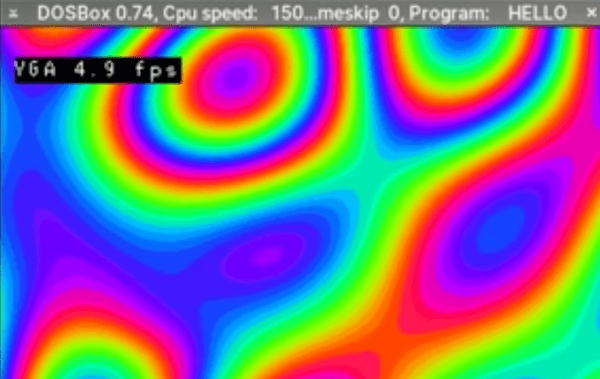
The technique generates COM files, not EXE files, so there are some limitations, such as a 64K file size. The compiler also won’t generate code for any CPU lower than a 80386, so if you have a real 8086, 80186, or 80286 CPU, you are out of luck. The resulting code will run in a real DOS environment on a ‘386 or higher or in a simulator like DOSBox.

You might be thinking why not use the DJGPP port of gcc to DOS. That sounds good, but it actually doesn’t produce true DOS code. It produces code for a DOS extender. In addition, [Chris] had trouble getting it to work with a modern setup.

The only real trick here is using the right combination of gcc flags to create a standalone image with the right codes. A COM file is just a dump of memory, so you don’t need a fancy header or anything. You also, of course, won’t have any library support, so you’ll have to write everything including functions to, say, print on the screen. Of course, you can borrow [Chris’] if you like.

The last pieces of the puzzle include adding a small stub to set up and call main and getting the linker to output a minimal file. Once you have that, you are ready to program like it is 1993. Don’t miss part 2, which covers interrupts.

If you pine away for QuickBasic instead of C, go download this. If you just want to run some old DOS games, that’s as close as your browser.

Continue reading “MSDOS Development With GCC”

Tiny Pinball Emulator Is Hugely Impressive

We were wondering what [Circuitbeard] has been up to lately. Turns out he’s been building a mini pinball cabinet to add to his arcade of self-built games.

[Circuitbeard] was forced to break out of his Raspi comfort zone this time. We’re glad he did because this is one impressive build. Finding the pinball emulation community lacking for Linux, he turned to the LattePanda, a tiny Windows 10 SBC with a built-in Arduino Leonardo. This was really the perfect board because he needed to support multiple displays with a minimum of fuss. That Leonardo comes in handy for converting button presses to key presses inside the Visual Pinball emulator.

The 3mm laser-cut plywood cabinet was designed entirely in Inkscape and sized around the two screens: a genuine 7″ LattePanda display for the playfield, and a 5″ HDMI for the back glass. The main box holds the Lattepanda, two Pimoroni mini speakers, and a fan to keep the board cool.

There’s a lot to like about this little cabinet thanks to [Circuitbeard]’s fantastic attention to detail, which you can see for yourself in the slew of pictures. Look closer at the coin drop—it’s really an illuminated button with a custom graphic. If you want to have a go at emulating this emulator, all the code is up on GitHub. Tilt past the break to watch some modern pinball wizardry in action, and then check out his mini Outrun machine.

If pinball emulators don’t score any points with you, here’s one that’s all wood and rubber bands.

Continue reading “Tiny Pinball Emulator Is Hugely Impressive”

DIY Variacs Get ESP8266 Upgrades

If you’be been hacking and making long enough, you’ve probably run into a situation where you realize that a previous project could be improved with the addition of technology that simply wasn’t available when you built it. Sometimes it means starting over from scratch, but occasionally you luck out and can shoehorn in some new gear without having to go back to the drawing board.

The two isolated variacs that [nop head] built were already impressive, but with the addition of the ESP8266 he was able to add some very slick additional features which really took them to the next level. He’s done an exceptional job detailing the new modifications, including providing all the source for anyone who might be walking down a similar path.

His variacs have digital energy meters right in the front panel which give voltage, amps, and a real-time calculation of watts. After reading an article by [Thomas Scherrer] about sniffing the SPI data out of one of these meters with an Arduino, [nop head] reasoned he could do the same thing with an ESP8266. The advantage being that he could then pull that data out over the network to graph or analyze however he wishes.

For his older variac, he decided to automate the device by adding a stepper and belt to turn the knob. The stepper is controlled by a Pololu stepper driver, which in turn get’s its marching orders from another ESP8266. He even came up with a simple web interface which allows you to monitor and control the variac from your smart device.

We don’t often see many variacs around these parts, and even fewer attempts at building custom ones. It’s one of those pieces of equipment you either can’t live without, or have never even heard of.

RC Paper Airplane From Guts Of Quadcopter

Mini indoor drones have become an incredibly popular gift in the last few years since they’re both cool and inexpensive. For a while they’re great fun to fly around, until the inevitable collision with a wall, piece of furniture, or family member. Often not the most structurally sound of products, a slightly damaged quad can easily be confined to a cupboard for the rest of its life. But [Peter Sripol] has an idea for re-using the electronics from a mangled quad by building his own RC controlled paper aeroplane.

[Peter] uses the two rear motors from a mini quadcopter to provide the thrust for the aeroplane. The key is to remove the motors from the frame and mount them at 90 degrees to their original orientation so that they’re now facing forwards. This allows the drone’s gyro to remain facing upwards in its usual orientation, and keep the plane pointing forwards.

The reason this works is down to how drones yaw: because half of the motors spin the opposite direction to the other half, yaw is induced by increasing the speed of all motors spinning in one direction, mismatching the aerodynamic torques and rotating the drone. In the case of the mini quadcopter, each of the two rear motors spin in different directions. Therefore, when the paper plane begins to yaw off-centre, the flight controller increases power to the appropriate motor.

Mounting the flight controller and motors to the paper plane can either be achieved using a 3D-printed mount [Peter] created, or small piece of foam. Shown here is the foam design that mounts the propellers at wing level but the 3D printed version has then under the fuselage and flies a bit better.

Making paper planes too much effort? You could always use the one-stroke paper plane folder, or even the paper plane machine gun.

Continue reading “RC Paper Airplane From Guts Of Quadcopter”

PGP Vulnerability Pre-announced By Security Researcher

From the gaping maw of the infosec Twitterverse comes horrifying news. PGP is broken. How? We don’t know. When will there be any information on this vulnerability? Tomorrow. It’s the most important infosec story of the week, and it’s only Monday. Of course, this vulnerability already has a name. Everyone else is calling it eFail, but I’m calling it Fear, Uncertainty, and Doubt.

Update: eFail site and paper now available. This was released ahead of Tuesday’s planned announcement when the news broke ahead of a press embargo.

Update 2: The report mentions two attacks. The Direct Exfiltration attack wraps the body of a PGP-encrypted email around an image tag. If a mail client automatically decrypts this email, the result will be a request to a URL containing the plaintext of the encrypted email. The second attack only works one-third of the time. Mitigation strategies are to not decrypt email in a client, disable HTML rendering, and in time, update the OpenPGP and S/MIME standards. This is not the end of PGP, it’s a vulnerability warranting attention from those with a very specific use case.

Update 3: Hackaday has published an in-depth explanation of how eFail works which details the scope of the vulnerability.

[Sebastian Schinzel] announced on Twitter today he will be announcing a critical vulnerability in PGP/GPG and S/MIME email encryption. This vulnerability may reveal the plaintext of encrypted emails. There are currently no fixes — but there’s no proof of concept, or any actual publication of this exploit either. The only thing that’s certain: somebody on Twitter said encrypted email is broken.

The EFF has chimed in on this exploit and advises everyone to immediately disable and uninstall tools that automatically decrypt PGP-encrypted email. It also looks like the EFF came up with a great little logo for eFail as well so kudos on that.

While there are no details whatsoever concerning eFail aside from a recommendation to not use PGP, a few members of the community have seen a pre-press of the eFail paper. [Werner Koch] of GnuPG says eFail is simply using HTML as a back channel. If this is true, PGP is still safe; you just shouldn’t use HTML emails. If you really need to read HTML emails, use a proper MIME parser and disallow access to external links. It should be noted that HTML in email is already an attack vector and has been for decades. You don’t need to bring PGP into this.

Should you worry about a vulnerability in PGP and email encryption? Literally no one knows. European security researchers are working on a publication release right now, but other experts in the field who have seen the paper think it’s not a big deal. There is no consensus from experts in the field, and there is no paper available right now. That last point will change in a few hours, but for now eFail just stands for Fear, Uncertainty, and Doubt.

MoAgriS: A Modular Agriculture System

Hackaday.io user [Prof. Fartsparkle] aims to impress us again with MoAgriS, a stripped-down rig for bringing crops indoors and providing them with all they need.

This project is an evolution of their submission to last year’s Hackaday Prize, MoRaLiS — a modular lighting system on rails — integrating modules for light, water, airflow, fertilizer and their appropriate sensors. With an emphasis on low-cost, a trio of metal bars serve as the structure, power and data transmission medium with SAM D11 chips shepherding each plant.

Reinforced, angled PCBs extend rails horizontally allowing the modules to be mounted at separate heights. Light module? Up top. Water sensor? Low on the rails above the pot’s rim. You get the idea. 3D printed clamps attach the rails to the plant’s pot with a touch of paint to keep it from sticking out like a sore thumb among the leaves.

Airflow modules replicate wind currents — the lack of which results in thin, fragile stems — and light modules include a soft white LED to accompany and mitigate the full-spectrum LEDs’ pink neon-like glow. To manage watering the plants, [Prof. Fartsparkle] initially wanted to use one pump to distribute water to every plant, but found some smaller pumps at a low enough price-point to make one per plant viable — and simpler to integrate as a module as well!

If you prefer your gardening to take place outdoors, consider a robot assistant to tackle your weeding.

The Electrical Outlet And How It Got That Way

Right now, if you happen to be in Noth America, chances are pretty good that there’s at least one little face staring at you. Look around and you’ll spy it, probably about 15 inches up from the floor on a nearby wall. It’s the ubiquitous wall outlet, with three holes arranged in a way that can’t help but stimulate the facial recognition firmware of our mammalian brain.

No matter where you go you’ll find those outlets and similar ones, all engineered for specific tasks. But why do they look the way they do? And what’s going on electrically and mechanically behind that familiar plastic face? It’s a topic we’ve touched on before with Jenny List’s take on international mains standards. Now it’s time to take a look inside the common North American wall socket, and how it got that way.

Continue reading “The Electrical Outlet And How It Got That Way”