Glitching Square Wave Clock Is Designed To Confuse

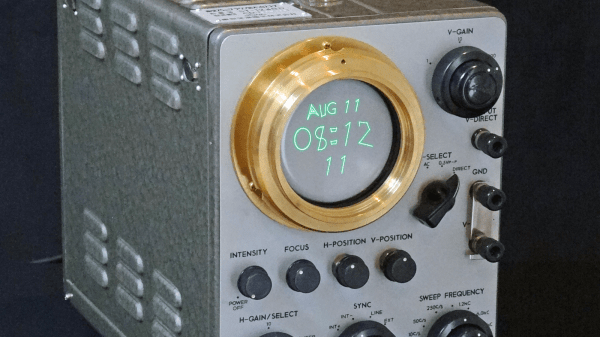
[Voja Antonic] has built a clock that tells the time in binary with square waves, and trolls the uninitiated in electronics.

The clock itself is very attractive. If you look closely you can see the circuitry backlit behind the dot LED matrix display. The whole thing is housed in a nicely folded steel case. RGB LEDs are used to good effect to highlight some additionally obfuscating circuit schematics. The workmanship is very top notch, and we would gladly host such an object on our desks.

The clock’s standard time telling mode is three sets of square waves showing the binary values for the hours, minutes, and seconds. Every now and then the clock will glitch out. The waves will distort. The colors will change. And every now and then, tantalizingly, the alpha-numeric time will show up for just a split second, before returning to those weird squiggles again.

We’ve seen a whole slew of binary clocks before. This one, for instance. But the waveform display makes us feel just that little bit more at home — it’s just like we’re sitting in front of our oscilloscope.

Cheap Smartwatch Teardown

A proper smartwatch can cost quite a bit of money. However, there are some cheap Bluetooth-connected watches that offer basic functions like show your incoming calls, dial numbers and display the state of your phone battery. Not much, but these watches often sell for under $20, so you shouldn’t expect too much.

Because they’re so cheap, [Lee] bought one of these (a U8Plus) and within an hour he had the case opened up and his camera ready. As you might expect, the biggest piece within was the rechargeable battery. A MediaTek MT6261 system on a chip provides the smart part of the watch.

Continue reading “Cheap Smartwatch Teardown”

3D Printed Tourbillon Clock

3D printed clocks have been done before, but never something like this. It’s a 3D printed clock with a tourbillon, a creative way to drive an escapement developed around the year 1800. Instead of a pendulum, this type of clock uses a rotating cage powered by a spring. It’s commonly found in some very expensive modern watches, but never before has something like this been 3D printed.

3D Printed Clock[Christoph Lamier] designed this tourbillon clock in Autodesk Fusion 360, with 50 printable parts, and a handful of pins, screws, and washers. The most delicate parts – the hairspring, anchor, escapement wheel, and a few gears were printed at 0.06 layer height. Everything else was printed at a much more normal resolution with 0.1mm layer height.

Because nearly the entire clock is 3D printed, this means the spring is 3D printed as well. This enormous 2 meter-long spiral of printed plastic could not have been printed without altering a few settings on the printer. The setting in question is Cura’s ‘combing’ or the ‘avoid crossing perimeters’ setting. If you don’t disable this setting, the print time increases by 30%, and moving the print head causes the plastic to ooze out over the spring.

There’s a 26-minute long video of the 3D printed tourbillon clock in action that is horrendously boring. It does demonstrate this clock works, though. You can check out the more interesting videos below.

Continue reading “3D Printed Tourbillon Clock”

ATtiny Does 170×240 VGA With 8 Colors

The Arduino is a popular microcontroller platform for getting stuff done quickly: it’s widely available, there’s a wealth of online resources, and it’s a ready-to-use prototyping platform. On the opposite end of the spectrum, if you want to enjoy programming every bit of the microcontroller’s flash ROM, you can start with an arbitrarily tight resource constraint and see how far you can push it. [lucas][Radical Brad]’s demo that can output VGA and stereo audio on an eight-pin DIP microcontroller is a little bit more amazing than just blinking an LED.

[lucas][RB] is using an ATtiny85, the larger of the ATtiny series of microcontrollers. After connecting the required clock signal to the microcontroller to get the 25.175 Mhz signal required by VGA, he was left with only four pins to handle the four-colors and stereo audio. This is accomplished essentially by sending audio out at a time when the VGA monitor wouldn’t be expecting a signal (and [lucas][Rad Brad] does a great job explaining this process on his project page). He programmed the video core in assembly which helps to optimize the program, and only used passive components aside from the clock and the microcontroller.

Be sure to check out the video after the break to see how a processor with only 512 bytes of RAM can output an image that would require over 40 KB. It’s a true testament to how far you can push these processors if you’re determined. We’ve also seen these chips do over-the-air NTSC, bluetooth, and even Ethernet.

Continue reading “ATtiny Does 170×240 VGA With 8 Colors”

Light Up Your Day With This LED Clock

We love clocks, and [Chris] got our attention with the internet enabled Light Clock. Time is displayed via RGB LED strip in a number of different ways around a 3D printed white disk. All the modes are based on two selectable colors to indicate hours and minutes, either in a gradient fashion or a hard stop.

Light is provided by a 144 LED neopixel strip and is powered by a beefy 4 amp 5 volt power supply, which also powers the controller. Brains are provided by a ESP8266 powered NodeMCU-12E board, and software is written using ESP8266 for Arduino core.

Being a WiFi enabled micro controller it is a simple matter of connecting to the clock using WiFi and using the embedded web pages to select your local timezone, color palette, and display mode. The correct time is set by network and will never be wrong. While there is a Kickstarter for selling the finished project, instructions and software are provided for making your own if you wish.

Join us after the break for the promotional Kickstarter and demonstration video

Continue reading “Light Up Your Day With This LED Clock”

Chromatic Clocks With A Steampunk Twist

There’s nothing like a good clock project, and tacking the steampunk modifier on it only makes it better. [José] built a steampunk clock that does it much better than just gluing some gears on an enclosure and calling it a day. This build includes glowing jewels displaying the time in different colors while displaying the a steampunker’s prowess with a pipe cutter.

The body of the clock is a piece of finely lacquered wood, hiding a perfboard construction with a DS3231 real time clock, a DHT22 temperature and humidity sensor, and a light sensor for dimming the WS2812 LEDs according to the ambient light level.

The rest of the clock is a bunch of 12mm copper pipe, elbows, and t couplers. The end of these pipes are capped off with marbles, with the RGB LEDs behind each of the ‘digits’ of the clock. This is a chromatic clock, with the digits 0 through 9 assigned a different color, based on the resistor color code scheme with exceptions for black and brown. Once you’ve figured out how to tell time with this clock, you should have no problem finding that single 56k resistor in your junk box.

You can check out the video of the clock below.

Continue reading “Chromatic Clocks With A Steampunk Twist”

Light Duty Timekeeping: Arduino Berlin Clock

Just when we thought we’d seen all the ways there are to tell time, along comes [mr_fid]’s Berlin clock build. It’s based on an actual clock commissioned by the Senate of Berlin in the mid-1970s and erected on the famous Kurfürstendamm avenue in 1975. Twenty years later it was decommissioned and moved to stand outside the historic Europa-center.

This clock tells the time using set theory and 24-hour time. From the top down: the blinking yellow circle of light at the top indicates the passing seconds; on for even seconds and off for odd. The two rows of red blocks are the hours—each block in the top row stands for five hours, and each block below that indicates a single hour. At 11:00, there will be two top blocks and one bottom block illuminated, for instance.

The bottom two rows show the minutes using the same system. Red segments indicate 15, 30, and 45 minutes past the hour, making it unnecessary to count more than a few of the 5-minute top segments. As with the hours, the bottom row indicates one minute per light.

Got that? Here’s a quiz. What time is it? Looking at the picture above, the top row has three segments lit. Five hours times three is 15:00, or 3:00PM. The next row adds two hours, so we’re at 5:00PM. All of the five-minute segments are lit, which adds 55 minutes. So the picture was taken at 5:55PM on some even-numbered second.

The original Berlin clock suffered from the short lives of incandescent bulbs. Depending on which bulb went out, the clock could be ‘off’ by as little as one minute or as much as five hours. [mr_fid] stayed true to the original in this beautiful build and used two lights for each hour segment. This replica uses LEDs driven by an Arduino Nano and a real-time clock. Since the RTC gives hours from 0-23 and minutes and seconds from 0-59, a couple of shift registers and some modulo calculations are necessary to convert to set theory time.

[mr_fid] built the enclosure out of plywood and white oak from designs made in QCAD. The rounded corners are made from oak, and the seconds ring is built from 3/8″ plywood strips bent around a spray can. A brief tour of the clock is waiting for you after the break. Time’s a-wastin’!

Continue reading “Light Duty Timekeeping: Arduino Berlin Clock”