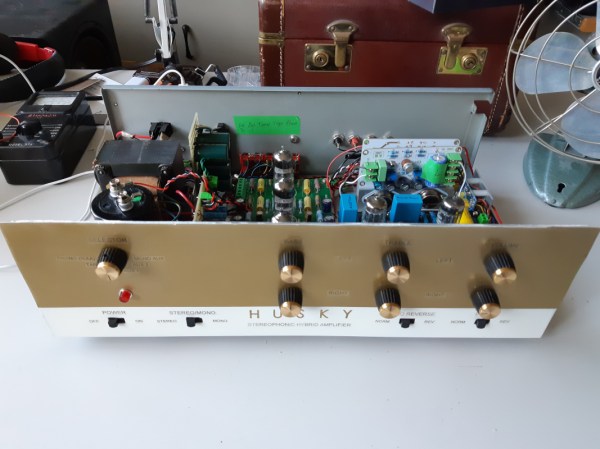
DOS Gaming PC Gets Necessary Updates

PC-104 is a standard computer form factor that most people outside of industrial settings probably haven’t seen before. It’s essentially an Intel 486 processor with lots of support for standards that have long since disappeared from most computers, but this makes it great for two things: controlling old industrial equipment and running classic DOS games on native hardware. For the latter, we turn once again to [The Rasteri] who is improving on his previous build with an even smaller DOS gaming rig, this time based on a platform even more diminutive than PC-104.

The key of a build like this is that it needs native support for the long-obsolete ISA bus to be able to interface with a SoundBlaster card, a gold standard for video games of the era. This smaller computer still has this functionality in a smaller package, but with some major improvements. First, it has a floating point unit so it can run games like Quake. It’s also much faster than the PC-104 system and uses less power. Finally, it fits in an even smaller case.

The build goes well beyond simply running software on a SoM computer. [The Rasteri] also custom built an interface board for this project, complete with all of the necessary ports and an ISA sound chip, all while keeping size down to a minimum. The new build also lets him give the build a better name than the old one (although he phrases this upgrade slightly differently), and will also let him expand some features in the future as well. Be sure to check out that first build if you’re new to this saga, too.

Continue reading “DOS Gaming PC Gets Necessary Updates”

Custom Dummy Load With Data Logging

While it might seem counterintuitive on the surface, there are a number of cases where dumping a large amount of energy into a resistor simply to turn it into heat is necessary to the operation of a circuit. Most of these cases involve testing electronic equipment such as power supplies or radio transmitters and while a simple resistor bank can be used in some situations, this active dummy load is comprised of different internals has some extra features to boot.

The load bank built by [Debraj] is actually an electronic load, which opens it up for a wider set of use cases than a simple passive dummy load like a resistor bank. It’s specifically designed for DC and also includes voltage measurement, current control, and temperature measurement and speed control of the fans on the heat sinks. It also includes a Bluetooth module that allows it to communicate to a computer using python via a custom protocol and GUI.

While this one does use a case and some other parts from another product and was specifically built to use them, the PCB schematics and code are all available to build your own or expand on this design. It’s intended for DC applications, but there are other dummy loads available for things such radio antenna design, and it turns out that you can learn a lot from them too.

Continue reading “Custom Dummy Load With Data Logging”

Solid Oak Arcade Cabinet: When Particle Board Won’t Do

Having an arcade cabinet of one’s own is a common dream among those who grew up during the video game arcade heyday of the 80s and early 90s. It’s a fairly common build that doesn’t take too much specialized knowledge to build. This cabinet, on the other hand, pulled out all of the stops for the cabinet itself, demonstrating an impressive level of woodworking expertise.

The cabinet enclosure is made with red oak boards, which the creator [Obstreperuss] sawed and planed and then glued together to create the various panels (more details are available on his Imgur album). The Mario artwork on the sides and front aren’t just vinyl stickers, either. He used various hardwoods cut into small squares to create pixel art inlays in the oak faces. After the fancy woodwork was completed, the build was finished out with some USB arcade controllers, a flat-panel screen, and a Raspberry Pi to run the games.

While the internals are pretty standard, we have to commend the incredible quality of the woodworking. It’s an impressive homage to classic arcade machines and we wouldn’t mind a similar one in our own homes. If you’re lacking the woodworking equipment, though, it’s possible to get a refined (yet smaller) arcade cabinet for yourself with a 3D printer instead.

Continue reading “Solid Oak Arcade Cabinet: When Particle Board Won’t Do”

Retrocomputing With Modern Hardware, No Emulation Required

The x86 processor family is for the time being, the most ubiquitous type of processor in the PC world, and has been since the 1980s when the IBM PC came on the scene. Emulating these older devices is easy enough if you want to play an old LucasArts game or experience Windows 3.1 again, but the true experience is found on original hardware. And, thanks to industrial equipment compatibility needs, you can build a brand new 486 machine with new hardware that will run this retro software as though it was new itself.

[The Rasteri] masterminded this build which is reminiscent of the NES classic and other nostalgic console re-releases. It’s based on the PC/104 standard which was introduced in the early 90s, mostly for industrial controls applications. The platform is remarkably small, and the board chosen for this build hosts a 486 processor running at 300 MHz. It has on-board VGA-compatible graphics but no Sound Blaster card, so he designed and built his own ISA-compatible sound card that fits in the PC/104’s available expansion port.

After adding some more tiny peripherals to the build and installing it in a custom case, [The Rasteri] has a working DOS machine on new, bare-metal 486 hardware which can play DOOM as it was originally intended. It can also run early versions of  Windows to play games from the Microsoft Entertainment Pack if you feel like being eaten by a snow monster while skiing. [The Rasteri] is no stranger to intense retro computing like this either, as he was the one who got DOOM to run on original NES hardware.

Continue reading “Retrocomputing With Modern Hardware, No Emulation Required”

Hardware Keymapper Routes Through Raspberry Pi

There are a lot of keyboards to choose from, and a quick trip through some of the forums will quickly show you how fanatical some people can be about very specific styles or switches. [Crdotson] doesn’t seem to be too far down the rabbit hole in that regard, but he does have a keyboard that he really likes despite one small quirk: it’s built for Mac, and some of the modifier keys aren’t laid out correctly for Windows. Since Windows has limited (and poor) options for software keymapping, he took an alternative route and built a keymapper in hardware instead.

The build uses a Raspberry Pi as a go-between from the keyboard to his computer. The Pi watches the USB bus using usbmon, which allows inspection of the packets and can see which keys have been pressed. It then passes those keypresses through to the computer. His only modification to the keyboard mapping is to swap the Alt and Super (Windows) keys for his keyboard of choice, although using this software would allow any other changes to be made as well. Latency is only on the order of a few microseconds, which is not noticeable for normal use cases.

While we have seen plenty of other builds around that can map keyboards in plenty of custom ways, if you don’t have the required hardware for a bespoke solution it’s much more likely that there’s a Raspberry Pi laying around that can do the job instead. There are a few issues with the build that [crdotson] is planning to tackle, though, such as unplugging the device while a key is being pressed, which perpetually sends that keystroke to the computer without stopping. But for now it’s a workable solution for his problem.

Retrocomputing Spray Paints: Amiga Beige, Commodore, And ATARI Grey

[retrohax] has provided vintage computer guidance for years, and part of that guidance is this: sometimes using paint as part of restoration is simply unavoidable. But the days of tediously color-matching to vintage hardware are gone, thanks to [retrohax] offering custom-mixed spray paints in Amiga 500 Beige, C-64 Beige, and ATARI ST/SE Grey. (At the moment only delivery within Poland is available due to shipping restrictions, but [retrohax] is working on a better solution.)

As a companion to making these vintage colors available, there is also a short how-to guide on how to properly prep and spray paint a computer case for best results that talks a little about the challenges in color matching to vintage hardware, and how getting custom paints mixed makes life much easier. Hackers may value making do with whatever is available, but we can also appreciate the value of having exactly the right material or tool for the job.

It’s not every day we see someone mixing custom spray paint colors, but off the shelf options don’t always cut it. Another example of getting specialty materials made from the ground up is custom plywood specifically designed for laser-cutting puzzles, something done because the troubles that came with off-the-shelf options were just not worth the hassle.

Broken Smartphones: Laptops In Disguise

Modern smartphones are a dizzying treatise on planned obsolescence. Whether it’s batteries that can’t be removed without four hours and an array of tiny specialized tools, screens that shatter with the lightest shock, or (worst of all) software that gets borked purposefully to make the phone seem older and slower than it really is, around every corner is some excuse to go buy a new device. The truly tragic thing is that there’s often a lot of life left in these old, sometimes slightly broken, devices.

This video shows us how to turn an old smartphone into a perfectly usable laptop. The build starts with a screen and control board that has USB-C inputs, which most phones can use to output video. It’s built into a custom aluminum case with some hinges, and then attached to a battery bank and keyboard in the base of the laptop. From there, a keyboard is installed and then the old phone is fixed to the back of the screen so that the aluminum body doesn’t interfere with the WiFi signal.

If all you need is internet browsing, messaging, and basic word processing, most phones are actually capable enough to do all of this once they are free of their limited mobile UI. The genius of this build is that since the phone isn’t entombed in the laptop body, this build could easily be used to expand the capabilities of a modern, working phone as well. That’s not the only way to get a functioning laptop with parts from the junk drawer, either,  if you’d prefer to swap out the phone for something else like a Raspberry Pi.

Thanks to [NoxiousPluK] for the tip!

Continue reading “Broken Smartphones: Laptops In Disguise”