Everyone’s favorite Canadian is at it again. This time, [AVE] needed to cut a large hole in a stone countertop. They making coring bits for this, but a bit this size would cost upwards of $400. Not a problem. [AvE] broke out the tools and built his own stone cutting bit.
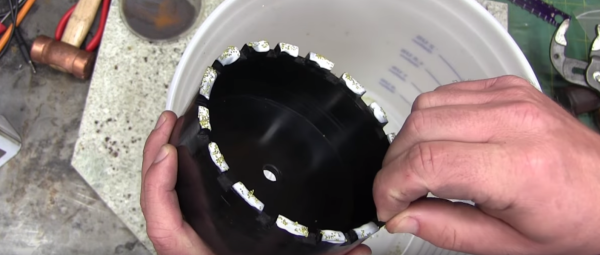
Everything starts with a 6″ plastic pipe cap. [AvE] center drilled the cap, then threaded it. A turned down bolt makes a great arbor for this new tool. The edge of the cap was then slotted. [AvE] used a clapped out Bridgeport milling machine, but you could do the same job with a hacksaw or a Dremel tool.
The secret sauce is industrial diamonds. That’s right, this is a diamond cutting bit. [AvE] ordered 20 grams of 20-25 mesh industrial diamonds. “Mesh” defines the size of the individual diamonds — in this case around 50 microns and up. Now, how to bind diamond and plastic? Plumber’s transition cement didn’t work – the diamonds and coating just peeled off like a sunburn. The solution turned out to be JB-Weld. A liberal coating of JB-Weld on the face of the tool, a sprinkling of industrial diamonds, and the pipe cap was ready to cut.
The cutting operation was slow, steady, and lots of cooling water. [AvE] made it most of the way through his countertop before having to refurbish his bit.
[AvE] usually is a man of many words, as can be seen in this post about his EDM machine. This time though, he gave us the silent treatment — an entire video with no words, set to classical music. It’s great seeing YouTubers step outside their comfort zone and trying something new.
Continue reading “Cutting Stone With A Diamond Bit Built From Plumbing Parts”

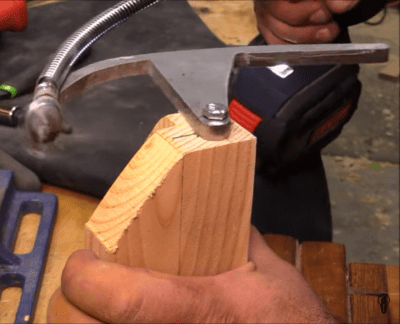 Starting with a piece of steel, [izzy] traced and cut out a 90 degree curve with an attached arm that will allow it to rotate from a central block. He then grabs a random drill bit and attaches it to a flex shaft which is secured to the leading point of the steel curve. To complete the handy setup the entire rig is bolted to a block that will clamp over the corner stock.