iram

PCI I-RAM Working Without A PCI Slot

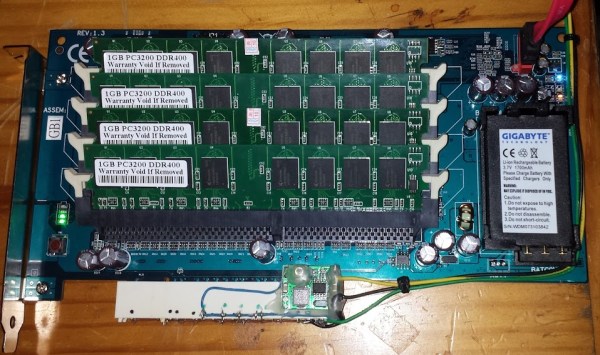
[Gnif] had a recent hard drive failure in his home server. When rebuilding his RAID array, he decided to update to the ZFS file system. While researching ZFS, [Gnif] learned that the file system allows for a small USB cache disk to greatly improve his disk performance. Since USB is rather slow, [Gnif] had an idea to try to use an old i-RAM PCI card instead.

The problem was that he didn’t have any free PCI slots left in his home server. It didn’t take long for [Gnif] to realize that the PCI card was only using the PCI slot for power. All of the data transfer is actually done via a SATA cable. [Gnif] decided that he could likely get by without an actual PCI slot with just a bit of hacking.

[Gnif] desoldered a PCI socket from an old faulty motherboard, losing half of the pins in the process. Luckily, the pins he needed still remained. [Gnif] knew that DDR memory can be very power-hungry. This meant that he couldn’t only solder one wire for each of the 3v, 5v, 12v, and ground pins. He had to connect all of them in order to share the current load. All in all, this ended up being about 20 pins. He later tested the current draw and found it reached as high as 1.2 amps, confirming his earlier decision. Finally, the reset pin needed to be pulled to 3.3V in order to make the disk accessible.

All of the wires from his adapter were run to Molex connectors. This allows [Gnif] to power the device from a computer power supply. All of the connections were covered in hot glue to prevent them from wriggling lose.

Reverse Engineering A Blu-ray Drive For Laser Graffiti

There’s a whole lot of interesting mechanics, optics, and electronics inside a Blu-ray drive, and [scanlime] a.k.a. [Micah Scott] thinks those bits can be reused for some interesting project. [Micah] is reverse engineering one of these drives, with the goal of turning it into a source of cheap, open source holograms and laser installations – something these devices were never meant to do. This means reverse engineering the 3 CPUs inside an external Blu-ray drive, making sense of the firmware, and making this drive do whatever [Micah] wants.

When the idea of reverse engineering a Blu-ray drive struck [Micah], she hopped on Amazon and found the most popular drive out there. It turns out, this is an excellent drive to reverse engineer – there are multiple firmware updates for this drive, an excellent source for the raw data that would be required to reverse engineer it.

[Micah]’s first effort to reverse engineer the drive seems a little bit odd; she turned the firmware image into a black and white graphic. Figuring out exactly what’s happening in the firmware with that is a fool’s errand, but by looking at the pure black and pure white parts of the graphic, [Micah] was able guess where the bootloader was, and how the firmware image is segmented. In other parts of the code, [Micah] saw thing vertical lines she recognized as ARM code. In another section, thin horizontal black bands revealed code for an 8051. These lines are only a product of how each architecture accesses code, and really only something [Micah] recognizes from doing this a few times before.

The current state of the project is a backdoor that is able to upload new firmware to the drive. It’s in no way a complete project; only the memory for the ARM processor is running new code, and [Micah] still has no idea what’s going on inside some of the other chips. Still, it’s a start, and the beginning of an open source firmware for a Blu-ray drive.

While [Micah] want’s to use these Blu-ray drives for laser graffiti, there are a number of other slightly more useful reasons for the build. With a DVD drive, you can hold a red blood cell in suspension, or use the laser inside to make graphene. Video below.

Continue reading “Reverse Engineering A Blu-ray Drive For Laser Graffiti”

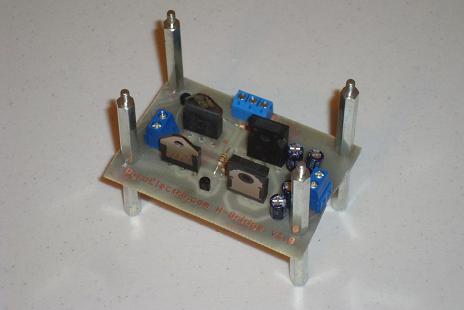
Introduction To The H-bridge Motor Controller

[Chris] sent us this fantastic tutorial, introducing beginners to H-bridge motor drivers. While many of you will consider this stuff basic, those who are trying to expand from building only things the arduino board can handle to bigger more expansive (and powerful) projects will find this quite helpful.  [Chris’s] tutorial is very in depth, not only going through the construction of the basic circuit but also showing you how to make your own PCB.  Pop on over there and learn some theory and some practice. Then you can build that battle bot you’ve always been dreaming of!

Emulating An Amiga Floppy Drive

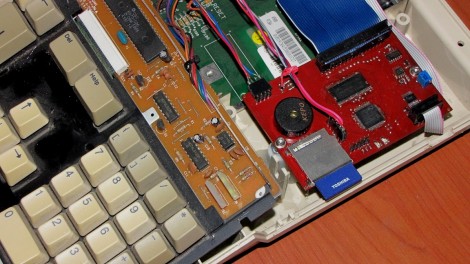
[Retromaster’s] Ultimate Floppy Emulator is a wicked display of hardware mastery. It is the culmination of several design stages aimed at replacing an Amiga floppy drive with a modern storage solution. You may be thinking that using an SD card in place of a floppy isn’t all that interesting but this hack does much more. The board, controlled by a PIC32, patches into the Amiga keyboard and monitor. This allows you to bring up an overlay menu for controlling the emulator in order to configure which virtual floppy disk is currently ‘in the drive’. He’s even gone so far as to add a piezo speaker to mimic the sounds the original drive head would make while reading a disk.

[Thanks Gokhan]

USB Accelerometer Controller

[youtube=http://www.youtube.com/watch?v=szZv2YYQm0U]

As you can see above, there is no wiimote in that accessory steering wheel. There is, instead, a home-made accelerometer controller that connects to the pc via USB. Based around a PIC 18F2550 and a 2 axis accelerometer, this device is detected by windows as a standard controller. The schematic and source code are available on his website. He says it can also be used as a “motion mouse”. You can see a video of that after the break.

When we first saw the video, we thought it might be the same person as the accelerometer controlled maze project, due to the wiimote steering wheel casing.

Continue reading “USB Accelerometer Controller”

Internal Wireless Headphones

[youtube=http://www.youtube.com/watch?v=upYgHgMgTpk&hl=en&fs=1&]

Wireless headphones can be a wonderful way to help clear up the clutter inherent in most desktop PC systems. However, after plugging a wall wart in, and the headphone jack into the computer, the number of wires used has actually doubled. After [Parker] found an old set of JVC 900 Mhz wireless headphones (and a generic 900MHz transmitter), he cracked open the case to see what he could do with them. Realizing that the transmitter used a 12V DC source, he powered it with an unused floppy connector (which provides +12V, +5V, and two ground lines). He also wired the audio-in line directly onto his sound card headers rather than feeding out a headphone jack to the back. He then wrapped the whole thing in plastic to prevent unwanted shorting and placed it back in his PC, leaving him with a very functional wireless system. Detailed photos after the break.

Continue reading “Internal Wireless Headphones”

USB Finger

usbfinger

[Jerry] lost his finger in an accident and has since added a prosthetic USB flash drive in its place. It’s making the best of a bad situation; there’s nothing wrong with a little voluntary cyborgization. At least it’s not as invasive as some of the implants we’ve seen before.

UPDATE: Here’s the entry on [Jerry]’s personal blog.

[via Gizmodo]