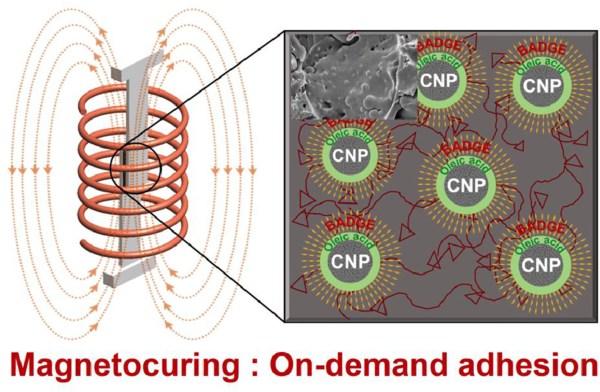
Lathe And 3D Printer Help Repair Buried Buttons

Usually corroded buttons on a piece of electronic equipment wouldn’t be that big a deal to repair, but as [Haris Andrianakis] recently found out, things can get a little tricky when they are sealed inside a device meant to operate in a marine environment. Figuring out how to get into the case to clean the buttons up is only half the battle, when you’re done you still need to close it back well enough that the elements can’t get in.

The device in question is a tachometer intended for a Yamaha outboard motor, and the buttons are sealed between the guage’s face and the compartment in the rear that holds the electronics. Pulling the guts out of the back was no problem, but that didn’t get [Haris] any closer to the defective buttons. In light of the cylindrical design of the gauge, he decided to liberate the front panel from the rest of the unit with his lathe.

Removing the face was a delicate operation, to put it mildly. The first challenge was getting the device mounted securely in the chuck, but then the cutting had to be done very carefully so as not to damage the housing. Once he cut through the side far enough to get the face off, the actual repair of the buttons was fairly straightforward. But how to get it back together?

After a few missteps, [Haris] finally found a solution that have him the results he was looking for. He 3D printed a ring that fit the front of the gauge tightly, hot glued it into place, and used it as a mould to pour in black epoxy resin. Once the epoxy had cured, the mould was cut off and the gauge went back on the lathe so he could trim away the excess. He had to do some hand sanding and filing to smooth out the bezel, but overall the end result looks very close to factory.

We get it, there’s a lot to consider when you add a lathe to your workshop. But hacks like these are wonderful reminders of how many tricks these versatile machines are really capable of.

Continue reading “Lathe And 3D Printer Help Repair Buried Buttons”

Degassing Epoxy Resin On The (Very) Cheap

Anyone who’s tried to encapsulate something in epoxy resin knows how much of a hassle air bubbles can be. If you’re trying to get a perfectly clear finish, the last thing you want is a bunch of microscopic bubbles frozen in time. The best way to prevent this is to put the parts in a vacuum chamber so all the air works its way out before the epoxy cures, but that’s a considerable investment for a one-off project.

But assuming your parts are small enough, [Jasper Sikken] has a great tip that allows you to construct a simple vacuum chamber for just a few dollars. He shows his homemade chamber off in the video after the break, and we think you’ll agree that the change between before and after is pretty dramatic. The best part is that if you want to build your own version, you only need two parts.

The first one is a airtight container large enough to hold the piece you’re working on. Remember that the larger the chamber is the more time it will take to pump down to a suitable vacuum, so avoid the temptation to use something larger than necessary. [Jasper] used a glass jar with a locking lid, which is not only cheap and readily available, but has a decently large internal volume.

Obviously, the second component is the vacuum pump itself. This might normally be a tall order, but [Jasper] recently found that you can buy small battery-powered gadgets designed for sucking the air out of food containers for as little as $5 USD from the usual import sites. All you need to do is pop a hole in the lid of your container, hold the device over the hole, and watch the magic.

This method is great for anything smaller than a paperweight, but if you’ve got something bigger than that, you’ll need to step up your chamber game. Luckily even larger vacuum chambers can be built cheaply at a pinch.

Continue reading “Degassing Epoxy Resin On The (Very) Cheap”

Ramen Pen Lets You Doodle With Noodles

Don’t write off your weird ideas — turn them into reality. For years, woodworkers have used pen bodies as a canvas for showing off beautiful wood. But what’s the fun in that? [JPayneWoodworking] made a pen out of Ramen noodles just to see if he could.

The process is pretty straightforward, as he explains in the build video after the break. He hammered the uncooked noodle mass into pieces small enough to fit a pen blank mold, but not so small that they’re unrecognizable. Then he poured in pigmented epoxy in orange, silver, and black. [JPayneWoodworking] chose those colors for Halloween, but rather than looking freaky, we think it makes the pen look like a bowl of beef broth-y goodness from a fancy Ramen place.

After adding the flavor packet pigments, he put it in a pressure tank to remove all air pockets. Once it sets up, the process is the same as any other pen blank — take it for a spin on the lathe, polish it up, ream it out, and fit it with the parts from a pen kit. We’d like to see the look on the face of the next person to ask [JPayneWoodworking] for a pen.

Want to get into woodworking just to make weird stuff like this? We don’t blame you. But how does a hardware hacker such as yourself get started? [Dan Maloney]’s got you covered.

Continue reading “Ramen Pen Lets You Doodle With Noodles”

Solar-Harvesting Blinkenlights

A few years ago a fad ripped through the makersphere where people would build cheap, solar powered LED blinkers, glue a magnet to them, and throw them on anything metal. It was an interesting time, but luckily did not last for too long. With some effort and craftsmanship, though, the solar throwie idea can be turned into something more elegant, though, such as this solar harvesting blinking gadget.

Like its predecessors, the device itself behaves simply, although this one is equipped with a small supercapacitor which can run the device for 8 hours without sun. It has a small solar panel which can charge the capacitor in five minutes, and from there the LEDs inside simply blink. The quality shows in the final packaging, as [Jasper] has taken to encasing them in epoxy shapes such as pyramids, for a nice paperweight or tchotchke. It is also noteworthy because of Jasper’s test device; since he is mass producing them he needed something to test each board for functionality before encasing them in the epoxy, and he built a small pen tester specifically for them too.

While the build is pretty straightforward, anyone looking to enclose a simple circuit in epoxy without bubbles or other problems might want to check this one out. It would also be a good platform for building other throwie-like projects on top of. In the past they didn’t just blink lights but also did things like run small Linux servers.

Epoxy LED Cube Looks Sleek, And Flashes To The Beat

If there’s one thing that’s universally popular in these polarizing times, it’s colorful glowing objects. LEDs reign supreme in this area, and we’re accustomed to seeing all manner of fun flashy devices hit the tips line. Today is no different, and we’ve been looking at [Modustrial Maker]’s stylish epoxy LED cube.

The build starts with the casting of a black epoxy cube, with a cutout near the top in which the LEDs will be installed. A melamine form is used, with aluminium foil tape, caulk and paste wax to help seal it up. After releasing the cast from the form, there were some unsightly voids which were swiftly dispatched, by trimming the block down with a table saw. With the block cut to size, LED strips were installed, and the light cavity sealed with hot glue before white epoxy was poured in as a diffuser. All that’s left was a simple matter of polishing the cube and installing electronics.

The cube runs from a single-cell LiPo battery, and there’s a wireless power receiver and charging module to keep the power flowing. The cube can be used on most wireless phone chargers, as well as its own dedicated charging base. The LEDs are controlled by an off-the-shelf module, which offers a variety of flashing displays as well as a music-reactive mode.

While the electronics side is done with off-the-shelf parts, the real art in this piece is in the build of the cube. Its glossy, attractive form would look stunning on any coffee table or bedside shelf.

LED cubes are a great rabbit hole to go down on your lunch break. This OpenGL-enabled build is particularly impressive. Video after the break.

Continue reading “Epoxy LED Cube Looks Sleek, And Flashes To The Beat”

Experiments In Creating The Best Epoxy Granite

If you want a big CNC machine you need a strong, vibration-resistant base. They build bells out of metal, so that might not be the best if you want something that doesn’t shake. Epoxy granite is your best bet, but what epoxy granite is the best? That’s the question [Adam Bender] answered in a series of experiments that resulted in a great-looking CNC machine.

While this is a project that resulted in a completed base for a CNC machine, this is also an experiment to determine the best formula for creating your own epoxy granite. The purpose of the experiment is effectively to determine the best-looking epoxy granite and uses four variables in the composition of this composite. Play sand, gravel, dye (in the form of iron oxide and liquid epoxy dye), and two-part epoxy were used to create seven different samples. Samples using rock didn’t turn out that great and still had trapped air. This was true even if the epoxy was put in a vacuum chamber for degassing. The winning combination turned out to be a mix of 80% sand and 20% epoxy with a bit of black dye, vibrated for 30 minutes on a DIY shaker table.

With the correct formula for epoxy granite, [Adam] set up his mold and waxed everything liberally. The internal skeleton, or what the CNC machine will be bolted to, is assembled inside the mold and the epoxy is poured in. The result is fantastic, and an excellent base for a machine that turns metal into chips. You can check out the video below.

Continue reading “Experiments In Creating The Best Epoxy Granite”

How To Build A Mill With Epoxy

The typical machine tool you’ll find in a workshop has a base and frame made of cast iron or steel. These materials are chosen for their strength, robustness and their weight, which helps damp vibrations. However, it’s not the only way to make a machine tool. [John McNamara] has been working on a CNC mill with an epoxy base, with impressive results.

The molds were designed in CAD prior to casting, ensuring there was room for all required components.

The build is one that could be readily achieved in any decently equipped makerspace. [John] used lasercut steel parts to construct the molds for the epoxy base, with some custom turned parts as well. The precision cut parts fit together with great accuracy, and with proper control of the casting process there is minimal post-processing of the final cast piece required. The mold is built with zero draft angle, and is designed to be taken apart to remove the finished pieces. By using steel, the same mold can be used many times, though [John] notes that MDF could be used for a one-off build.

The base is cast in epoxy, mixed with granite aggregate and sand to create a strong, heavy, and vibration damping material. There are also steel reinforcements cast in place consisting of threaded rods, and conduits for various electrical connections. After casting, [John] has spent much time measuring and truing up the mill to ensure the best possible results from the outset.

It’s an impressive build, that shows that building your own accurate machine tools is quite achievable with the right tools and knowledge. We’ve seen similar work before, too – epoxy really does make a great material for casting at home.