Hacking A Fluke Multimeter To Serve Readings Over WiFi

Your multimeter is probably your most useful instrument if you work regularly with electronics. It goes with you everywhere, and is your first port of call in most cases when you are presented with a piece of equipment. And when you think about it, it’s a pretty amazing instrument. Multimeter technology has advanced to the point at which even an inexpensive modern device has functions that would have required a hefty budget a few decades ago.

There is still one thing affordable multimeters remain unable to do: they can’t log their readings for analysis on a computer. They’re an instantaneous instrument, just as they always have been.

Lord of Hackaday [Sprite_TM] decided to hack his multimeter to serve its readings over Wi-Fi. Rather than start with a throwaway meter from the bargain bin, he did it with a Fluke. The meter he chose was a Fluke 15B+, the company’s budget offering for the Indian and Chinese markets, since he had one spare.

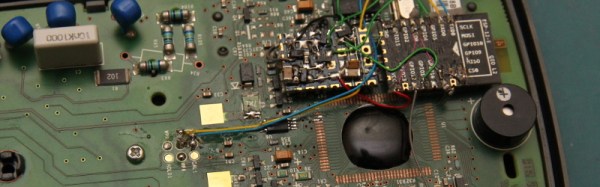
Opening up the 15B+, he was presented with its processor concealed under a blob of epoxy and thus unidentifiable. Armed with the knowledge that other similar Flukes contain Fortune Semiconductor parts, he investigated as many data sheets as he could find from the same company and finally identified it as an FS98O24 one-time-programmable microprocessor. Sadly this chip has no serial port, but he did find an I2C EEPROM which he correctly guessed held calibration settings. Removing this chip gave him a meter with slightly off calibration, but also gave him a serial port of sorts.

Further detective work allowed him to identify the baud rate, and supplying random commands delivered him some that returned data packets. Eventually he identified a packet containing the states of the LCD’s segments, from which he could derive its displayed value. Connecting an ESP8266 module with appropriate software left him with a Wi-Fi connected multimeter. There was a little more refinement to his hack, he created a power management board to activate the ESP when needed, and a neat hack to display its IP address on the screen.

Multimeter hacks have featured several times here at Hackaday. We’ve had another serial port hack, or how about a remote display for another Fluke on a Gameboy Advance?

Power Glove Takes Over Quadcopter Controls

Gerrit and I were scoping out the Intel booth at Bay Area Maker Faire and we ran into Nolan Moore who was showing of his work to mash together a Nintendo Power Glove with an AR Drone quadcopter. Not only did it work, but the booth had a netted cage which Nolan had all to himself to show off his work. Check the video clip below for that.

The control scheme is pretty sweet, hold your hand flat (palm toward the ground) to hover, make a fist and tilt it in any direction to affect pitch and roll, point a finger up or down to affect altitude, and point straight and twist your hand for yaw control. We were talking with Nolan about these controls it sounded sketchy, but the demo proves it’s quite responsive.

The guts of the Power Glove have been completely removed (that’s a fun project log to browse through too!) and two new boards designed and fabbed to replace them. He started off in Eagle but ended up switching to KiCAD before sending the designs out for fabrication. I really enjoy the footprints he made to use the stock buttons from the wrist portion of the glove.

A Teensy LC pulls everything together, reading from an IMU on the board installed over the back of the hand, as well as from the flex sensors to measure what your fingers are up to. It parses these gestures and passes appropriate commands to an ESP8266 module. The AR Drone 2.0 is WiFi controlled, letting the ESP8266 act as the controller.

Minimal MQTT: Power And Privacy

In this installment of Minimal MQTT, I’m going to cover two loose ends: one on the sensor node side, and one on the MQTT server side. Specifically, I’ll tackle the NodeMCU’s sleep mode to reduce power and step you through bridging MQTT servers to get your data securely out of your home server and into “the cloud”, which is really just other people’s servers.

If you’re just stepping into this series now, you should really check out the other three posts, where I set up a server, then build up some sensor nodes, and then flesh-out a few ways to control everything from your phone or the web. That’s the coolest material, anyway. This last installment just refines what we’ve built on. Let’s go!

Continue reading “Minimal MQTT: Power And Privacy”

Find The Source: WiFi Triangulation

[Michael] was playing with his ESP8266. Occasionally he would notice a WiFi access point come up with, what he described as, “a nasty name”. Perhaps curious about the kind of person who would have this sort of access point, or furious about the tarnishing of his formerly pure airspace, he decided to see if he could locate the router in question.

[Michael] built himself a warwalking machine. His ESP8266 went in along with a GPS module interfaced with a PIC micro controller. It was all housed in an off the shelf case with a keypad and OLED screen. He took his construction for a nice calming war walk around the neighborhood and came home with a nice pile of data to sort through. To save time, he placed the data in a SQL database and did the math using queries. After that it was a quick kludge to put together a website with the Google Maps API and some JavaScript to triangulate the computed results.

Sure enough, the person with the questionable WiFi access point shows up on the map.

Federico Musto Of Arduino SRL Shows Off New ARM-based Arduino Boards

I caught up with Federico Musto, President and CEO of Arduino SRL, at the 2016 Bay Area Maker Faire. Their company is showing off several new boards being prepared for release as early as next month. In partnership with Nordic Semi and ST Microelectronics they have put together some very powerful offerings which we discuss in the video below.

arduino-primo-core-alicepad-star-otto-lcdThe new boards are called Arduino Primo, Arduino Core, Arduino Alicepad, and Arduino Otto.

The first up is the Primo, a board built to adhere to the UNO form factor. This one is packing an interesting punch. The main micro is not an Atmel chip, but a Nordic nRF52832 ARM Cortex-M4F chip. Besides being a significantly fast CPU with floating-point support, the Nordic IC also has built-in Bluetooth LE and NFC capabilities, and the board has a PCB antenna built in.

On an UNO this is where the silicon would end. But on the Primo you get two more controllers: an ESP8266 and an STM32F103. The former is obvious, it brings WiFi to the party (including over-the-air programming). The STM32 chip is there to provide peripheral control and debugging. Debugging is an interesting development and is hard to come by in the Arduino-sphere. This will use the OpenOCD standard, with platformio.org as the recommended GUI.

Continue reading “Federico Musto Of Arduino SRL Shows Off New ARM-based Arduino Boards”

Minimal MQTT: Control And Clients

So you’ve built a central server and filled your house with WiFi-connected nodes all speaking to each other using the MQTT protocol. In short, you’ve got the machine-to-machine side of things entirely squared away. Now it’s time to bring the humans into the loop! We’re going to explore a couple graphical user interfaces.

You could build a physical knob and/or LED display for every little aspect of your entire system, but honestly, this is where GUIs really shine. In this installment of Minimal MQTT, we’re going to look at human-friendly ways of consuming and producing data to interact with your connected sensors, switches, and displays. There are a ton of frameworks out there that use MQTT to build something like this, but we’re going to cut out the middle-man and go straight for some GUI MQTT clients.

Continue reading “Minimal MQTT: Control And Clients”

Tiny Matchbox WiFi Weather Station

Sometimes a project doesn’t have to be technically amazing to win over our hearts. [Malte]’s ESP8266-based weather station is so cute, and so nicely executed, that it’s easily worth a look. It could totally be a commercial product, and it’s smaller than a matchbox.

It combines temperature, humidity, and barometric pressure sensors on one side of a PCB, with pads for soldering a pre-built ESP8266 module on the other side. Solder it all together and flash the firmware and you’re almost all set.

The final step is to configure it to work with the network. For this, [Malte] built in a nice web-based configuration (and display) application. It also can log its data to an MQTT system, so there’s a bunch more configuration (which we’re trying to make easier) needed there, and the web frontend makes that light work. Everything, from the hardware to the firmware, and even a pre-compiled binary, is up on his GitHub. Very complete and very well done.

If you can read German, or are willing to run it through a translator, give his personal projects webpage a look as well. Good stuff here. Now all he needs is a matching nice display for inside.