[Ronan] likes 35mm film photography, but the world, of course, has gone digital. He picked up an Epson FilmScan 200 for about €10. This wonder device from 1997 promised to convert 35mm film to digital at 1200 DPI resolution. But there was a catch: it connects via SCSI. Worse, the drivers were forever locked to Windows 95/98 and Mac System 7/8.
In a surprise twist, though, [Ronan] recently resurrected a Mac SE/30 with the requisite SCSI port and the System 7 OS. Problem solved? Not quite. The official software is a plugin for Photoshop. So the obvious answer is to write new software to interact with the device.
In the 1930s, as an alternative to celluloid, some Japanese companies printed films on paper (kami firumu), often in color and with synchronized 78 rpm record soundtracks. Unfortunately, between the small number produced, varying paper quality, and the destruction of World War II, few of these still survive. To keep more of these from being lost forever, a team at Bucknell University has been working on a digitization project, overcoming several technical challenges in the process.
The biggest challenge was the varying physical layout of the film. These films were printed in short strips, then glued together by hand, creating minor irregularities every few feet; the width of the film varied enough to throw off most film scanners; even the indexing holes were in inconsistent places, sometimes at the top or bottom of the fame, and above or below the frame border. The team’s solution was the Kyōrinrin scanner, named for a Japanese guardian spirit of lost papers. It uses two spools to run the lightly-tensioned film in front of a Blackmagic cinematic camera, taking a video of the continuously-moving film. To avoid damaging the film, the scanner contacts it in as few places as possible.
After taking the video, the team used a program they had written to recognize and extract still images of the individual frames, then aligned the frames and combined them into a watchable film. The team’s presented the digitized films at a number of locations, but if you’d like to see a quick sample, several of them are available on YouTube (one of which is embedded below).
This piece’s tipster pointed out some similarities to another recent article on another form of paper-based image encoding. If you don’t need to work with paper, we’ve also seen ways to scan film more accurately.
iSCSI is a widely used protocol for exposing SCSI devices over a network connection, and some scanners have in the past been equipped with SCSI ports. So, could you have an iSCSI network scanner? [xssfox] details her journey making a Canoscan FS4000US film scanner work over iSCSI, sparked by someone’s overly-confident StackOverflow comment that it couldn’t be done. Nothing in the spec said it couldn’t actually work, however, and after figuring out a tentative architecture, a hardware setup was put together.
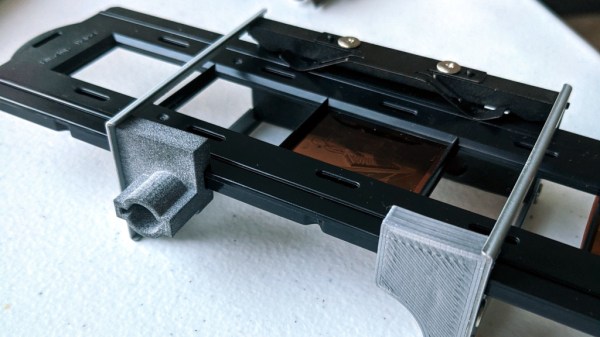
No flatbed scanners with SCSI ports could be found on the cheap, so a film scanner had to be procured. After figuring out a few hitches with the loading mechanism and getting a test image locally, it was time to try and build up the software setup, tearing through SCSI compatibility and cabling, driver and PCI pass-through woes, bluescreens, and intermediate software having dropped some of the necessary features by now. Still, [xssfox] eventually exported the scanner as an iSCSI target – and, on the other end of the network, successfully connected to it and completed a scan. The StackOverflow answer was wrong, after all.
Film scanners are a useful tool for digitizing slides and negatives, and the Plustek 8100 that [Christian Chapman] had was capable, but limited to small format film only. Rather than pay for a much more expensive medium format scanner that could handle 120 film, he modified his 8100 to accomplish the same thing with a combination of good old software and hardware tampering.
On the software side, [Christian] modified a driver for the Plustek 8100 so that it sweeps the scan head further than usual. At the application level, to scan medium format frames, it does a total of four scans: one for each quadrant. The results get stitched together in software with a thoughtfully-designed shell script that provides previews and handles failures and restarts gracefully.
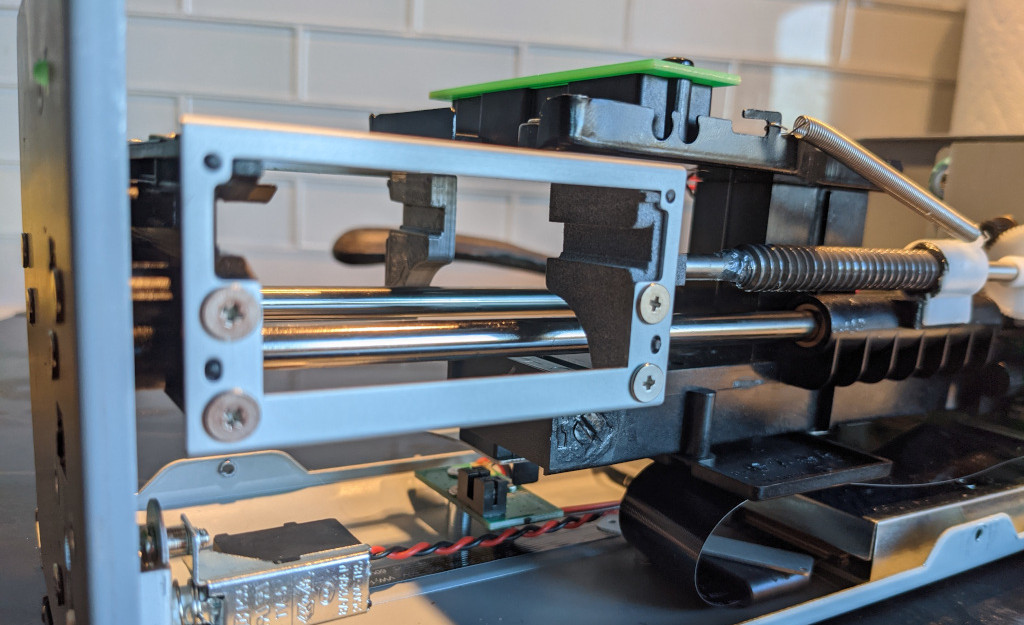
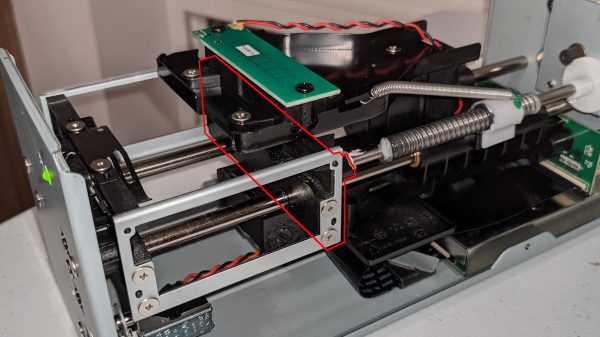
Hardware-wise, the scanning carriage needs modification to ensure nothing interferes with the scan head as it moves further than originally designed. Some CAD and 3D printing made short work of this. Incidentally, this hardware mod is an excellent demonstration of one of the core strengths of 3D printing: the ability to make geometrically-straightforward objects that would nevertheless be troublesome or impractical to construct in any other way.
Scanning film is great for archival purposes as well as sharing said photos digitally. However, if you’re scanning 120 film, aka medium format, it can be expensive to get the requisite hardware. 35mm scanners are comparatively more common, so [Christian Chapman] decided to modify one to suit medium film instead.
The hack is for the Plustek 8100, and requires modifying the scanner in two ways. Firstly, the driver has to be scanned to sweep a longer range to take into account the bigger film. Secondly, a part of the film carriage has to be replaced so it doesn’t show up in the scanners field of view.
The former is achieved by using the sane-genesys scanner software backend, which can be easily modified to adjust the scan length values appropriately. The latter is achieved via 3D printing replacement components that fit without blocking the requisite area.
From his comments about the noisy image and limited controls, we’re going to go out on a limb and assume [Andrew Jeddeloh] isn’t a huge fan of using his Epson V550 for scanning film. But is it really irredeemable? That’s what he set out to determine in a recent series of posts on his blog, and from what we can tell, it’s not looking good for the old Epson.
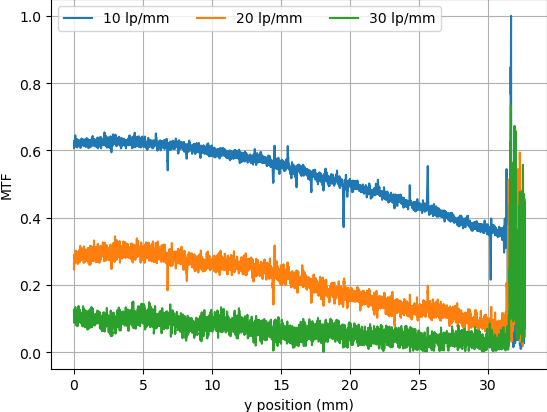
The first post attempts to quantify the optical capabilities of the scanner by determining its modulation transfer function (MTF), point spread function (PSF), and comparing its horizontal and vertical resolution. As you might expect, the nuances of these measurements are a bit beyond the average user. The short version of his analysis is that the scanner’s slide frame does indeed seem to be holding objects at the proper “sweet spot” for this particular image sensor; meaning that contrary to the advice he’d seen online, there’s nothing to be gained by purchasing custom film or slide holders.
MTF versus height of film from bed.
While investigating the optical properties of the scanner, [Andrew] became curious about the automatic focus options offered by the VueScan software he was using. The images produced appeared to be identical regardless of what option he selected, and he began to suspect the feature wasn’t actually doing anything. To confirm his theory, he wrote a shim program that would sit between the proprietary VueScan program and the V550 driver and log all of the data passing between them.
After tweaking various options and comparing the captured data streams, [Andrew] determined that enabling automatic focus in VueScan doesn’t do anything. At least, not with his scanner. He did notice a few extra bytes getting sent to the driver depending on which focus options were selected, but the response from the scanner didn’t change. He thinks the program likely has some kind of generic framework for enabling these kind of features on supported hardware, and it’s just mistakenly showing the autofocus options for a scanner that doesn’t support it.
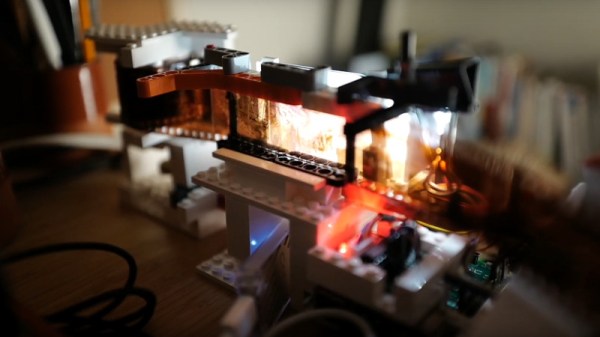
There was a time during the early years of mass digital photography, when a film scanner was a common sight. A small box usually connected to a USB port, it had a slot for slides or negatives. In 2020 they’re a rare breed, but never fear! [Bezineb5] has a solution in the shape of an automated scanner using a Radpberry Pi and a mechanism made of Lego.
The Lego mechanism is a sprocket feeder that moves the film past the field of view from an SLR camera. The software on the Pi runs in a Docker container, and features a machine learning approach to spotting frame boundaries. This is beyond the capabilities of the Pi, so is offloaded to a Google Coral accelerator.
The whole process is automated with the Pi controlling not only the Lego but also the camera, to the extent of retrieving the photos from it to the Pi. There’s a smart web interface to control everything, making the process — if you’ll excuse the pun — a snap. There’s a video of it in action, that you can see below the break.
We’ve featured many film scanner projects over the years, one that remains memorable is this 3D printed lens mount.


![The film scanner [xssfox] found, in the center of a table, with other stuff strewn across the table](https://hackaday.com/wp-content/uploads/2024/05/hadimg_iscsi_scanner_feat.png?w=600&h=450)