Hackaday Prize Entry: Solar WiFi Rover Roves At Night

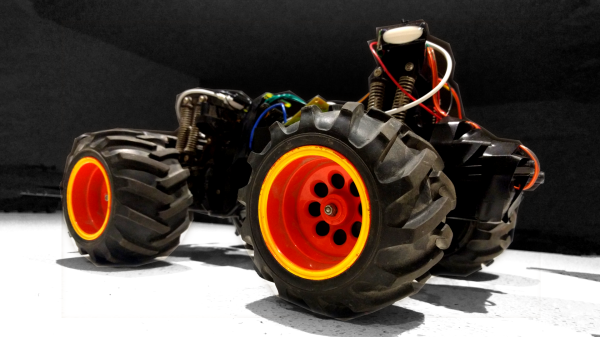
[TK] has a stretch goal for his RC car project — enabling it to recharge on solar power during the day and roam around under remote Internet control at night. It’s like a miniature, backyard version of NASA’s Curiosity rover.

Right now, he’s gotten a Raspberry Pi Zero and a camera on board, and has them controlling the robot over WiFi. He looks like he’s having a great time piloting it around his house. Check out the video down below for (crashy) remote-controlled operation.

We can’t wait to see if solar power is remotely possible (tee-hee!) as an option for this vehicle. The eventual plan to connect it via 3G cellular modem is still off in the future, and will probably demand more of the smarts of the Raspberry Pi than at present. But we love the idea of a long-running autonomous vehicle, so we’re pulling for you, [TK]!

Continue reading “Hackaday Prize Entry: Solar WiFi Rover Roves At Night”

Hackaday Prize Entry: A WiFi Swiss Army Knife

WiFi is all around us, but if you want to work with this ubiquitous networking protocol, you’ll need to pull out a laptop or smartphone like a caveman. [Daniel] has a better idea. It’ s a simple, compact tool for cracking WiFi passwords or sending deauth packets to everyone at the local Starbucks. It’s an ESP Swiss Army Knife, and a great entry for the Hackaday Prize.

As you would expect, this WiFI Swiss Army Knife is powered by the ESP8266 and features a tiny OLED display and a bunch of buttons for the UI. With this, [Daniel] is able to perform a deauth attack on a network, kicking anyone off the network, provided this device already has the MAC address of the victim.

This tiny wireless tool also has an SD card, making it possible to collect authentication frames for later decryption on a device that actually has the power to crack a network. With a LiPo charge controller and a sufficiently large battery, this tiny device could be left in the corner of an office collecting authentication packets for days until it’s later retrieved, opening up the network to anyone with a sufficiently fast computer. It’s a great build and very useful, making this a great entry for The Hackaday Prize.

Hackaday Prize Entry: The Strength Of 3D Printed Parts

[Sam Barrett] is doing something that is sorely needed. He’s doing real materials research on FDM parts.

There’s nothing wrong with the rough experiments like hanging a 1 L bottle of water from the end of a rectangular test print to compare strengths. We also have our rules-of-thumb, like expecting the print to perform at 30% of injection molded strength. But these experiments are primitive and the guidelines are based on hearsay. Like early metallurgy or engineering; 3D printing is full of made-up stuff.

What [Sam] has done here is really amazing. He’s produced a model of a printed ABS part and experimentally verified it to behave close enough to the real thing. He’s also set a method for testing and proposed a new set of questions. If it couldn’t be better, he also included his full research notebook. Make sure to read the FDMProperties-report (PDF) in the files section of Hackaday.io.

Sam finally answered a question we've had of what it looks like when the printer over extrudes.
Sam finally answered a question we’ve had of what it looks like when the printer over extrudes.

If research like this is being done elsewhere, it’s either internal to a large 3D printer manufacturer, or it’s behind a paywall so thorough only the Russians can help a regular peasant get through to them. Anyone with access to a materials testing lab can continue the work (looking at you every single engineering student who reads this site) and begin to help everyone achieve an understanding of 3D printed parts that could lead to some really cool stuff one day.

Hackaday Prize Entry: Diagnosing Concussions

Athletes of every age receive a lot of blows to the head. After a few years of this and a lot of concussions, symptoms similar to Alzheimer’s can appear. For his Hackaday Prize entry, [Mihir] wanted to build a simple device that could be given to high school coaches that would diagnose concussions. He came up with HeadsUp, a device so simple even a high school gym teacher could use it.

The origins of HeadsUp began as an augmented reality device, but after realizing that was a difficult project, pivoted to something a bit easier and even more useful. HeadsUp tracks the wearer’s eye movements with a webcam while a series of LEDs strobe back and forth in front of the wearer’s eyes. This is the fastest and easiest way to test for a concussion, and making this automated means it’s the perfect device to throw in a gym bag.

Hackaday Prize Entry: Helping Millions See Clearly

Slit lamps are prohibitively expensive in the third world areas of India where they are most needed. An invention that’s been around for over a hundred years, the slit lamp is a simple-in-concept way to see and diagnose a large array of ocular issues.

Since they are relatively old by technological standards, the principles behind them have become more and more understood as time has gone on. While a nice lab version with a corneal microscope is certainly better, innovations in manufacturing have brought the theoretical minimum cost of the device way down, or at least that’s what [Kewal Chand Swami] hopes.

His design aims for portability and cost reduction. It must be able to travel to remote locations and it must be significantly cheaper than the lab versions. It uses off-the-shelf lenses in a 3D printed housing with a simple LED torch, the kind you can buy for a dollar at the check-out stand.

The assembly slides onto the user’s head and is held there with straps. The doctor can adjust where the slit the lamp shines and also look through a microscope to diagnose the issue. Hopefully devices like this will see similar community support to the prosthetic projects we’ve covered.

Hackaday Prize Entry: Low Cost, DIY Thermal Imaging

A few years ago, thermal imaging sensors – cameras that could see heat – became very cheap. FLIR was going all-in with their Lepton module, and there were a number of clip-on cellphone accessories that gave the computer in your pocket the ability to see infrared.

Fast forward a few years, and you can still buy a thermal imaging sensor for your cellphone, and it still costs about the same as it did in 2013. For his Hackaday Prize project, [Josh] is building a more modern lower cost thermal imaging camera. It won’t have the resolution of the fancy $1000 FLIR unit, but it will be very inexpensive with a BOM cost of about $50.

[Josh] is building his low-cost thermal camera around Panasonic’s Grid-EYE module. This thermopile array contains 64 individual infrared sensors, giving this ‘camera’ a resolution of 8×8 pixels. That’s nothing compared to the thousands of pixels found in devices using the FLIR Lepton, but the Grid-EYE is very cheap.

Right now, [Josh]’s build is using an ARM Cortex M0+ and a cheap touch screen LCD he picked up from AliExpress. There’s an optional component to this build in the form of a visible light camera, giving [Josh] the ability to overlay thermal sensor data over a visible light image, just like the fancier, more expensive units.

With a total BOM cost of $44.50, [Josh]’s build is easy on the pocketbook, but still good enough to get some useful information. It’s a great build, and a great entry for The Hackaday Prize.

Hackaday Prize Entry: Smart USB Hub And IoT Power Meter

[Aleksejs Mirnijs] needed a tool to accurately measure the power consumption of his Raspberry Pi and Arduino projects, which is an important parameter for dimensioning adequate power supplies and battery packs. Since most SBC projects require a USB hub anyway, he designed a smart, WiFi-enabled 4-port USB hub that is also a power meter – his entry for this year’s Hackaday Prize.

[Aleksejs’s] design is based on the FE1.1s 4-port USB 2.0 hub controller, with two additional ports for charging. Each port features an LT6106 current sensor and a power MOSFET to individually switch devices on and off as required. An Atmega32L monitors the bus voltage and current draw, switches the ports and talks to an ESP8266 module for WiFi connectivity. The supercharged hub also features a display, which lets you read the measured current and power consumption at a glance.

Unlike most cheap hubs out there, [Aleksejs’s] hub has a properly designed power path. If an external power supply is present, an onboard buck converter actively regulates the bus voltage while a power path controller safely disconnects the host’s power line. Although the first prototype is are already up and running, this project is still under heavy development. We’re curious to see the announced updates, which include a 2.2″ touchscreen and a 3D-printable enclosure.