There Are No LEDs Around The Face Of This Clock

This unusual clock by [Moritz v. Sivers] looks like a holographic dial surrounded by an LED ring, but that turns out to not be the case. What appears to be a ring of LEDs is in fact a second hologram. There are LEDs but they are tucked out of the way, and not directly visible. The result is a very unusual clock that really isn’t what it appears to be.

The face of the clock is a reflection hologram of a numbered spiral that serves as a dial. A single LED – the only one visibly mounted – illuminates this hologram from the front in order to produce the sort of holographic image most of us are familiar with, creating a sense of depth.

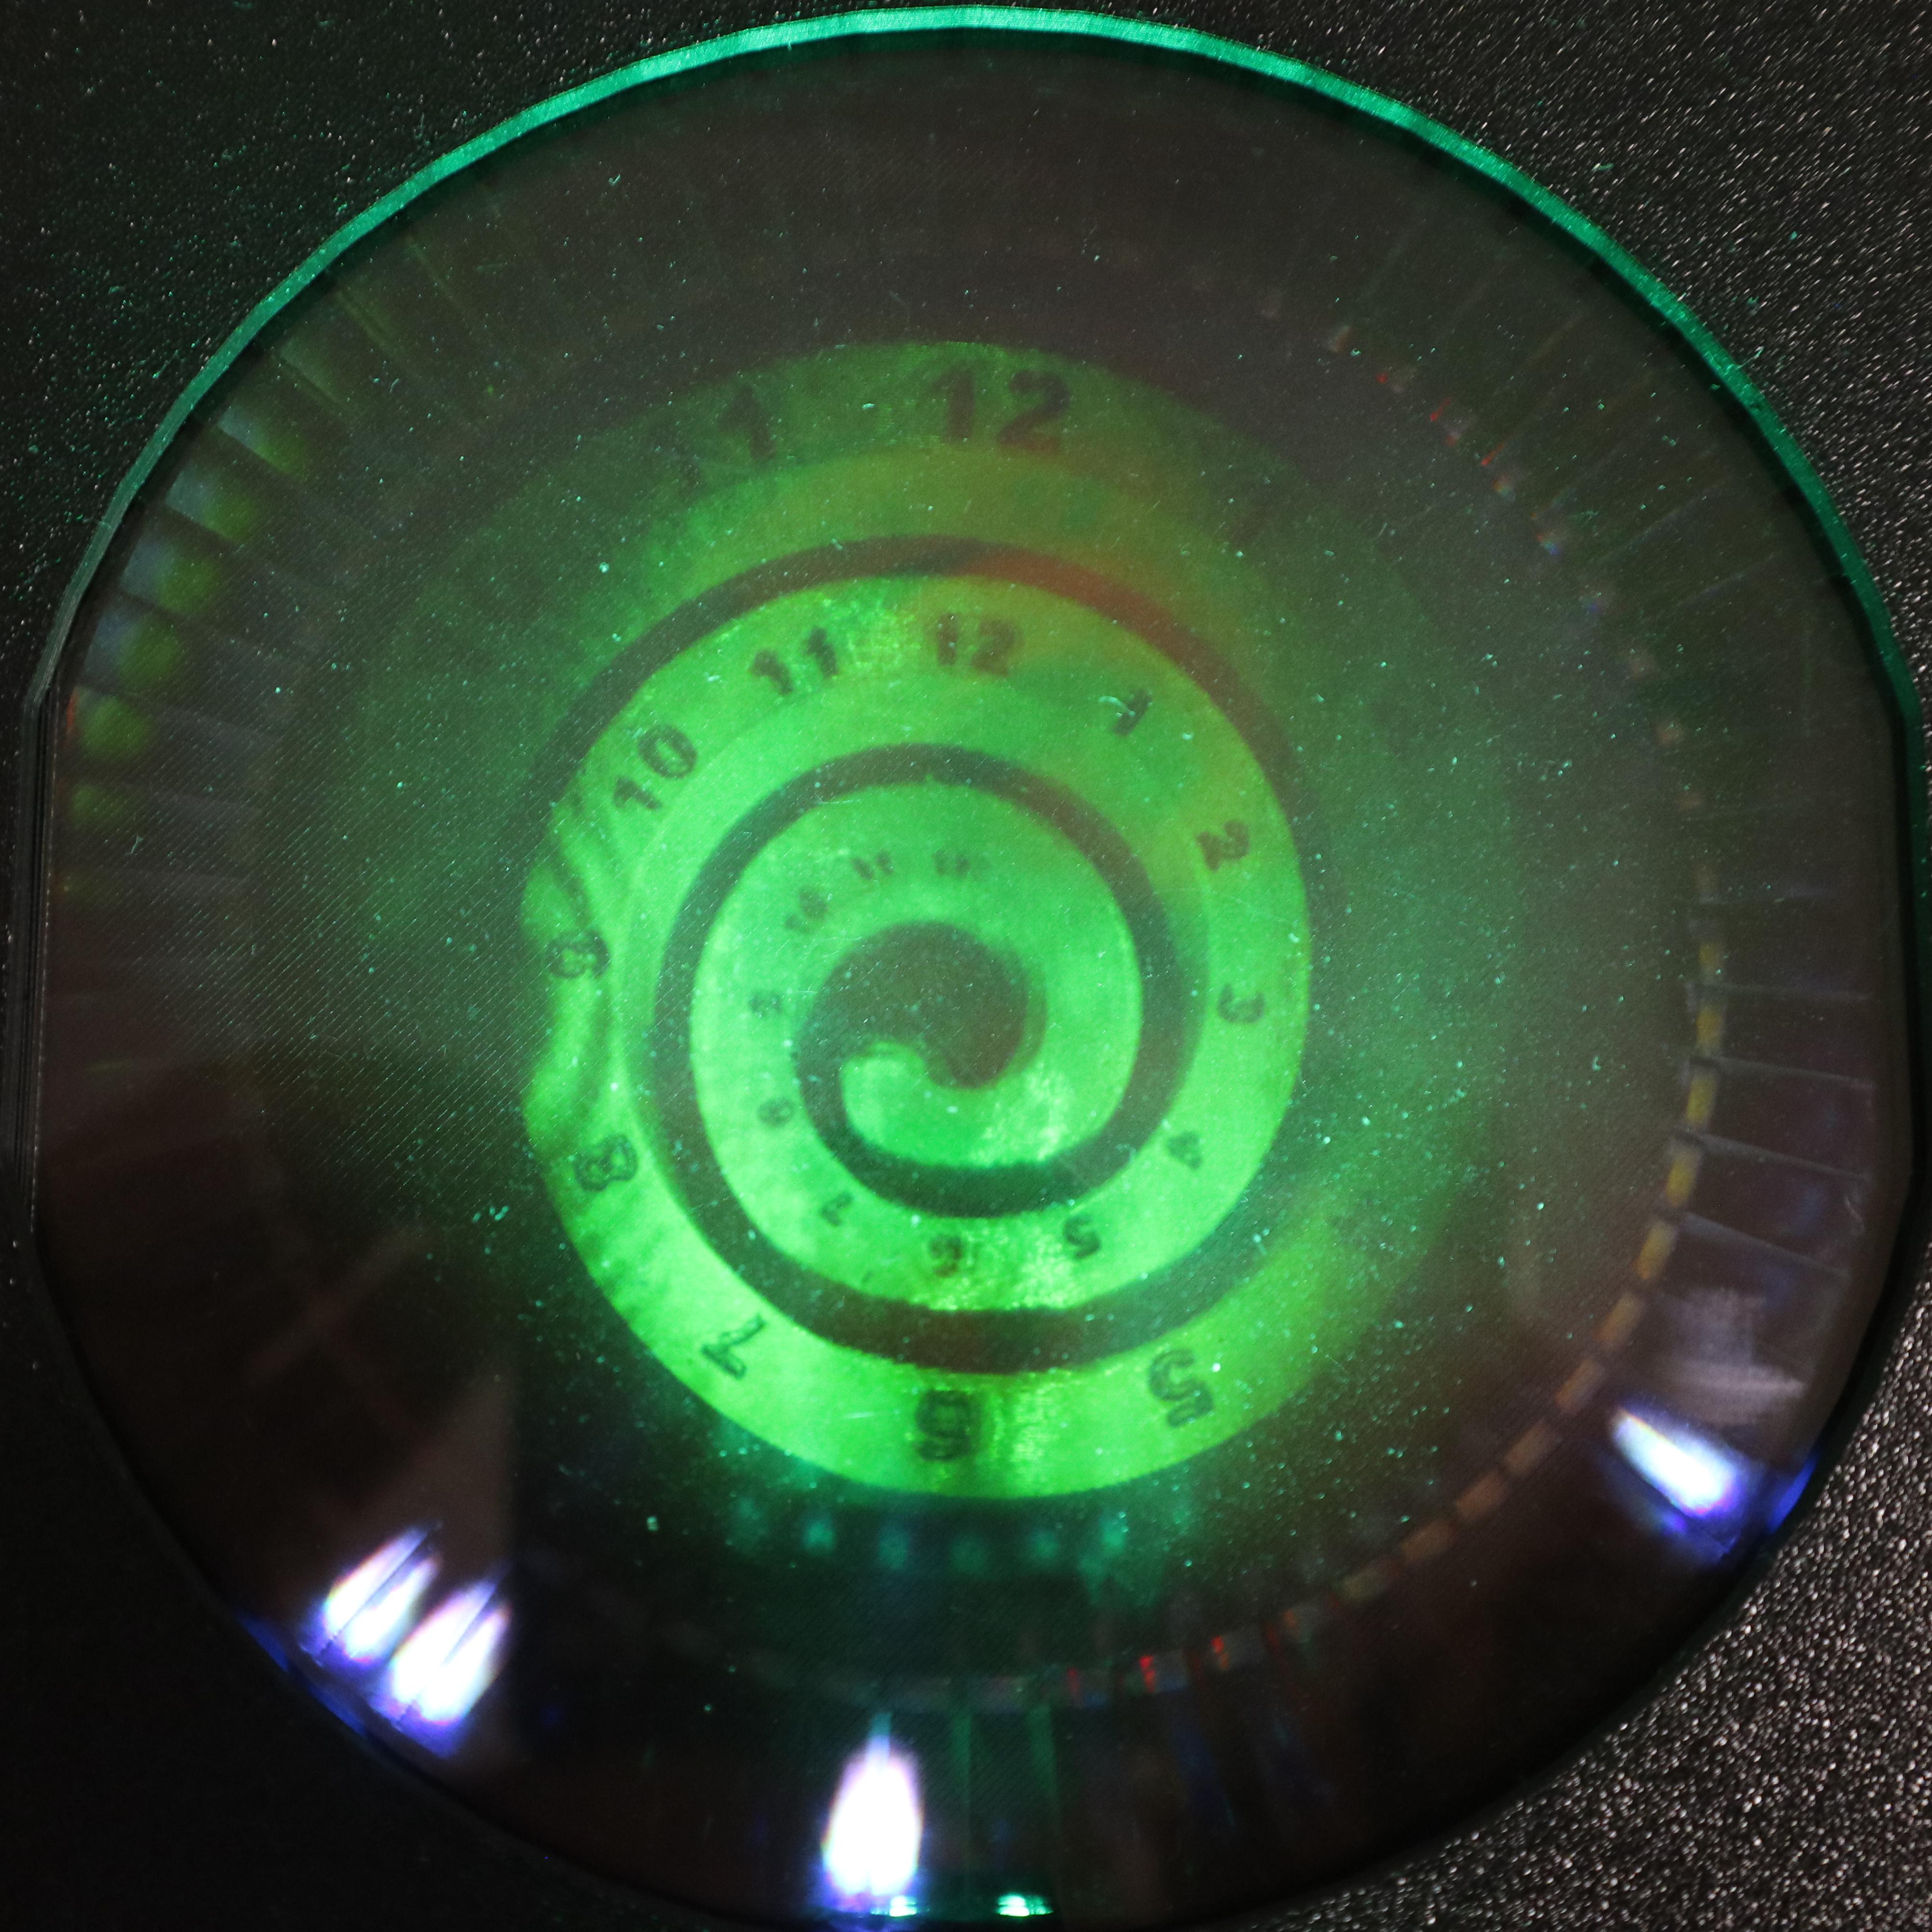
The lights around the circumference are another matter. What looks like a ring of LEDs serving as clock hands is actually a transmission hologram made of sixty separate exposures. By illuminating this hologram at just the right angle with LEDs (which are mounted behind the visible area), it is possible to selectively address each of those sixty exposures. The result is something that really looks like there are lit LEDs where there are in fact none.

[Moritz] actually made two clocks in this fashion. The larger green one shown here, and a smaller red version which makes some of the operating principles a bit more obvious on account of its simpler construction.

If it all sounds a bit wild or you would like to see it in action, check out the video (embedded below) which not only showcases the entire operation and assembly but also demonstrates the depth of planning and careful execution that goes into multi-exposure of a holographic plate.

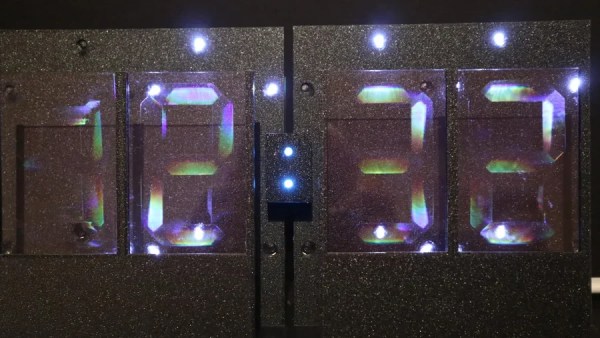
[Moritz v. Sivers] is no stranger to making unusual clocks. In fact, this analog holographic clock is a direct successor to his holographic 7-segment display clock. And don’t miss the caustic clock, nor his lenticular clock.

Continue reading “There Are No LEDs Around The Face Of This Clock”

A Holographic Seven-Segment Clock

Seven-segment displays are one of the most ho-hum ways to display the time. They were cool for a little bit in the 70s, but by now, they’re a little bit old hat. That is, unless you get weird with it. This holographic seven-segment clock from [mosivers] qualifies neatly in that category.

The first step was to make the holographic segment displays, because they’re not really something you can just buy off the shelf. [mosivers] achieved this by using a kit from LitiHolo, which enables you to create holograms by shooting a laser at special holographic film. Only, a few upgrades were made to use the kit with a nicer red diode laser that [mosivers] had on hand for better performance. The seven-segment layouts were carefully recorded on to the film to form the basic numerals of the clock, such that illuminating the films from different angles would light different segments of the numeral. It’s quite involved, but it’s explained well in the build video.

As for the timekeeping side of things, an ESP32 was used, setup to query a network time server to stay accurate. The microcontroller then commands a series of LEDs to light up as needed to illuminate the relevant segments of the holographic film to show the time.

Ultimately, [mosivers] built a cool clock with a look you won’t find anywhere else. It’s a lot more work than just wiring up some classic seven-segment LEDs, but we think the result is worth it. If you fancy other weird seven-segment builds, though, we’ve got plenty of others in the till.

Continue reading “A Holographic Seven-Segment Clock”

An array of tiny parallel green lines appears over a steel surface. The white dot a laser beam is visible in the lower center of the picture.

A New Way To Make (Almost) Holograms With Lasers

The spectrum of laser technologies available to hackers has gradually widened from basic gas lasers through CO2 tubes, diode lasers, and now fiber lasers. One of the newer entries is the MOPA laser, which combines a laser diode with a fiber-based light amplifier. The diode’s pulse length and repetition rate are easy to control, while the fiber amplifier gives it enough power to do interesting things – including, as [Ben Krasnow] found, etch hologram-like diffraction gratings onto stainless steel.

Stainless steel works because it forms a thin oxide layer when heated, with a thickness determined by the temperature it reaches. The oxide layer creates thin-film interference with incoming light, letting the laser mark parts of a steel sheet with different colors by varying the intensity of heating. [Ben] wrote a script to etch color images onto steel using this method, and noticed in one experiment that one area seemed to produce diffraction patterns. More experimentation revealed that the laser could consistently make diffraction gratings out of parallel patterns of oxide lines. Surprisingly, the oxide layer seemed to grow mostly down into the metal, instead of up from the surface.

The pitch of the grating is perpendicular to the direction of the etched lines, and varying the line spacing changes the angle of diffraction, which should in theory be enough control to print a hologram with the laser. [Ben]’s first experiment in this general direction was to create a script that turned black-and-white photographs into shimmering matrices of diffraction-grating pixels, in which each pixel’s grating orientation was determined by its brightness. To add a parallax depth effect, [Ben] spread out images into a gradient in a diffraction grating, so that it produced different images at different angles. The images were somewhat limited by the minimum size required for the grating pixels, but the effect was quite noticeable.

Unfortunately, since the oxide layers grow down into the metal, [Ben] doubts whether the laser can etch molds for diffraction-grating chocolate. If you’re interested in more diffraction optics, check out these custom diffraction lenses or the workings of normal holograms.

Hackaday Links Column Banner

Hackaday Links: August 24, 2025

“Emergency Law Enforcement Officer Hologram program activated. Please state the nature of your criminal or civil emergency.” Taking a cue from Star Trek: Voyager, the Seoul Metropolitan Police Agency is testing a holographic police officer, with surprisingly — dare we say, suspiciously? — positive results. The virtual officer makes an appearance every two minutes in the evening hours in a public park, presumably one with a history of criminal activity. The projection is accompanied by a stern warning that the area is being monitored with cameras, and that should anything untoward transpire, meat-based officers, presumably wearing something other than the dapper but impractical full-dress uniform the hologram sports, will be dispatched to deal with the issue.

Continue reading “Hackaday Links: August 24, 2025”

New Camera Does Realtime Holographic Capture, No Coherent Light Required

Holography is about capturing 3D data from a scene, and being able to reconstruct that scene — preferably in high fidelity. Holography is not a new idea, but engaging in it is not exactly a point-and-shoot affair. One needs coherent light for a start, and it generally only gets touchier from there. But now researchers describe a new kind of holographic camera that can capture a scene better and faster than ever. How much better? The camera goes from scene capture to reconstructed output in under 30 milliseconds, and does it using plain old incoherent light.

The camera and liquid lens is tiny. Together with the computation back end, they can make a holographic capture of a scene in under 30 milliseconds.

The new camera is a two-part affair: acquisition, and calculation. Acquisition consists of a camera with a custom electrically-driven liquid lens design that captures a focal stack of a scene within 15 ms. The back end is a deep learning neural network system (FS-Net) which accepts the camera data and computes a high-fidelity RGB hologram of the scene in about 13 ms.  How good are the results? They beat other methods, and reconstruction of the scene using the data looks really, really good.

One might wonder what makes this different from, say, a 3D scene captured by a stereoscopic camera, or with an RGB depth camera (like the now-discontinued Intel RealSense). Those methods capture 2D imagery from a single perspective, combined with depth data to give an understanding of a scene’s physical layout.

Holography by contrast captures a scene’s wavefront information, which is to say it captures not just where light is coming from, but how it bends and interferes. This information can be used to optically reconstruct a scene in a way data from other sources cannot; for example allowing one to shift perspective and focus.

Being able to capture holographic data in such a way significantly lowers the bar for development and experimentation in holography — something that’s traditionally been tricky to pull off for the home gamer.

Holograms: The Art Of Recording Wavefronts

The difference between holography and photography can be summarized perhaps most succinctly as the difference between recording the effect photons have on a surface, versus recording the wavefront which is responsible for allowing photographs to be created in the first place. Since the whole idea of ‘visible light’ pertains to a small fragment of the electromagnetic (EM) spectrum, and thus what we are perceiving with our eyes is simply the result of this EM radiation interacting with objects in the scene and interfering with each other, it logically follows that if we can freeze this EM pattern (i.e. the wavefront) in time, we can then repeat this particular pattern ad infinitum.

Close-up of the wavefront pattern recorded on the holographic film (Credit: 3Blue1Brown, YouTube)

In a recent video by [3Blue1Brown], this process of recording the wavefront with holography is examined in detail, accompanied by the usual delightful visualizations that accompany the videos on [3Blue1Brown]’s channel. The type of hologram that is created in the video is the simplest type, called a transmission hologram, as it requires a laser light to illuminate the holographic film from behind to recreate the scene. This contrasts with a white light reflection hologram, which can be observed with regular daylight illumination from the front, and which is the type that people are probably most familiar with.

The main challenge is, perhaps unsurprisingly, how to record the wavefront. This is where the laser used with recording comes into play, as it forms the reference wave with which the waves originating from the scene interact, which allows for the holographic film to record the latter. The full recording setup also has to compensate for polarization issues, and the exposure time is measured in minutes, so it is very sensitive to any changes. This is very much like early photography, where monochromatic film took minutes to expose. The physics here are significant more complex, of course, which the video tries to gently guide the viewer through.

Also demonstrated in the video is how each part of the exposed holographic film contains enough of the wavefront that cutting out a section of it still shows the entire scene, which when you think of how wavefronts work is quite intuitive. Although we’re still not quite in the ‘portable color holocamera’ phase of holography today, it’s quite possible that holography and hologram-based displays will become the standard in the future.

Continue reading “Holograms: The Art Of Recording Wavefronts”

Holograms Display Time With ESP32

Holograms and holographic imagery are typically viewed within the frame of science fiction, with perhaps the most iconic examples being Princess Leia’s message to Obi-Wan in Star Wars, or the holodecks from Star Trek. In reality, holograms have been around for a surprising amount of time, with early holographic images being produced in the late 1940s. There are plenty of uses outside of imagery for modern holographic systems as well, and it’s a common enough technology that it’s possible to construct one using an ESP32 as well.

In this build, [Fiberpunk] demonstrates the construction and operation of a holographic clock. The image is three-dimensional and somewhat transparent and is driven by an ESP32 microcontroller. The display is based around a beamsplitter prism which, when viewed from the front, is almost completely invisible to the viewer. The ESP32 is housed in a casing beneath this prism, and [Fiberpunk] has two firmware versions available for the device. The first is the clock which displays an image as well as the time, and the second is more of a demonstration which can show more in-depth 3D videos using gcode models and also has motion sensing controls.

For anyone interested in holography, a platform like this is might make an excellent entry point to explore, and with the source for this build available becomes even easier. It’s almost certainly less expensive than these 3D printers that can turn out custom holographic images, and has the added benefit of being customizable and programmable as well.

Continue reading “Holograms Display Time With ESP32”