EcoEDA Integrates Your Junk Bin Into Your Designs

If you’re like us, there’s a creeping feeling that comes over you when you’re placing an order for parts for your latest project: Don’t I already have most of this stuff? With the well-stocked junk bins most of us sport and the stacks of defunct electronics that are almost always within arm’s length, chances are pretty good you do. And yet, we always seem to just click the button and place a new order anyway; it’s just easier.

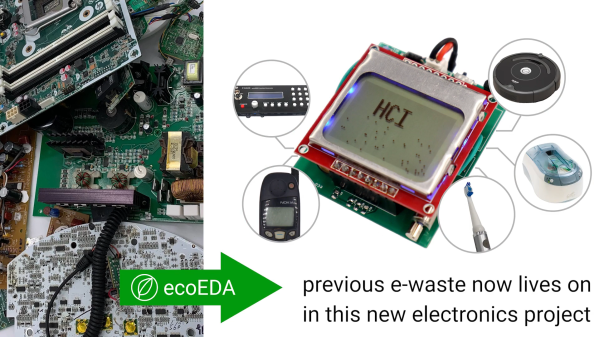
But what if mining the treasure in your junk bin was easier? If you knew right at design time that you had something in your stash you could slot into your build, that would be something, right? That’s the idea behind ecoEDA, a Python-based KiCAD plugin by [Jasmine Lu], [Beza Desta], and [Joyce Passananti]. The tool integrates right into the schematic editor of KiCAD and makes suggestions for substitutions as you work. The substitutions are based on a custom library of components you have on hand, either from salvaged gear or from previous projects. The plug-in can make pin-for-pin substitutions, suggest replacements with similar specs but different pinouts, or even build up the equivalent of an integrated circuit from available discrete components. The video below gives an overview of the tool and how it integrates into the design workflow; there’s also a paper (PDF) with much more detail.

This seems like an absolutely fantastic idea. Granted, developing the library of parts inside all the stuff in a typical junk bin is likely the biggest barrier to entry for something like this, and may be too daunting for some of us. But there’s gold in all that junk, both literally and figuratively, and putting it to use instead of dumping it in a landfill just makes good financial and environmental sense. We’re already awash in e-waste, and anything we can do to make that even just a little bit better is probably worth a little extra effort. Continue reading “EcoEDA Integrates Your Junk Bin Into Your Designs”

New Contest: Making Tech At Home

Put that parts bin to good use and build something! That’s the gist of the Making Tech at Home contest where your inner pack rat can shine by building from the parts you have on hand.

So what are you supposed to build? We’re not particular, we just want it to be cool. Grab everyone’s attention with an awesome project, and then win our hearts with the story of where you found the components.

Daniel Domínguez’s Parts Bin Self Portrait is an excellent example

An excellent example is the Parts Bin Self Portrait seen here that was a runner-up in the Circuit Sculpture contest. [Daniel Domínguez] talks about cutting out his silhouette from a scrap of prototyping board, pulling dev boards out of the parts box, and finding a ceiling fan on the side of the road which ended up donating the wire from the windings of its motor.

Your story is what’s important here. You can build a sleek and beautiful bit of gear that doesn’t look hacky at all — tell us about what the finished project does, but we also need to hear what parts you had on hand, where they came from, and what led you to use them. There is an element of satisfaction when that broken thermostat that you’ve been squirreling way for ten years, or the accidentally ordered reel of 0402 resistors, ends up getting used. Dust off that electronics hoard and get building!

Prizes Sent Out Throughout the Contest

This contest runs until July 28th, but you won’t have to wait that long to score some loot. Thirty entries will win a grab bag of stuff from Digi-Key and we’ll pick a few projects every week as we work toward that number. Help us decide what to send in those grab bags by voting for the gear you like the most.

Once the contest wraps up, three top winners will receive a mega grab bag stuffed with $500 worth of components. You know… to add to your parts bin for all those future builds.

If you’re anything like us, people deliver their broken stuff to you because they’ve heard you build things out of broken electronics. You feel torn about keeping old hardware around, but feel guilty about sending it to the landfill. When you order parts you get multiples just so you have them on hand for the next project. You were made for this competition, and no matter who the prizes go to, we want a look inside your parts bin.

Ask Hackaday: How Do You Keep The 3D Printer From Becoming EWaste

One thing we sometimes forget in our community is that many of the tecniques and machines that we take for granted are still something close to black magic for many outsiders. Here’s a tip: leave a 3D printer running next time you take a group of visitors round a hackerspace, and watch their reaction as a Benchy slowly emerges from the moving extruder. To us it’s part of the scenery, but to them it’s impossibly futuristic and their minds are blown.

Just because something says it's a Prusa i3, doesn't mean it is a Prusa i3.
Just because something says it’s a Prusa i3, doesn’t mean it is a Prusa i3.

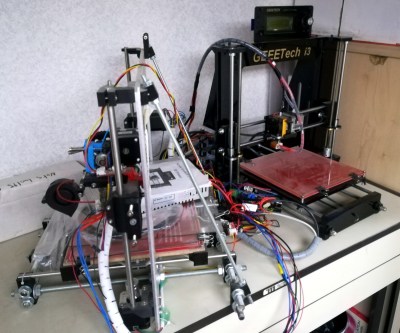
Nearly 15 years after the dawn of the RepRap project we have seen a huge advancement in the capabilities of affordable 3D printers, and now a relatively low three-figure sum will secure a machine from China that will churn out prints whose quality would amaze those early builders. We’ve reached the point in our community at which many people are on their third or fourth printer, and this has brought with it an unexpected side-effect. Where once a hackerspace might have had a single highly prized 3D printer, now it’s not unusual to find a pile of surplus older printers on a shelf. My hackerspaces both have several, and it’s a sight I’ve frequently seen on my travels around others. Perhaps it’s a sign of a technology maturing when it becomes ewaste, and thus it seems affordable 3D printing has matured. Continue reading “Ask Hackaday: How Do You Keep The 3D Printer From Becoming EWaste”

A Nexus 5 Smartphone Running PostmarketOS

PostmarketOS Turns 600 Days Old

PostmarketOS began work on a real Linux distribution for Android phones just over 600 days ago. They recently blogged about the state of the project and ensured us that the project is definitely not dead.

PostmarketOS’ overarching goal remains a 10 year life-cycle for smartphones. We previously covered the project on Hackaday to give an introduction. Today, we’ll concern ourselves with the progress the PostmarketOS team has made.

The team admits that they’re stuck in the proof-of-concept phase, and need to break out of it. This has required foundational changes to the operating system to enable development across a wide variety of devices and processor architectures. There’s now a binary package repository powered by builds.sr.ht which will allow users to install packages for their specific device.

Other updates include fixing support for the Nexus 5 and Raspberry Pi Zero, creating support for open source hardware devices including the Pine A64-LTS and Purism Librem 5. PostmarketOS now boots on a total of 112 different devices.

We’re excited to see the PostmarketOS project making progress. With the widespread move to mobile devices, users lose control over their computing devices. PostmarketOS gives us the ability to run code that we can read and modify on these devices. It’s no small feat though. Supporting the wide variety of custom hardware in mobile devices requires a lot of effort.

While it may be a while before PostmarketOS is your daily driver, the project is well suited to building task-specific devices that require connectivity, a touch screen, and a battery. We bet a lot of Hackaday readers have a junk drawer phone that could become a project with the help of PostmarketOS.

A Three Axis Mill For The End Of The World

A mill is one of those things that many hackers want, but unfortunately few get their hands on. Even a low-end mill that can barely rattle its way through a straight cut in a piece of aluminum is likely to cost more than all the other gear on your bench. A good one? Don’t even ask. So if something halfway decent is out of your price range, you might as well throw caution to the wind and build one.

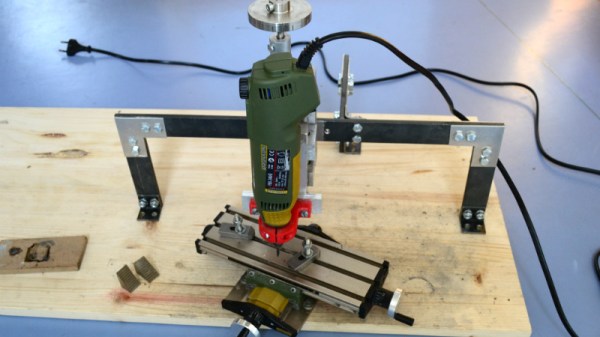
That’s more or less the goal behind this extremely basic three axis mill built by [Michael Langeder]. Designed around a cheap rotary tool, it’s hard to imagine a more simplistic mill. Almost all the components are stuff you could pick up from the local hardware store, or probably even the junk pile if you were really in a pinch. It won’t be the best looking piece of gear in your shop, but it’s good enough to learn the basics on and just might be able to bootstrap a second-generation mill RepRap-style.

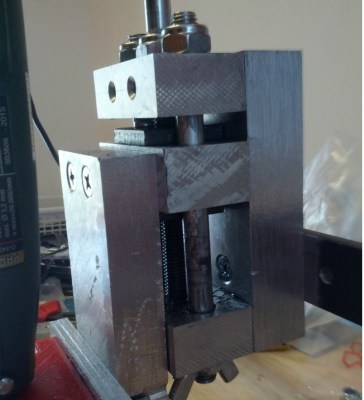
Made out of scrap blocks of aluminum and some threaded rod, the Z axis itself represents the bulk of the work on this project. It gives the user fine control over the height of the rotary tool by way of a large knob on the top. It’s held over the work piece with some flat steel bars and corner brackets rather hastily cut out of aluminum sheet.

While the tool holder is 3D printed, you could probably hack something up out of a block of wood if you didn’t have access to a printer. The only part of the mill that’s really “cheating” is the cross slide table, but at least they can be had for relatively cheap. If you really wanted to do this with junk bin finds, you could always replicate the Z axis design for X and Y.

If you’re not looking for something quite so austere, we’ve covered slightly more advanced DIY mills in the past. You could always go in the opposite direction and put a cross slide vise on your drill press, but do so at your own risk.

Friend In Need Gets Junk Bin PC For Cramped Quarters

If you doubt the power of the Hackaday community, check this one out. Stalwart reader and tipster [starhawk] has pitched in to help a friend in need, someone he met through Hackaday.io. Seems this friend’s current living arrangements are somewhat on the cramped side, and while he’s in need of a PC, even a laptop would claim too much space.

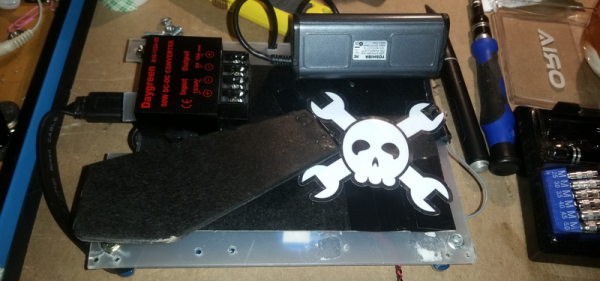
So with a quick trip to the store and a few items from the junk bin, [starhawk] whipped up an all-in-one PC the size of a tablet for his friend. As impressed as we are by the generosity, we’re more impressed by the quality of his junk bin. The heart of the compact machine is a motherboard from a Wintel CX-W8, scarcely larger than a Raspberry Pi model A. After the addition of a larger heatsink and fan, the board was attached via a sheet of plastic to the back of a 7-inch touchscreen, also a junk bin find. A cheap picture frame serves as the back of the all-in-one, complete with Jolly Wrencher, of course. Alas, the DC-DC converter was one of the only purchased items, bringing the cost for the build to all of $22, including the $15 for a wireless keyboard/touchpad on clearance from Walmart. After some initial power troubles, the fixes for which are described in this update, the machine was ready to ship.

Does this one seem familiar? It should — [starhawk] built a similar “laptop” for himself a while back when he was low on funds. Now it seems like he’s paying it forward, which we appreciate. For more details on how he pulled this all of, check out The Anytop, [starhawk’s] portable computer anyone can build. It was his 2017 Hackaday Prize entry!