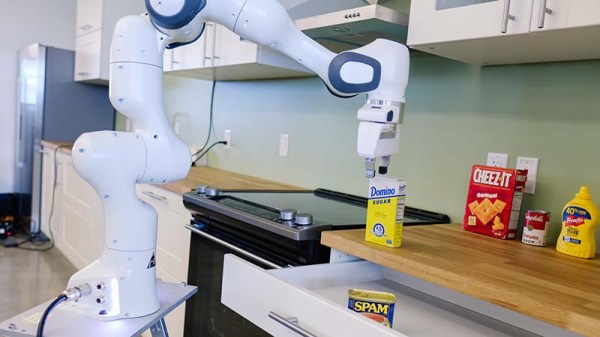
Bringing A Child’s Play Kitchen To Life

Given how many adults will go out of their way to avoid spending any extended amount of time in the kitchen, it’s pretty amazing how much children love playing in their miniature versions. Especially since they tend to be pretty simple: usually they’re little more than different sized boxes made out of MDF to represent the refrigerator, oven, and microwave. Of course, some kids are fortunate enough to have hackers and makers for parents.

[Brian Lough] wanted to get his two year old daughter her own play kitchen, but wasn’t terribly impressed with anything on the market. So he decided to start with the IKEA Duktig and add in his own personal touches to turn the stark white playset into something that would really get his daughter’s imagination going. With the liberal application of RGB LEDs and microcontrollers, her kitchen is sure to be envy of the sandbox.

Being the class act that he is, [Brian] starts his write-up acknowledging the various IKEA Duktig hacks and modifications that served as inspiration for his own build. Most of the prior art out there relates to making the microwave and oven a bit more exciting with the addition of lights and sounds, which ultimately ended up being the way he approached his daughter’s version as well.

For the oven, [Brian] decided to add some big arcade buttons over the door which would change the color of the RGB LEDs inside. He thought this association would be a good way to help his daughter learn her colors, since she’ll be able to see the oven change color when she presses the corresponding button. He also added a knob to control the intensity of the light, meant to be analogous to the temperature control in a real oven.

The modifications to the microwave are a bit more extensive, including a “timer” made out of a TM1637 LED display in a 3D printed panel complete with a buzzer to indicate when the plastic food has been thoroughly illuminated. [Brian] even made it so the LEDs in the NeoPixel ring light up in a spinning pattern to cast some shadows and simulate movement. He notes that the microwave was actually a bit overwhelming to his daughter at first, but after a couple months of getting used to the functions, she enjoys it as much as the oven.

While hacking a play kitchen might be new territory for him, [Brian] is no stranger to building awesome stuff. We’ve previously seen him put together a YouTube subscriber counter in the style of Tetris, and he even managed to create a gorgeous looking display out of shoelaces of all things.

How Do You Etch Something You Can’t Move?

We probably don’t need to tell this to the average Hackaday reader, but we’re living in a largely disposable society. Far too many things are built as cheaply as possible, either because manufacturers know you won’t keep it for long, or because they don’t want you to. Of course, the choice if yours if you wish to you accept this lifestyle or not.

Like many of us, [Erik] does not. When the painted markings on his stove become so worn that he couldn’t see them clearly, he wasn’t about to hop off to the appliance store to buy a new one. He decided to take things into his own hands and fix the poor job the original manufacturers did in the first place. Rather than paint on new markings, he put science to work and electroetched them into the metal.

Whether or not you’ve got a stove that needs some sprucing up, this technique is absolutely something worth adding to your box of tricks. Using the same methods that [Erik] did in his kitchen, you could etch an awesome control panel for your next device.

So how did he do it? Despite the scary multisyllabic name, it’s actually quite easy. Normally the piece to be etched would go into a bath of salt water for this process, but obviously that wasn’t going to work here. So [Erik] clipped the positive clamp of a 12 V battery charger to the stove itself, and in the negative clamp put a piece of gauze soaked in salt water. Touching the gauze to the stove would then eat away the metal at the point of contact. All he needed to complete the project were some stencils he made on a vinyl cutter.

We’ve previously covered using electricity to etch metal in the workshop, as well as the gorgeous results that are possible with acid etched brass. Next time you’re looking to make some permanent marks in a piece of metal, perhaps you should give etching a try.

[via /r/DIY]

Camp Kitchen Kit For Food On The Go!

Camping and road trips are a heck of a lot of fun, despite lacking many of the creature comforts that come from a house and its amenities. We’re all for fire-cooked meals, but sometimes, you want a cook-top and a sink to make cooking on the go a quick process. What if you could pack up a kitchen into a box and take it with you?

[pointblankjustice]  — opting for overkill — built this for his girlfriend instead of the requested box to simply store camping supplies. Glued and screwed plywood forms the frame, drawers, and lid which was then stained and painted to make for an appealing finish. A simple propane camp stove makes a worthy cook-top.

Obviously, one must include a kitchen sink, so a small bar sink and hose faucet are kept running with a cheap, 12V, 35psi pressure pump from Amazon. A little doughnut magnet keeps the faucet secured when not in use. Spent grey-water drains from a hose into a bucket or into a ditch (don’t worry — [pointblankjustice] uses biodegradable soap!).

As an added bonus, [pointblankjustice] has some under-cabinet lighting and accent lighting to keep things cooking late into the night, with power supplied by an extension cord going to their Jeep’s cigarette lighter outlet — plans to add a built-in battery are pending. There’s also a pair of USB ports to keep one’s phone charged and a bear-shaped bottle opener to keep the good times rolling!

The kit packs up nicely and fits snug in the rear of [pointblankjustice]’s Jeep with enough room for other supplies and a pair of dogs.

For longer hauls out into the wilderness, you might consider bringing a solar power supply unit that literally lasts for days.

[via /r/DIY]

Featured Image

A Cold Press Juicer For The Price Of A Few Trips To Jamba Juice

Do you enjoy drinking juice but hate the cleanup after making it? Yeah, we do too. So does [Max Maker], which led to the design and birth of the $40 cold-press juicer. If you’ve been thinking about buying a juicer but the cost has been keeping you from pulling the trigger, you should definitely check it out. This build will save you some serious cash and looks relatively simple to replicate.

[Max] designed this juice press while keeping us common folk in mind who don’t have expensive tools in our humble garage or workshop. For example, to make the tray, we are shown how to perform the initial bends in the sheet of stainless steel using only some plywood and clamps. Then we’re shown how to bend the corners, and finally the ‘funnel’ part of the tray with just a few more basic tools – a bench vise, hammer, and pliers. No metal brake required!

The press is easy to use – wrap your fruit or vegetables in some cheesecloth, put it on the tray, and pump the handle of the jack. Clean-up (which has been a notorious pain-in-the-rear when it comes to commercial juicers) is quick and simple too – just rinse the tray!

Build video after the break.

Continue reading “A Cold Press Juicer For The Price Of A Few Trips To Jamba Juice”

Open Sound Control Of Kitchen Lights

Controlling the Internet of Things is all about passing information around. Realistically, it doesn’t matter what is used, be it MQTT, HTTP, serial data, whatever, and it doesn’t really matter what data is sent as long as the sender and receiver agree on what the data means. MIDI could be used to pass information back and forth, for example and while MIDI is good for some things, Open Sound Control is a more modern alternative and one area where OSC excels over MIDI is Internet connectivity. [Matt] used OSC to control the lighting he installed in his kitchen.

kitchen_controller
ESP8622-1 and Buck Converter

[Matt] had moved in to a new house and wanted some under-cupboard lighting for his kitchen. He got a few cheap warm white LED lights from the Internet and went about wiring them together. For the controller, an ESP8266-1 was used as well as a 12 volt constant-current buck converter. The software runs on the Sming framework, rather than the Arduino framework, and listens for incoming OSC messages. When it receives a command on a specific channel, a callback function turns the lights on and off.  [Matt] also added a switch on the outside of the control box to manually turn the lights on and off.

OSC might not be the right choice for this project, and even [Matt] doesn’t know why he used it, but [Matt] got it working and uses an app on his phone to control it. If he wanted to, he could have used Ableton or another controller to control the lights. (He hasn’t wanted to yet.) OSC is an interesting alternative to MIDI and can also be used with an Arduino without an ethernet shield, or with RFID tags.

Kitchen Timer

A Kitchen Timer Fit For MacGyver

Here’s a project that you don’t want to bring into an airport, ship through the mail, or probably even remove from your home. [ProjectGeek] has built himself a simple kitchen timer masquerading as a bomb. The build is actually pretty simple, but the end result is something that would look at home in a Hollywood action flick.

The timer circuit is built from four simple components. An 8051 microcontroller board is used as the primary controller and timer. The code is available on GitHub. This board is attached to a another board containing four momentary push buttons. These are used to program the timer and to stop the buzzing. Another board containing four 7-segment displays is used to show the remaining time on the timer. A simple piezo buzzer is used to actually alert you when the timer has run out. All of these components are connected with colorful jumper wires.

The physical part of this build is made from easily available components. Old newspapers are rolled up to form the “explosive” sticks. These are then covered in plain brown paper ordinarily used to cover text books. The rolls are bundled together and fixed with electrical tape. The electronics can then be attached to the base with some hot glue or double-sided tape.

Postage Scale

Fixing A Broken Postage Scale

[Starhawk] had an old Pitney Bowes G799 postage scale that wasn’t working as it should. After years of faithfully measuring packages and cooking ingredients, the scale stopped working. At first it fell out of calibration. Then the power up sequence stopped working. The scale normally would turn on, light up the entire display, then change to dashes, and finally set itself to 0.0 lbs. In this case, it would get stuck at the dashes and never change to 0.0.

[Starhawk] ended up purchasing another duplicate scale from eBay, only to find that when it arrived it had the exact same power up problem. Using deductive reasoning, he decided that since the scale was broken during shipping the problem would likely be with a mechanical component. He turned out to be correct. The cheap momentary power button was at fault. When pressing the button, the contact would get stuck closed preventing the scale from zeroing out properly. [Starhawk] easily fixed his problem by replacing the switch.

Next [Starhawk] replaced the old scale’s LCD module with one from the new scale, since the old one looked to be on its way out. The scale still had a problem correctly measuring weight. [Starhawk] tried swapping the load cell from the new scale to the old one, but he found that the new load cell had some kind of problem that prevented the scale from zeroing out properly. The solution ended up being to use the newer “analog board” as [Starhawk] calls it.  The end result was the old scale with two newer circuit boards, an older load cell, and a new power switch. Next time it might be easier to just build his own scale.