Build Your Own Digital Panel Meter

A popular purchase from the usual stockists of imported electronic modules is a digital panel meter. A very small amount of money secures a module with a seven-segment display that you can stick on the front of your power supply or project for an easy readout. Even before the advent of these ultra-cheap Chinese products there have been readily available digital meters, in a line stretching back to the 1970s with chips such as the Intersil 7106.

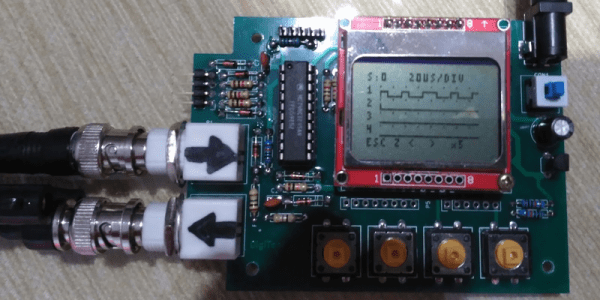
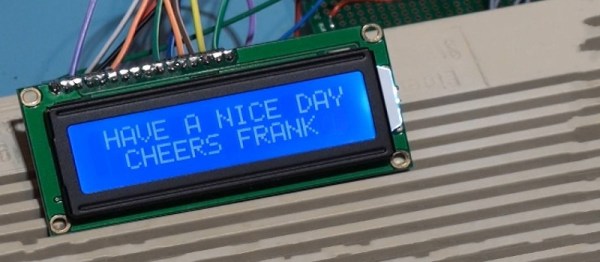
[Marcus Taciuc] is eschewing the off-the-shelf parts, and creating his own digital panel meter. He’s using an MSP430 microprocessor as the brain of his device, and a Hitachi HD44780 compatible LCD display at the front end. The appropriate combinations of resistors and op-amps feeding the MSP’s ADC inputs allow his meter to be used to measure up to 40 VDV, and up to 10A.

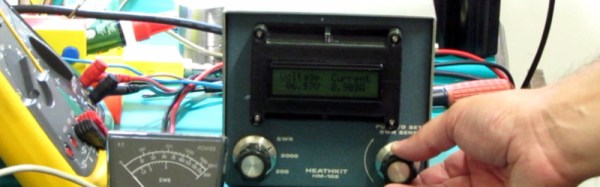
He’s put up a video which we’ve included below the break, showing the use to which this meter has been put: replacing the moving-coil meter in what looks like a classic piece of Heathkit equipment. A 3D printed bracket allows the new meter to fit the circular hole of the original meter, with the LCD on the front. You might still order a prefab meter module, but you can’t deny this looks good.

Continue reading “Build Your Own Digital Panel Meter”

Purely Functional Selfies: Thermal Printer Speaks Haskell

[Dan] recently got a cheap POS thermal printer to chooch remotely over ESP32. Having conquered that project, he decided to see what else he could get the printer to do. Why not use it to print pictures? Sure, it’s been done, but not with Haskell. And yeah, the pictures will be grainy and weird-ish and limited to black and white, but hey, we love black and white around here as much as the idea of doing something simply because you can.

In the first project, [Dan] had to figure out how to talk to the printer since the RS422 cable it came with didn’t seem to work. He bought a TTL-to-RS485 adapter, but then realized he could use TTL directly and wired up a ESP32/OLED dev board to it. During the course of turning it into a photo booth, he had to switch to a bigger screen with a better refresh rate.

Unfortunately, [Dan] was unable to use Haskell by itself. He blames this on the cobwebs in the Haskell ecosystem, something that isn’t a problem for languages like Python that celebrate wide usage and support. [Dan] wrote a Python script that handles image capturing, display, and listening for touch activity on the screen, but Haskell ultimately controls the printer. Check out [Dan]’s demo after the break.

This project may have been trying at times, but at least [Dan] didn’t have to give it a brain transplant to get it to do what he wanted.

Continue reading “Purely Functional Selfies: Thermal Printer Speaks Haskell”

Rage Against The Dying Of The Light With A Raspi Night Vision Camera

One of the most interesting things about hacking is the difference between the vision we have at the beginning and the reality of we’ve built at the end. What began as a simple plan to build a night vision VR headset turned into a five-month adventure for [facelessloser] that culminated in this great-looking camera. He thought it would be easy, but almost every aspect presented some kind of challenge. The important thing is that he kept at it.

One of the major issues [facelessloser] encountered was power. He found that the Pi (Zero W), the screen, and the IR LEDs draw between 1.5 and 2A altogether. He was able to solve this one by using the charging board from a 2A power bank paired with a 1200mAh Li-Po built for the high draw required by vaping. If not for space issues, he might have used a 18650 or two.

Another challenge he faced was storing the video and images. He’d considered setting up the Pi as an access point to view them from a phone browser, but ultimately extended a USB port with an OTG cable to use flash drives. With a bit of Python he can watch for the drive to mount and then write to it. If the flash drive suddenly disappears, the Pi starts saving to the SD card.

There are two videos after the break, a walk through and a night vision demo. You’ll see a bit of a lag happening in the demo video—that’s because [facelessloser] is running the feed through PyGame first. No matter what nightlife you want to peep, it might be nice to add automated zoom with a rangefinder or get a closer look with some PiNoculars.

Continue reading “Rage Against The Dying Of The Light With A Raspi Night Vision Camera”

Why Not Expose Your PCBs Through An LCD?

Most people who have dabbled in the world of electronic construction will be familiar in some form with the process of producing a printed circuit board by exposing a UV sensitive coating through a transparent mask, before moving on to etching. Older readers will have created their masks by hand with crêpe paper tape on acetate, while perhaps younger ones started by laser-printing from their CAD package.

How about a refinement of the process, one which does away with the acetate mask entirely? [Ionel Ciobanuc] may have the answer, in the form of an exposure through an LCD screen. The video below the break shows how it’s done, starting with a (probably a bit too lengthy) sequence on applying the photo-resist coating to the board, and then sitting LCD on top of UV lamp with the board positioned at the top of the pile.

It’s an interesting demonstration, and one that certainly removes a step in the process of PCB creation as it brings the pattern direct from computer to board without an intermediate. Whether or not it’s worth the expenditure on an LCD is up to you, after all a sheet of acetate is pretty cheap and if you already have a laser printer you’re good to go. We’re curious to know whether or not any plastic components in the LCD itself might be damaged by long-term exposure to intense UV light.

Continue reading “Why Not Expose Your PCBs Through An LCD?”

Hacked Headset Brings VR To The Commodore 64

The venerable Commodore 64 got a lot of people started in computers, and a hard core of aficionados keeps the platform very much alive to this day. But a C64 just doesn’t have the horsepower to do anything more than some retro 8-bit graphics games, right?

Not if [jim_64] has anything to say about it. He’s created a pair of virtual-reality goggles for the C64, and the results are pretty neat. Calling them VR is a bit of a stretch, since that would imply the headset is capable of sensing the wearer’s movements, which it’s not. With just a small LCD screen tucked into the slot normally occupied by a smartphone in the cheap VR goggles [jim64] used as a foundation for his build, this is really more of a 3D wearable display — so far. The display brings 3D-graphics to the C64, at least for the “Street Defender” game that [jim64] authored, a demo of which can be seen below. We’ll bet position sensing could be built into the goggles to control the game too. Even then it won’t be quite the immersive (and oft-times nauseating) experience that VR has become, but for a 35-year old platform, it’s not too shabby.

Looking for more C64 love? We’ve got a million of ’em — case mods, C64 laptops, tablets, even CPU upgrades.

Continue reading “Hacked Headset Brings VR To The Commodore 64”

Digitool Helps Debugging

Logic analyzers used to be large boxes full of high-speed logic and a display monitor. Today, they are more likely to be a small box with a USB port that feeds data to a PC application. [Juan Antonio Rubia Mena] wanted something more self-contained, so he built Digitool. Built around a PIC18F2525, the device can measure frequency up to 10 MHz and inject square waves up to 1 MHz into the circuit under test. Oh yeah. It also has a simple four-channel logic analyzer that displays on a tiny LCD.

The 500,000 sample per second rate and the 1024 sample buffer isn’t going to put any logic analyzer vendors out of business, but it is still enough to help you figure out why that SPI or I2C logic is messed up. It looks like a fun project that could have some usefulness.

Continue reading “Digitool Helps Debugging”

Adding Character To The C64

The venerable Commodore 64, is there anything it can’t do? Like many 1980s computer platforms, direct access to memory and peripherals makes hacking easy and fun. In particular, you’ll find serial & parallel ports are ripe for experimentation, but the Commodore has its expansion/cartridge port, too, and [Frank Buss] decided to hook it up to a two-line character LCD.

Using the expansion port for this duty is a little unconventional. Unlike the parallel port, the expansion port doesn’t have a stable output, as such. The port contains the data lines of the 6510 CPU and thus updates whenever RAM is read or written to, rather then updating in a controlled fashion like a parallel port does. However, [Frank] found a way around this – the IO1 and IO2 lines go low when certain areas of memory are written to. By combining these with latch circuitry, it’s possible to gain up to 16 parallel output lines – more than enough to drive a simple HD44780 display! It’s a testament to the flexibility of 74-series logic.
It’s all built on a C64 cartridge proto-board of [Frank]’s own design, and effort was made to ensure the LCD works with BASIC for easy experimentation. It’s a tidy mod that could easily be built into a nice enclosure and perhaps used as the basis for an 8-bit automation project. Someone’s gotta top that Amiga 2000 running the school district HVAC, after all!