Chaotic Oscillator From Antique Logic

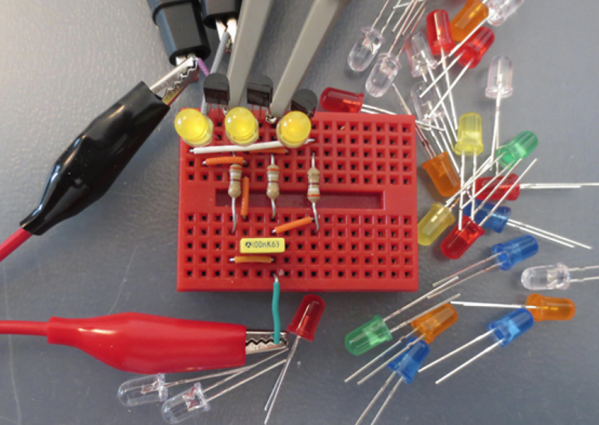
While working on recreating an “ancient” (read: 60-year-old) logic circuit type known as resistor-transistor logic, [Tim] stumbled across a circuit with an unexpected oscillation. The oscillation appeared to be random and had a wide range of frequency values. Not one to miss out on a serendipitous moment, he realized that the circuit he built could be used as a chaotic oscillator.

Chaotic systems can be used for, among other things, random number generation, so making sure that they do not repeat in a reliable way is a valuable property of a circuit. [Tim]’s design uses LEDs in series with the base of each of three transistors, with the output of each transistor feeding into the input of the next transistor in line, forming a ring. At certain voltages close to the switching voltages of the transistors, the behavior of the circuit changes unpredictably both in magnitude and frequency.

Building real-life systems that exhibit true randomness or chaotic behavior are surprisingly rare, and even things which seem random are often not random enough for certain applications. [Tim]’s design benefits from being relatively simple and inexpensive for how chaotic it behaves, and if you want to see his detailed analysis of the circuit be sure to visit his project’s page.

If you want to get your chaos the old fashioned way, with a Chua circuit, look out for counterfeit multipliers.

Gorgeous Clock, And Not A Line Of Code In Sight

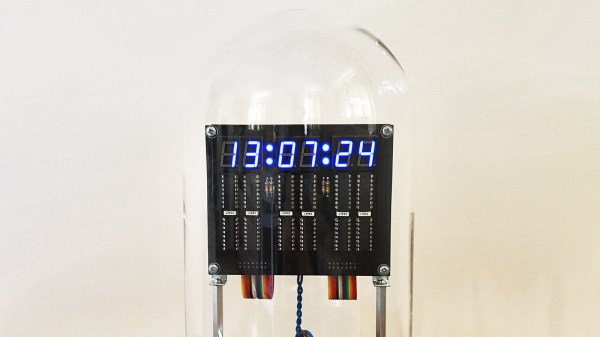
[Harry] dropped us a note to let us know about his completed CMOS clock project, and we’re delighted that he did because it’s gorgeous. It’s a digital clock satisfyingly assembled entirely from hardware logic, without a single line of code. There are three main parts to this kind of digital clock: ensuring a stable time base, allowing for setting the time, and turning the counter outputs into a numerical display.

Keeping accurate time is done with a 32.768 kHz crystal, and using CMOS logic to divide that down to a 1 Hz square wave. From there, keeping track of hours and minutes and seconds is mostly a matter of having counters reset and carry at the appropriate times. Setting the clock is done by diverting the 1 Hz signal so that it directly increments either the hours or minutes counter. The counter values are always shown “live” on six 7-segment displays, which makes it all human-readable.

The whole thing is tastefully enclosed in a glass dome which looks great, but [Harry] helpfully warns prospective makers that such things have an unfortunate side effect of being a fingerprint magnet. Schematics and design files are provided for those who want a closer look.

This clock uses a crystal and divider, but there’s another method for keeping accurate time and that’s to base it off the alternating current frequency of power from the grid. Not a bad method, albeit one that depends on being plugged into the wall.

Universal Interface Board Comes To The Rescue Of Bigger Projects

As soon as a project involves other assemblies, parts, or modules, things get more complicated. Devices like fans, cooling units, probes, pumps, or lighting might have simple electrical requirements, but they are rarely identical. As a result, one’s tidy project ends up having to deal with, for example, a pump that is controlled with 5 V active high logic, a sensor that outputs 5 V active low, lights that expect to be switched with 24 VDC, and a fan that needs a relay right now. But that might change in the future.

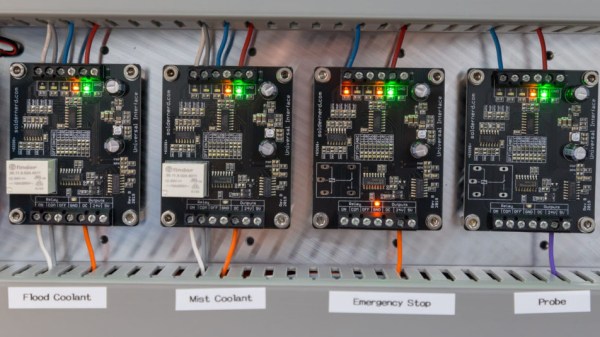
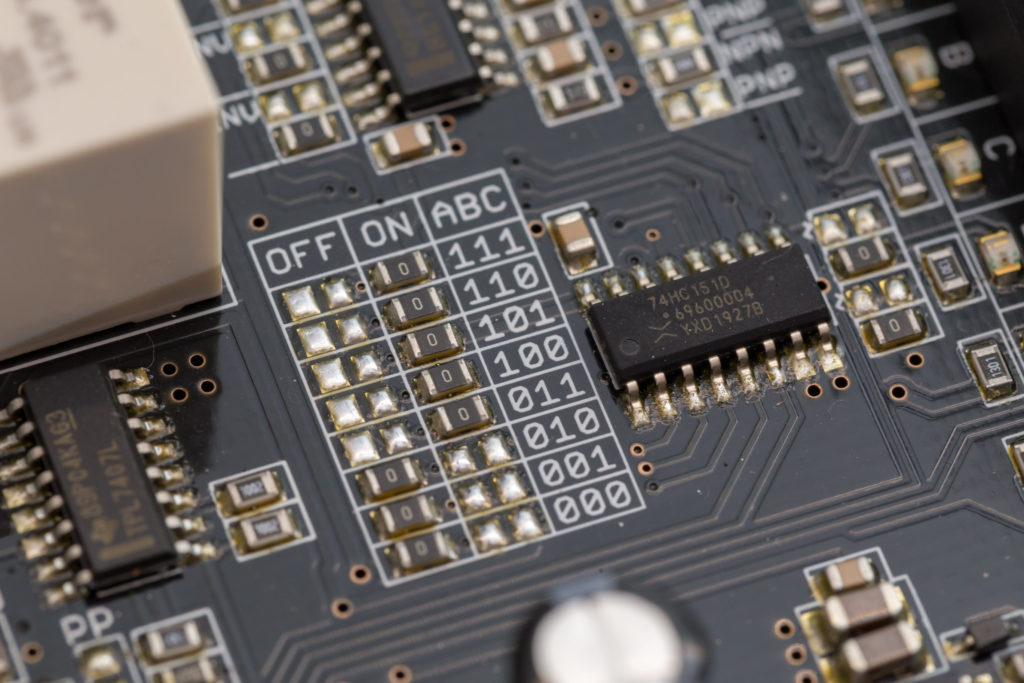
That’s exactly what led [Lukas Fässler] to design and build the Universal Interface, a board intended to be a kind of universal translator and interface for all such devices. The idea is to have one Universal Interface board for every external device. For each board, a wide variety of input combinations controls a single output. The boards are “hardware programmable” in the sense that jumpers (zero-ohm resistors) are used to spell out in black and white exactly what combinations of inputs result in which output state. In this way, some standardization and clarity of control can be enforced while still being flexible enough to accommodate changes.

Jumper-configured logic table defining with utter clarity which combination of inputs results in an OFF or ON.

Each Universal Interface board has three inputs and an enable line, each with their own indicator LED visually confirming its state. The inputs are 24 V tolerant and each can be configured with a pull-up, a pull-down, and as an active high or active low. There is one output, but it takes several forms: a sturdy relay, a powerful open-collector output, a 5 V logic output, and a 24 V logic output. Configuring which output state corresponds to what combination of inputs is set by jumpers, so the board is very much WYSIWYG.

[Lukas] is currently using four of these devices with his CNC mill project, all in different configurations, and they’re working reliably. Interested? The GitHub repository for the project has all the board design files.

Circuit VR: Advanced Falstad Logic With Geniac

I find that if I’m trying to make a point with a student or a colleague about a circuit, sometimes the Falstad online simulator is worth a few thousand words. You can draw the circuit, play with the values, and even see the current flow in an intuitive way as well as make traditional measurements. The simulator not only handles analog but also digital circuits. At first glance, though, the digital functions appear limited, but if you dig deeper, there is a custom logic block that can really help. I dug into this — and into how switches work in the simulator — the other day in response to a Hackaday post. If you use Falstad, read on!

Continue reading “Circuit VR: Advanced Falstad Logic With Geniac”

Pushing Pixels To A Display With VGA Without A PC

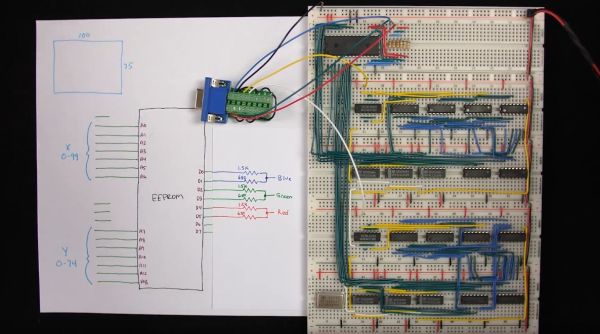
[Ben Eater] is back with the second part of his video series on building a simple video card that can output 200×600 pixels to a display with nothing but a VGA connection, a handful of 74-logic chips and a 10 MHz crystal. In this installment we see how he uses nothing but an EEPROM and a handful of resistors to get an image onto the screen.

The interesting part is in how the image data is encoded into the EEPROM, since it has to be addressable by the same timing circuit as what is being used for the horizontal and vertical timing. By selecting the relevant inputs that’d make a valid address, and by doubling the size of each pixel a few times, a 100 x 75 pixel image can be encoded into the EEPROM and directly addressed using this timing circuit.

The output from the EEPROM itself not fed directly into the monitor, as the VGA interface expects a 0 V to 0.7 V signal on each RGB pin, indicating the brightness. To get more than three colors out of this setup, [Ben] builds up a simple 2-bit DAC that allows for two bits per channel, meaning four brightness levels per color channel or 64 colors effectively.

See the video after the link for the full details. While pretty close to perfect, a small issue remains at the end in the forms of black vertical lines. These are caused by a timing issue in the circuit, with comments on the YouTube video suggesting various other potential fixes. Have you breadboarded your own version yet to debug this issue before [Ben]’s next video comes out?
Continue reading “Pushing Pixels To A Display With VGA Without A PC”

Minivac 601 Replica Gets A Custom Motorized Rotary Switch

One of the joys of electronics as a hobby is how easy it is to get parts. Literally millions of parts are available from thousands of suppliers and hundreds of distributors, and everyone competes with each other to make it as easy as possible to put together an order from a BoM. If you need it, somebody probably has it.

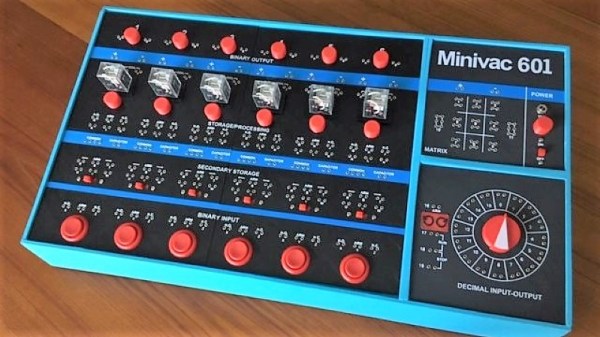
But what do you do when you need a part that doesn’t exist anymore, and even when it did was only produced in small numbers? Easy – you create it yourself. That’s just what [Mike Gardi] did with this unique motorized rotary switch he needed to complete his replica of a 1960s computer trainer. We covered his build of the Minivac 601, a trainer from the early computer age that let experimenters learn the ropes of basic digital logic. It used mostly relays, lamps, and switches connected by jumpers, but it had one critical component – a rotary control that was used for input and, with the help of a motor, as an output indicator.

[Mike]’s version of the switch is as faithful to the original as possible, at least in terms of looks. The parts are mostly 3D-printed, with 16 reed switches embedded in the walls and magnets placed in the rotor. The motor to operate the rotor is a simple gear motor mounted to a hinged bracket; when the rotor needs to move, a solenoid pulls the motor’s friction drive wheel up against the rotor.

The unique control slots right into the Minivac replica and really completes the look and feel. Hats off to [Mike] for a delightful replica of a lost bit of computer history and the dedication to see it through to completion.

Continue reading “Minivac 601 Replica Gets A Custom Motorized Rotary Switch”

Logic And EEPROMs Bring VGA To Life, Sans Microcontroller

For whatever reason, the Video Graphics Array standard seems to attract a lot of hardware hacks. Most of them tend to center around tricking a microcontroller into generating the signals needed to send images to a VGA monitor. We love those hacks, but this one takes a different tack – a microcontroller-free VGA display that uses only simple logic chips and EEPROMs.

When we first spied this project, [PH4Nz] had not yet shared his schematics and code, but has since posted everything on GitHub. His original description was enough to whet our appetite, though. He starts with a 27.175-MHz clock and divides that by 4 with a 74HCT163, which has the effect of expanding the 160×240 pixels image stored in one of the EEPROMs to 640×480. Two 8-bit counters keep track of horizontal and vertical positions, while the other EEPROM takes care of generating the Hsync and Vsync signals. It’s all quite hackish, but it works. [PH4Nz] tells us that the whole thing is in support of a larger project: an 8-bit computer made from logic chips. We’re looking forward to seeing that one too.

This isn’t the first microcontroller-less VGA project we’ve seen, of course. Here’s a similar one also based on EEPROMs, and one with TTL logic chips. And we still love VGA on a microcontroller such as the ESP32; after all, there’s more than one way to hack.

Thanks to [John U] for the tip.