Tiny Gasoline Engine Fitted With A Custom Billet Waterpump

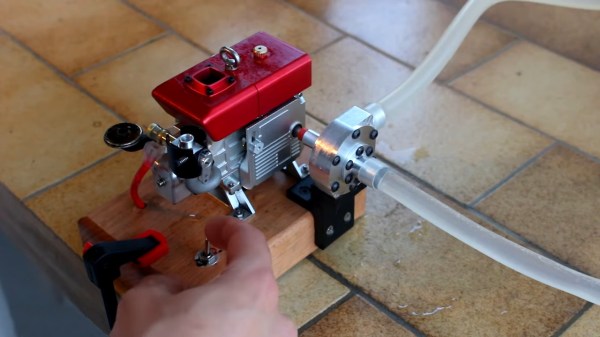
We don’t typically use gasoline engines smaller than 50 cc or so on a regular basis. Below that size, electric motors are typically less messy and more capable of doing the job. That doesn’t mean they aren’t cute, however. [JohnnyQ90] is a fan of tiny internal combustion engines, and decided to whip up a little water pump for one of his so it could do something useful besides make noise.

The pump is built out of billet aluminium, showing off [JohnnyQ90]’s machining skills. The two pieces that make up the main body and cover plate of the pump are impressive enough, but the real party piece is the tiny delicate impeller which actually does the majority of the work. The delicate curves of the pump blades are carefully carved out and look exquisite when finished.

The pump’s performance is adequate, and the noise of the tiny gasoline engine makes quite a racket, but it’s a great display of machining skill. If so desired, the pump could also do a great job for a small liquid delivery system if hooked up to a quiet electric motor, too. The aluminium design has the benefit of being relatively leak free when assembled properly, something a lot of 3D printed designs struggle to accomplish.

We’ve seen [JohnnyQ90]’s micro engine experiments before, too — like this small generator build. Video after the break.

Continue reading “Tiny Gasoline Engine Fitted With A Custom Billet Waterpump”

A Chainsaw Gives This Winch Some Grunt

For a satisfying Youtube watching session there is noting like some quality machine shop work, and that’s exactly what [Made In Poland] supply with their conversion of a small 12V winch to power from a chainsaw. The finished product contains not much more than the gearbox and shaft components from the original, but the mesmerising sight of rusty steel stock being transformed into dimension-perfect components which come together to form an entirely new assembly is as always a draw.

The conversion starts with the removal and disassembly of the motor to reveal its shaft and the locking mechanism for the drum. The shaft is then turned down and a collar manufactured to couple it to the drive spline on a chainsaw. We’re pleased to see that the chainsaw isn’t modified in this build, instead the blade is simply unscrewed and the winch attached in a reversible process. Finally, the original drum is deemed too small for the application, so a new drum is fabricated. We see the result on a Polish farm, happily participating in some forestry work and even pulling their pickup truck when it became stuck.

This is by no means the first time we’ve featured [Mad in Poland] in these pages, not least with this electromagnetic circle cutting jig.

Continue reading “A Chainsaw Gives This Winch Some Grunt”

Homebrew Espresso Machine Has Closed-Loop Control

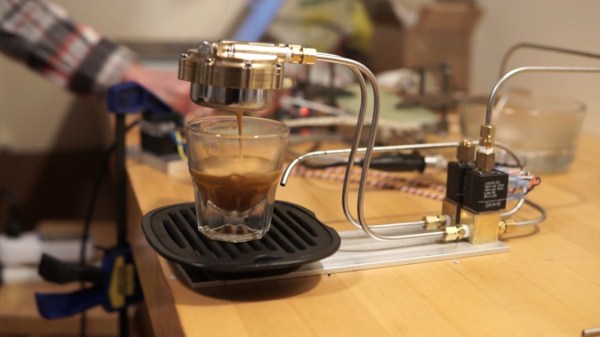
[Ben Katz] is in the process of building a compact, closed-loop espresso machine, and really seems to be pulling it off in the first shot. Though it may not be the final product, we’re in awe of the beautiful guts and would love to taste-test the early results.

This machine will hit a sweet spot between lever-type espresso machines that are like driving a manual without power steering, and those fully automated machines that squeeze all the fun out of playing barista but are easier on the joints.

Here’s how it works so far: a motor drives an electric gear pump that pumps the water through a heater. It’s a closed-loop system, so there’s a 3-way valve after the heater that keeps sending the water back until it’s deemed hot enough. Once that happens, the valve switches functions and begins to pump water through the group head and on to the coffee grounds.

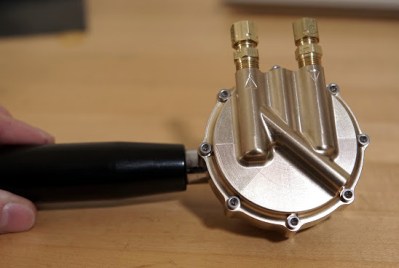
[Ben] designed and milled a beautiful group head that’s designed to fit a La Pavoni portafilter and some other parts he already had on hand. Grab a coffee and watch it pull the first shot after the break, then stick around to see the milling and the drilling.

Ready to kick that Keurig to the curb and get an espresso machine? Don’t just throw it out or take it to a field and smash it with a baseball bat — turn that thing into an automatic drip for a small houseplant.

Continue reading “Homebrew Espresso Machine Has Closed-Loop Control”

Machining A Honing Jig Will Keep Skills Sharp

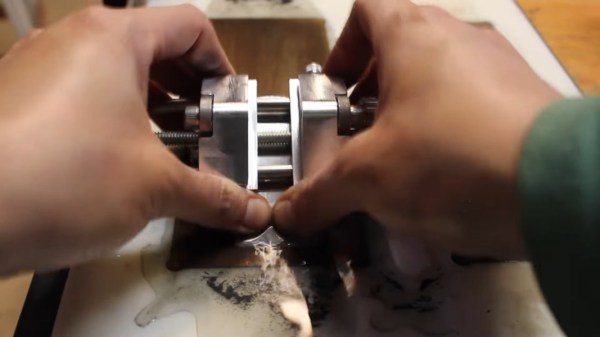
[Amy Makes Stuff] has long used a pair of diamond honing blocks to freehand sharpen planes, chisels, and all the other dull things around the shop. Although this method works fairly well, the results are often inconsistent without some kind of jig to hold the blade securely as it’s being sharpened. These types of devices are abundant and cheap to buy, but as [Amy] says in the video after the break, then she doesn’t get to machine anything. Boy, do we know that feeling.

[Amy] was able to make this completely out of stuff she had lying around, starting with a block of scrap aluminium that eventually gets cut into the two halves of the jig. The video is full of tips and tricks and it’s really interesting to see [Amy]’s processes up close. Our favorite part has to be that grippy knob that expands and contracts the jig. [Amy] made it by drilling a bunch of holes close to the outside edge of a circle, and then milled away the edge until she had a fully fluted knob. Once she had the jig finished, she upgraded her honing blocks by milling a new home for them out of milky-white high-density polyethylene.

Mills are fantastic tools to have, but they’re a bit on the pricey side. If you’re just getting started, why not convert a drill press into a mill? Wouldn’t that be more fun that just buying one?

Continue reading “Machining A Honing Jig Will Keep Skills Sharp”

Making A Toothbrush From Scratch, Right Down To The Bristles

Most of us probably get by with a toothbrush costing a couple dollars at most, made of injection-moulded plastic for delicate, tender mouths. Maybe if you’re a real cleantooth, you have a fancy buzzy electric one. We’d wager few are machining their own bespoke toothbrushes from scratch, but if you want some inspiration, [W&M Levsha] is doing just that.

Much of the work will be familiar to die hard machining enthusiasts. There’s careful crafting of the wood handle, involving a stackup of multiple stained and varnished woods – in this case, hornbeam being the paler of the two, and amaranth providing that rich red color. The stem is a stylish stainless steel piece, elegantly bent to a tasteful curve. Finally, the assembly of the brush head alone is worth the watch. It’s custom made – with a steel backing plate and fishing wire bristles custom cut with an automated jig using stepper motors.  We’re suspect fishing wire is not rated for dental use, but the nylon strands are at least in the ballpark of what regular toothbrushes use.

While we probably wouldn’t slide this one betwixt our lips without consulting a dental professional first, it’s a great video for learning about what it takes to make beautiful bespoke objects in the workshop. We’ve seen elegant work from [W&M Levsha] before, too – in the form of a delightfully eclectic cap gun lighter. Video after the break.

Continue reading “Making A Toothbrush From Scratch, Right Down To The Bristles”

Micromachining Glass With A Laser — Very, Very Slowly

When it comes to machining, the material that springs to mind is likely to be aluminum, steel, or plastic. We don’t necessarily think of glass as a material suitable for machining, at least not in the chuck-it-up-in-the-lathe sense. But glass is a material that needs to be shaped, too, and there are a bunch of different ways to accomplish that. Few, though, are as interesting as micromachining glass with laser-induced plasma bubbles. (Video, embedded below.)

The video below is from [Zachary Tong]. It runs a bit on the longish side, but we found it just chock full of information. The process, formally known as “laser-induced backside wet-etching,” uses a laser to blast away at a tank of copper sulfate. When a piece of glass is suspended on the surface of the solution and the laser is focused through the glass from the top, some interesting things happen.

The first pulse of the laser vaporizes the solution and decomposes the copper sulfate. Copper adsorbs onto the glass surface inside the protective vapor bubble, which lasts long enough for a second laser pulse to come along. That pulse heats up the adsorbed copper and the vapor in the original bubble, enough to melt a tiny bit of the glass. As the process is repeated, small features are slowly etched into the underside of the glass. [Zachary] demonstrates all this in the video, as well as what can go wrong when the settings are a bit off. There’s also some great high-speed footage of the process that’s worth the price of admission alone.

We doubt this process will be a mainstream method anytime soon, not least because it requires a 50-Watt Nd:YAG fiber laser. But it’s an interesting process that reminds us of [Zachary]’s other laser explorations, like using a laser and Kapton to make graphene supercapacitors.

Continue reading “Micromachining Glass With A Laser — Very, Very Slowly”

Tighten This Bolt In Any Direction You Want

Metal lathes are capable machines that played a large role in the industrial revolution, and an incredible tool to have at your disposal. But that doesn’t mean they can’t be used to have a little fun, as demonstrated by [Oleg Pevtsov] who made a bidirectional bolt as a machining exercise just because he could.

Both videos after the break are in Russian, but the video and auto generated subtitles are enough to get the main points across. The bolt is an M42 size with a 40 mm pitch, with grooves cut in both directions to allow left-handed and right-handed nuts to be threaded. The large pitch means that instead of a single continuous groove like a normal bolt, ten separate grooves need to be cut for each threading direction to cover the bolt surface. Since this was all machined on a manual lathe, a dial indicator was required to maintain accurate spacing. It took [Oleg] four painstaking attempts to get it right, but the end result looks very good. Instead of a fixed cutter, he used a trimming router mounted on a custom clamp.

[Oleg] also machined three different brass nuts to go on the bolt with a fixed cutter. First left-hand and right hand threaded nuts were made, followed by a bidirectional nut. Due to the large pitch and careful machining, all three nuts will spin down the bolt under the force of gravity alone. Although the bidirectional nut doesn’t move as smoothly as the other two, it can change rotation and translation direction at random.

While this is a one-of-a-kind fidget toy, have any of our readers seen a bidirectional bolt or lead screw in the wild? We can imagine that the ability to move two nuts in opposite directions on a single lead screw might have some practical applications.

It’s possible to make incredible parts on a manual lathe. A handbuilt V10 engine and a pneumatic hexacopter model are just two examples of what’s possible with enough skill, knowledge, and patience. Sadly it is a fading form of craftsmanship, rendered mostly obsolete outside of hobby projects by CNC machines.

Continue reading “Tighten This Bolt In Any Direction You Want”