Design Tips To Hide Layer Lines In 3D Printed Parts

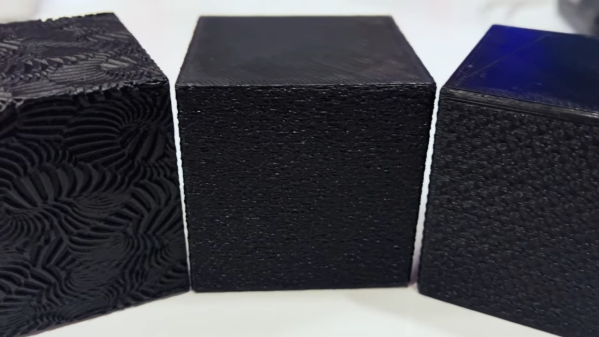
[Slant 3D] knows a lot about optimizing 3D prints so that they can be cranked out reliably with minimal need for post-processing, and in this short video he uses a cube as a simple example of how a few design changes can not only optimize for production, but can even hide layer lines pretty effectively.

Just to be perfectly clear, layer lines cannot be eliminated entirely without some kind of post-processing. But [Slant 3D]’s tips sure goes a long way toward making a part lose that obvious 3D-printed “look”. They also dovetail nicely with advice on how to optimize cranking out high numbers of parts in a print farm.

Adding texture to the outer layer is especially effective when combined with non-traditional part orientations.

One simple way to avoid visible layer lines is to put some kind of texture onto the part. This can be modeled into the part’s surface, or the slicer software can be used to modify the exterior of the print to add a texture such as a geometric pattern or by applying a fuzzy skin modifier.

Printing a texture onto the exterior is great, but the outcome can be even further improved by also printing the object in a non-traditional orientation.

Using a cube as an example, printing the cube on a corner has the advantage of putting the layer lines in a different orientation as well as minimizing the contact area on the print bed. This applies the texture across more of the part, and looks less obviously 3D printed in the process. Minimizing bed adhesion also makes parts much easier to remove, which has obvious benefits for production. [Slant 3D] points out that performing these operations on a 3D-printed part is essentially free.

A few other optimizations for production involve rounding sharp corners to optimize tool travel paths, and putting a slight chamfer on the bottom of parts to avoid any elephant foot distortion (Elephant’s foot can be compensated for, but simply putting a slight chamfer on a part is a design change that helps avoid accounting for machine-to-machine variance.)

Even if one has no need to optimize for high production volume, the tips on hiding layer lines with design changes is great advice. Watch it all in action in the short video, embedded below.

Continue reading “Design Tips To Hide Layer Lines In 3D Printed Parts”

Lessons In Mass Production From An Atari Punk Console

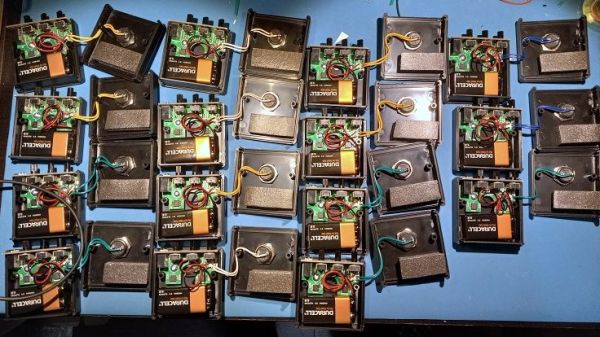
Sometimes the most interesting part of a project isn’t the widget itself, but what it teaches you about the manufacturing process. The story of the manufacturing scale-up of this Atari Punk Console and the lessons learned along the way is a perfect example of this.

Now, don’t get us wrong — we love Atari Punk Consoles. Anything with a couple of 555s that bleeps and bloops is OK in our books. But as [Adam Gulyas] tells the tale, the point of this project was less about the circuit than about the process of making a small batch of something. The APC was low-hanging fruit in that regard, and after a quick round of breadboarding to decide on component values, it was off to production. [Adam] was shooting for 20 units, each in a nice enclosure and a classy package. PCB assemblies were ordered, as were off-the-shelf plastic enclosures, which ended up needing a lot of tweaking. [Adam] designed custom labels for the cases, itself a fraught job; glossy label stock and button bezels apparently don’t mix.

After slogging through the assembly process, boxing the units for shipping was the next job. [Adam] sourced jewelry boxes just a bit bigger than the finished APCs, and rather than settle for tissue paper or packing peanuts, designed an insert to hold the units snugly. That involved a lot of trial and error and a little bit of origami-fu, and the results are pretty nice. His cost per unit came out to just a hair over $20 Canadian, including the packaging, which is actually pretty remarkable for such a short production run.

[Adam] includes a list of improvements for larger-scale runs, including ordering assembled PCBs, outsourcing the printing processes, and getting custom boxes made so no insert is needed. Any way you cut it, this production run came out great and teaches us all some important lessons.

Better 3D Prints, Courtesy Of A Simple Mass-Produced Bracket

On the “hack/not-a-hack” scale, a 3D printed bracket for aluminum extrusions is — well, a little boring. Such connectors are nothing you couldn’t buy, and even if you insisted on printing them instead, Printables and Thingiverse are full of ready-to-use designs. So why would you waste your precious time and effort rolling your own?

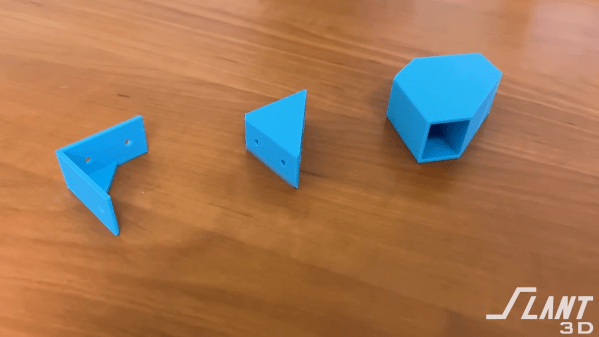
According to production 3D printing company [Slant 3D], a lot of times, we forget to take advantage of the special capabilities of 3D printing. The design progression of the L-bracket shown is a perfect example; it starts as a simple L, moves on to a more elaborate gusseted design, and eventually into a sturdy sold block design that would be difficult to make with injection molding thanks to shrinkage but is no problem for a 3D printer. Taking that a step further, the bracket morphs into a socketed design, taking advantage of what 3D printers can do by coming up with a part that reduces assembly time and fastener count while making a more finished, professional look.

Again, this isn’t really about the bracket. Rather, it’s about a different way of thinking about your designs and leveraging the unique capabilities of 3D printers relative to other mass-production methods, like injection molding. We’ve covered some of [Slant 3D]’s high-volume design insights before, such as including living hinges and alternatives of pins and holes for assembling printed parts. Continue reading “Better 3D Prints, Courtesy Of A Simple Mass-Produced Bracket”

Mass Mask-Making Masterclass

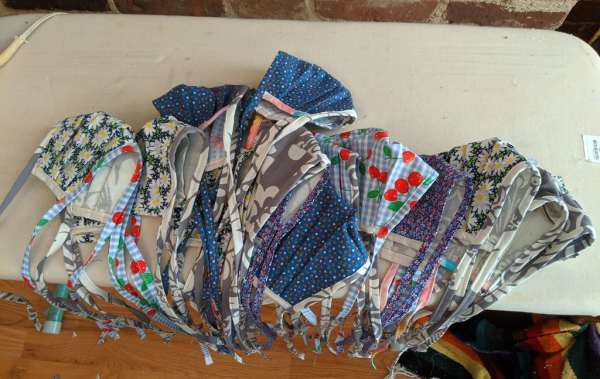
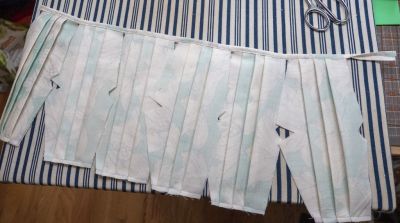
Just as 3D printers around the world have been churning out face shields, the thread injectors of home sewists have been stitching up fabric masks. Over the past several weeks, [Becky Stern] has made them for friends, family, neighbors, and anyone in her community who happens upon the box of free masks she’s left at a nearby bus stop. This is in addition the scores she has made and donated to health care workers so they can extend the life of their N95 masks.

If you’re going to make more than a few of anything, it just makes sense to make multiples at the same time and adjust the process for batch production. [Becky Stern] has some great ideas for ramping up assembly even further that include cutting out multiple main mask pieces at the same time, and ironing the pleats of several masks round robin style so you don’t waste time while they cool.

Even if you don’t dabble in the fabric arts, her method of kitting out the process of mask making is an interesting look into small-scale production.

Our favorite idea concerns the side bindings and the straps, which are the last part of the build and take the longest to do. [Becky] makes several miles of straps ahead of time with a 3D printed bias tape folder and then sews them all into a continuous strip. She can add the short side bindings to a bunch of masks at once, feeding them in one after the other so they end up strung together like sausages. Then she can just snip them apart and keep going, having saved both time and thread. Watch [Becky] make a single mask after the break and see how easy it is.

If sewing is a no-go for you, there are plenty of ways to help the PPE effort by firing up that printer.

Continue reading “Mass Mask-Making Masterclass”

How Many Parts In A Triumph Herald Heater?

This Herald is in much better condition than my 12/50 was. Philafrenzy [CC BY-SA 4.0]
What was your first car? Mine was a 1965 Triumph Herald 12/50 in conifer green, and to be frank, it was a bit of a dog.

The Triumph Herald is a small saloon car manufactured between about 1959 and 1971. If you are British your grandparents probably had one, though if you are not a Brit you may have never heard of it. Americans may be familiar with the Triumph Spitfire sports car, a derivative on a shortened version of the same platform. It was an odd car even by the standards of British cars of the 1950s and 1960s. Standard Triumph, the manufacturer, had a problem with their pressing plant being owned by a rival, so had to design a car that used pressings of a smaller size that they could do in-house. Thus the Herald was one of the last British mass-produced cars to have a separate chassis, at a time when all other manufacturers had produced moncoques for years.

My 12/50 was the sporty model, it had the high-lift cam from the Spitfire and a full-length Britax sunroof. It was this sunroof that was its downfall, when I had it around a quarter century of rainwater had leaked in and rotted its rear bodywork. This combined with the engine being spectacularly tired and the Solex carburetor having a penchant for flooding the engine with petrol made it more of a pretty thing to look at than a useful piece of transport. But I loved it, tended it, and when it finally died irreparably I broke it for parts. Since then I’ve had four other Heralds of various different varieties, and the current one, a 1960 Herald 948, I’ve owned since the early 1990s. A piece of advice: never buy version 0 of a car.

Continue reading “How Many Parts In A Triumph Herald Heater?”

We Have A Problem: Mass Versus Local Production

Hackaday, we have a problem. We’re trying to engineer a brighter future; a task that calls for a huge mental leap. This week, instead of discussing a concrete problem, let’s gather around the digital campfire to gnaw on a thought exercise. In thinking abstractly I hope we’ll trigger a slew of ideas you can use as your entry in the 2015 Hackaday Prize in which you can win a Trip to Space or hundreds of other prizes.

Shipping Mass Produced vs. Producing Locally

This morning I was reading an interesting story about an email server that couldn’t deliver message to any ISP physically located more than 500 miles away. In that case it turns out that the limiting factor was misconfiguration and the speed of light. But it got me thinking about things we transport in bulk versus things being transported individually. I often think about the transport of finished goods and compare where we are now to the fabrication visions [Neal Stephenson] talked about in his novel The Diamond Age. In that picture of the future, it is common building blocks of matter that are delivered to every home and business and not finished goods. Interesting.

What kind of resources are consumed in local production versus centralized mass production? Is there merit in using technology to change the way we’ve always done some things? Certainly there will not be one answer for everything so let’s talk about a few examples that might be done differently.

Scenario #1: You send a greeting card with your hand-written message to your mother for her Birthday.

handwritten-message-cardThe way things work right now, you go to the store and pick out a card. You write a personal message inside, lick, stamp, and send it through the mail. The thing is, this card is probably already in a store down the street from your mother. What if you could digitize your handwritten message and have it printed on the card and delivered from a local repository? Take it a step further, assuming that these cards are bulk-printed in one central location and distributed widely, does it save any resources to decentralize the production of the cards and make production local so that the finished goods are not being transported more than 500 miles? And for those skeptics saying that you can’t add a check or cash to the card when done this way… yes you can!

Scenario #2: The meal is finished and just as you close the door to the dishwasher you hear a horrible crack as the plastic latch that holds the door closed breaks.

Recycled household appliancesStandard practice is that the part be ordered from a parts supplier (either by you or by a serviceman). These suppliers keep a stock of common parts which are well documented in a huge library of service manuals for the myriad of home appliances out there. But when you get right down to it, it’s just a little plastic bauble. Let’s assume all of these are made in a single factory in huge production runs that supply both the manufacturer and the legacy parts houses. What if instead of this you could have these parts 3D printed by a business within 500 miles of where they are needed. There are industrial-grade 3D printing techniques that produce parts strong enough to act as a replacement. Where do you come down on resource saving between the two methods?

Scenario #∞: It’s your turn to come up with an example.

We want to hear your ideas on local production versus centralized mass production. Don’t be afraid to share half-baked ideas. The entire point of We Have a Problem is to spark civil debate on issue which could lead to world-changing solutions. Help us start the idea mill and jump on to see where it takes us. Don’t forget to carry the inspiration you find into your entry for the Hackaday Prize.


The 2015 Hackaday Prize is sponsored by: