Upgraded Raster Laser Projector Goes RGB

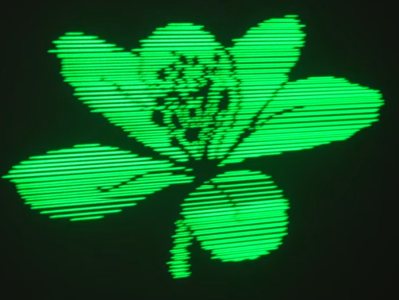
We’ve covered a scanning laser project by Ben Make’s Everything last year, and now he’s back with a significant update. [Ben]’s latest project now offers a higher resolution and RGB lasers. A couple of previous versions of the device used the same concept of a rotating segmented mirror synchronised to a pulsed laser diode to create scanlines. When projected onto a suitable surface, the distorted, pixelated characters looked quite funky, but there was clearly room for improvement.

More scanlines and a faster horizontal pixel rate

The previous device used slightly inclined mirrors to deflect the beam into scanlines, with one mirror per scanline limiting the vertical resolution. To improve resolution, the mirrors were replaced with identically aligned mirrors of the type used in laser printers for horizontal scanning. An off-the-shelf laser galvo was used for vertical scanning, allowing faster scanning due to its small deflection angle. This setup is quicker than then usual vector galvo application, as the smaller movements require less time to complete. Once the resolution improvement was in hand, the controller upgrade to a Teensy 4 gave more processing bandwidth than the previous Arduino and a consequent massive improvement in image clarity.

Finally, monochrome displays don’t look anywhere near as good as an RGB setup. [Ben] utilised a dedicated RGB laser setup since he had trouble sourcing the appropriate dichroic mirrors to match available lasers. This used four lasers (with two red ones) and the correct dichroic mirrors to combine each laser source into a single beam path, which was then sent to the galvo. [Ben] tried to find a DAC solution fast enough to drive the lasers for a proper colour-mixing input but ended up shelving that idea for now and sticking with direct on-off control. This resulted in a palette of just seven colours, but that’s still a lot better than monochrome.

The project’s execution is excellent, and care was taken to make it operate outdoors with a battery. Even with appropriate safety measures, you don’t really want to play with high-intensity lasers around the house!

Here’s the previous version we covered, a neat DIY laser galvo using steppers, and a much older but very cool RGB vector projector.

Continue reading “Upgraded Raster Laser Projector Goes RGB”

Lasers Al Fresco: Fun With Open-Cavity Lasers

Helium-neon lasers may be little more than glorified neon signs, but there’s just something about that glowing glass tube that makes the whole process of stimulated emission easier to understand. But to make things even clearer, you might want to take a step inside the laser with something like [Les Wright]’s open-cavity He-Ne laser.

In most gas lasers, the stimulated emission action takes place within a closed optical cavity, typically formed by a glass tube whose ends are sealed with mirrors, one of which is partially silvered. The gas in the tube is stimulated, by an electrical discharge in the case of a helium-neon laser, and the stimulated photons bounce back and forth between the mirrors until some finally blast out through the partial mirror to form a coherent, monochromatic laser beam. By contrast, an open-cavity laser has a gas-discharge tube sealed with the fully silvered mirror on one end and a Brewster window on the other, which is a very flat piece of glass set at a steep angle to the long axis of the tube and transparent to p-polarized light. A second mirror is positioned opposite the Brewster window and aligned to create a resonant optical cavity external to the tube.

To switch mirrors easily, [Les] crafted a rotating turret mount for six different mirrors. The turret fits in a standard optical bench mirror mount, which lets him precisely align the mirror in two dimensions. He also built a quick alignment jig, as well as a safety enclosure to protect the delicate laser tube. The tube is connected to a high-voltage supply and after a little tweaking the open cavity starts to lase. [Les] could extend the cavity to almost half a meter, although even a waft of smoke was enough obstruction to kill the lasing at that length.

If this open-cavity laser arrangement seems familiar, it might be because [Les] previously looked at an old-school particle counter with such a laser at its heart. Continue reading “Lasers Al Fresco: Fun With Open-Cavity Lasers”

More Mirrors (and A Little Audio) Mean More Laser Power

Lasers are pretty much magic — it’s all done with mirrors. Not every laser, of course, but in the 1980s, the most common lasers in commercial applications were probably the helium-neon laser, which used a couple of mirrors on the end of a chamber filled with gas and a high-voltage discharge to produce a wonderful red-orange beam.

The trouble is, most of the optical power gets left in the tube, with only about 1% breaking free. Luckily, there are ways around this, as [Les Wright] demonstrates with this external passive cavity laser. The guts of the demo below come from [Les]’ earlier teardown of an 80s-era laser particle counter, a well-made instrument powered by a He-Ne laser that was still in fine fettle if a bit anemic in terms of optical power.

[Les] dives into the physics of the problem as well as the original patents from the particle counter manufacturer, which describe a “stabilized external passive cavity.” That’s a pretty fancy name for something remarkably simple: a third mirror mounted to a loudspeaker and placed in the output path of the He-Ne laser. When the speaker is driven by an audio frequency signal, the mirror moves in and out along the axis of the beam, creating a Doppler shift in the beam reflected back into the He-Ne laser and preventing it from interfering with the lasing in the active cavity. This forms a passive cavity that greatly increases the energy density of the beam compared to the bare He-Ne’s output.

The effect of the passive cavity is plain to see in the video. With the oscillator on, the beam in the passive cavity visibly brightens, and can be easily undone with just the slightest change to the optical path. We’d never have guessed something so simple could make such a difference, but there it is.

Continue reading “More Mirrors (and A Little Audio) Mean More Laser Power”

Bone-Shaking Haunted Mirror Uses Stable Diffusion

We once thought that the best houses on Halloween were the ones that gave out full-size candy bars. While that’s still true, these days we’d rather see a cool display of some kind on the porch. Although some might consider this a trick, gaze into [Tim]’s mirror and you’ll be treated to a spooky version of yourself.

Here’s how it works: At the heart of this build is a webcam, OpenCV, and a computer that’s running the Stable Diffusion AI image generator. The image is shown on a monitor that sits behind 2-way mirrored glass.

We really like the frame that [Tim] built for this. Unable to find something both suitable and affordable, they built one out of wood molding and aged it appropriately.

We also like the ping pong ball vanity globe lights and the lighting effect itself. Not only is it spooky, it lets the viewer know that something is happening in the background. All the code and the schematic are available if you’d like to give this a go.

There are many takes on the spooky mirror out there. Here’s one that uses a terrifying 3D print.

Dielectric Mirror Shines Bright

We knew the mirrors in our house were not really very good mirrors, optically speaking. Your mirror eats up 20 to 40 percent of the light that hits it. High-quality first-surface mirrors are better, but [Action Lab] has a video (see below) of something really different: a polymer dielectric mirror with 99.5% reflectivity. In addition, it has no Brewster angle — light that hits it from any angle will reflect.

Turns out something that thin and reflective can be hard to find. It also makes a little flashlight if you roll a tube of the material and pinch the back end together. The light that would have exited the rear of the tube now bounces around until it exits from the front, making it noticeably bright. The film comes from 3M, and apparently, they were surprised about the optical properties, too.

Continue reading “Dielectric Mirror Shines Bright”

Toxic Telescope Makes You Mad As A Hatter

[Hank Green] posted an interesting video about the first liquid mirror telescope from back in the 1850s. At the time, scientists were not impressed. But, these days, people are revisiting the idea. The big problem with the early telescope is that it used mercury. Mercury is really bad for people and the environment.

The good thing about a liquid scope is that you can pretty easily make a large mirror. You just need a shallow pool of liquid and a way to spin it. However, there are downsides. You need to isolate the liquid from vibrations and dust. Another downside is that since gravity makes the shape of the mirror, these telescopes only go one way — straight up.

Continue reading “Toxic Telescope Makes You Mad As A Hatter”

Magic Mirror Isn’t Transparent Metal

One of the Star Trek movies has a McGuffin called “transparent aluminum.” While magic mirrors aren’t really transparent, it appears that way to a casual observer. If you haven’t seen one of these, they are polished metal mirrors with a pattern embossed on the back. When you shine a point source of light on the mirror, however, the reflection matches what is on the back of the mirror. Is it transparent? No, and the video by [Steve Mould] below explains what’s really going on.

The reality is that very subtle variations of the surface produce the image. You need some understanding of optics and calculus to fully understand what’s going on.

Continue reading “Magic Mirror Isn’t Transparent Metal”