Sushi-Snarfing Barbie Uses Solenoid To Swallow

The view from America has long seen French women as synonymous with thin and/or beautiful. France is well-known for culinary skill and delights, and yet many of its female inhabitants seem to view eating heartily as passé. At a recent workshop devoted to creating DIY amusements, [Niklas Roy] and [Kati Hyyppä] built an electro-mechanical sushi-eating game starring Barbie, American icon of the feminine ideal. The goal of the game is to feed her well and inspire a happy relationship with food.

Built in just three days, J’ai faim! (translation: I’m hungry!) lets the player satiate Barbie one randomly lit piece of sushi at a time. Each piece has a companion LED mounted beneath the surface that’s connected in series to the one on the game board. Qualifying sushi are determined by a photocell strapped to the underside of Barbie’s tongue, which detects light from the hidden LED. Players must race against the clock to eat each piece, taking Barbie up the satisfaction meter from ‘starving’ to ‘well-fed’. Gobble an unlit piece, and the score goes down.

The game is controlled with a lovely pink lollipop of a joystick, which was the main inspiration for the game. Players move her head with left and right, and pull down to engage the solenoid that pushes her comically long tongue out of her button-nosed face. Barbie’s brain is an Arduino Uno, which also controls the stepper motor that moves her head.

[Niklas] and [Kati] wound up using cardboard end stops inside the box instead of trying to count the rapidly changing steps as she swivels around. The first motor they used was too weak to move her head. The second one worked, but the game’s popularity combined with the end stops did a number on the gears after a day or so. Click past the break to sink your teeth into the demo video.

Barbie can do more than teach young girls healthy eating habits. She can also teach them about cryptography.

Continue reading “Sushi-Snarfing Barbie Uses Solenoid To Swallow”

Custom ATTiny85 Board Powers Kids’ Light Show

We’ve often said that kids with hackers and makers for parents must be some of the luckiest kids in the world. While all the other children have to settle for some mass produced drivel from Toys“R”Us Amazon, they’ve got some of the most thoughtfully engineered and built toys and gadgets on the planet. After all, there’s no way any hacker worth their salt is going to give anything less than 110% for their own child.

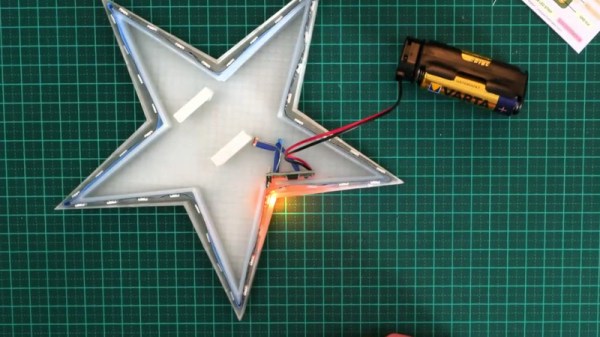
A case in point is this RGB star nightlight that [Unexpected Maker] built for his children. The star itself is simple enough, just a basic shape printed in transparent PLA on his Prusa i3. The impressive part is how he lights it up. Rather than stick an Arduino or ESP8266 in there as we have seen plenty of times before, he’s put together his own custom ATTiny85 board specifically for controlling the RGB LED strips.

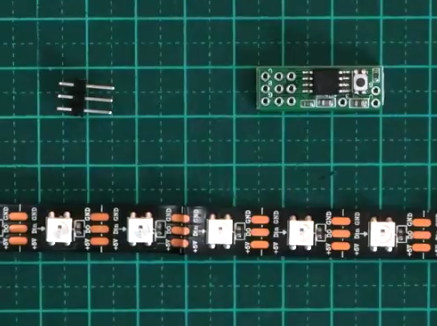
The board, which he calls TinyDev, is designed to be the same thickness as NeoPixel style LED strips so it can fit inside tight spaces. He solders it onto the tail end of his LED strip, adds a photoresistor so the star can tell when it’s time to light up, and then snakes the whole arrangement through a channel printed in the star itself. There’s a battery pack in the middle, but that’s about it. It really does allow for a remarkably clean LED strip implementation, and the mind can’t help but start thinking of interesting possibilities when you can tuck the controller into the same space as the lights themselves.

[Unexpected Maker] has made the TinyDev completely open source for anyone who wants to build their own, but it’s also available on Tindie if you want to get one to play with quickly. If you’re looking to light up the little one’s room with somewhat more mainstream methods, we’ve got that covered too.

Continue reading “Custom ATTiny85 Board Powers Kids’ Light Show”

Blinging Buttons For Pick And Place

With 3D-printing, cheap CNC machines, and the huge variety of hardware available these days, really slick-looking control panels are getting to be commonplace. We’re especially fond of those nice indicators with the chrome bezels, and the matching pushbuttons with LED backlighting; those can really make a statement on a panel.

Sadly for [Proto G], though, the LEDs in his indicator of choice were just boring old one-color units, so he swapped them out and made these addressable RGB indicators. The stock lamps are not cheap units, but they do have a certain look, and they’re big enough to allow room for a little modification. The original guts were removed with a Dremel to make way for a Neopixel board. [Proto G] wanted to bring the board’s pads out to screw terminals, so he had to adapt the 3.0-mm pitch blocks he had on hand to the 2.54-mm pitch on Neopixel board, but that actually came out neater than you’d think. With a little hot glue to stick it all back together, he now has fully-addressable indicators that can be daisy-chained together and only take up a single GPIO pin.

These indicators and the nice looking panel they’re on is part of a delta pick-and-place robot build [Proto G] has been working for a while. He’s had some interesting side projects too, like the clickiest digital clock in the world and easing ESP32 setup for end-users. While we like all his stuff, we can’t wait to write up the finished delta.

Continue reading “Blinging Buttons For Pick And Place”

After The Sun Set On San Mateo, LED Takes Over Hackaday’s BAMF Meetup

After this Spring’s Bay Area Maker Faire closed down for Saturday night and kicked everybody out, the fun moved on to O’Neill’s Irish Pub where Hackaday and Tindie held our fifth annual meetup for fellow Maker Faire attendees. How do we find like-minded hackers in a crowded bar? It’s easy: look for tables lit by LEDs and say hello. It was impossible to see everything people had brought, but here are a few interesting samples.

Continue reading “After The Sun Set On San Mateo, LED Takes Over Hackaday’s BAMF Meetup”

A YouTube Subscriber Counter With A Tetris Twist

When it comes to YouTube subscriber counters, there’s not much wiggle room for creativity. Sure, you can go with Nixies or even more exotic displays, but in the end a counter is just a bunch of numbers.

But [Brian Lough] found a way to jazz things up with this Tetris-playing YouTube sub counter. For those of you not familiar with [Brian]’s channel, it’s really worth a watch. He tends toward long live-stream videos where he works on one project for a marathon session, and there’s a lot to learn from peeking over his virtual shoulder. This project stems from an earlier video, posted after the break, which itself was a condensation of several sessions hacking with the RGB matrix that would form the display for this project. He’s become enamored of the cheap and readily-available 64×32 pixel RGB displays, and borrowing an idea from Mc Lighting author [toblum], he decided that digits being assembled from falling Tetris blocks would be a nice twist. [Brian] had to port the Tetris-ifying code to Arduino before getting the ESP8266 to do the work of getting the subs and updating the display. We think the display looks great, and the fact that the library is open and available means that you too can add Tetris animations to your projects.

None of this is to say that more traditional sub counters can’t be cool too. From a minimalist display to keeping track of all your social media, good designs are everywhere. And adding a solid copper play button is a nice touch too.

Continue reading “A YouTube Subscriber Counter With A Tetris Twist”

Definitely-Not-Neopixel Rings, From Scratch!

The WS2812 addressable LED is a marvellous component. Any colour light you want, all under the control of your favourite microcontroller, and daisy-chainable to your heart’s content. Unsurprisingly they have become extremely popular, and can be found in a significant number of the project s you might read about in these pages.

A host of products have appeared containing WS2812s, among which Adafruit’s Neopixel rings are one of the more memorable. But they aren’t quite as cheap as [Hyperlon] would like, so the ever-resourceful hacker has created an alternative for the constructor of more limited means. It takes the form of a circular PCB that apes the Adafruit original, and it claims to deliver a Bill of Materials cost that is 85% cheaper.

In reality the Instructables tutorial linked above is as much about how to create a PCB and surface-mount solder as it is specific to the pixel ring, and many readers will already be familiar with those procedures. But we won’t rest until everyone out there has tried their hands at spinning their own PCB project, and this certainly proves that such an endeavour is not out of reach. Whether or not you pay for the convenience of the original or follow this lead is your own choice.

The real thing has been in so many projects it’s difficult to pick just one to link to. This Christmas tree is rather nice.

NeoPixel Game Rewards Button Mashing

Who has the fastest thumbs at Maker Faire UK? That’s the question [wellsey1972] sought to answer when he created this simple game using little more than two NeoPixel rings, two chunky arcade buttons, and a Trinket.

The idea is simple: each button push lights up one NeoPixel. The first one to fill up their ring is the winner, and is treated to a ring of flashing green lights. The loser, of course, gets flashing red. Both controllers are hard-wired to a box containing a Trinket, a custom PCB with pull-up resistors, and two sets of solderless terminals. [wellsey1972] smartly re-purposed a cat 5 cable for sleeker wiring.

He has a few ideas for the future, like going wireless, printing smaller controllers, and making winning more difficult via potentiometer. We humbly suggest that the loser be taunted by the cry of a sad tuba. Mash past the break for a brief demo.

If you like lights and simplicity but find this build less than challenging, try building a minimal secret maze game.

Continue reading “NeoPixel Game Rewards Button Mashing”