The Future’s So Bright, You Gotta Wear Arduglasses

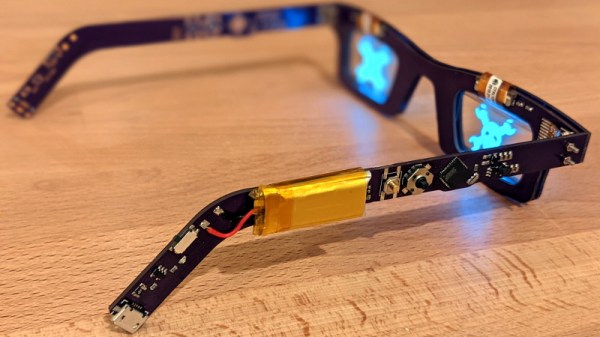
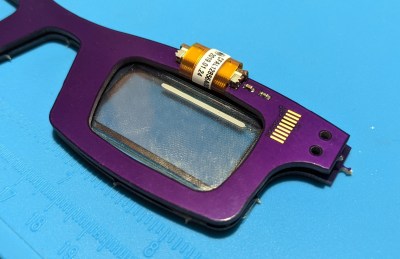
Tiny OLED displays are an absolute must-have in the modern parts bin, so what better way to show your allegiance to the maker movement than with a pair of Arduino-compatible OLED glasses? Created by Arduboy mastermind [Kevin Bates], these digital spectacles might not help you see any better — in fact, you’ll see a bit worse — but they’ll certainly make you stand out in the crowd at the next hacker con. (Whenever we can have one of those again, anyway.)

The key to this project is a pair of transparent CrystalFonts OLED displays, just like the ones [Sean Hodgins] recently used to produce his gorgeous volumetric display. In fact, [Kevin] says it was his success with these displays that inspired him to pursue his own project. With some clever PCB design, he came up with some boards that could be manufactured by OSH Park and put together with jewelry box hinges. Small flexible circuits, also from OSH Park, link the boards and allow the frames to fold up when not being worn.

The Arduglasses use the same ATmega32U4 microcontroller as the Arduboy, and with a few basic controls and a small 100 mAh rechargeable battery onboard, they can technically run anything from the open source handheld’s extensive software library. Of course, technically is the operative word here. While the hardware is capable of playing the games, [Kevin] reports that the OLED displays are too close to the wearer’s eyes to actually focus on them. That said the ability to easily create software for these glasses offers plenty of opportunity for memes, as we see in the video below.

For reasons that are probably obvious, [Kevin] considers the Arduglasses an experiment and isn’t looking to turn them into a commercial product or kit. But if there’s interest, he’s willing to put the design files up on GitHub for anyone who wants to add a pair of Arduino glasses to their cyberpunk wardrobe.

Continue reading “The Future’s So Bright, You Gotta Wear Arduglasses”

A Handy Reference For Display Drivers And LCD Controllers

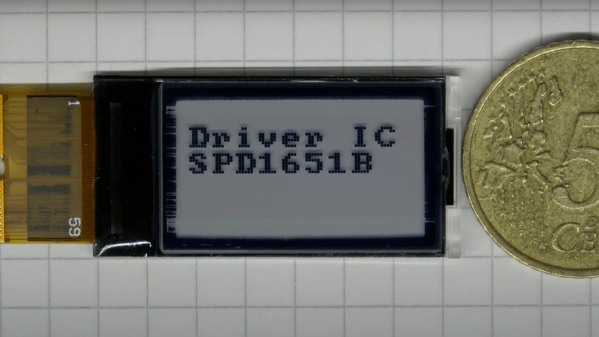
Ever tried to find the data on a mysterious LCD controller that’s kicking around in your parts bin? Well check out this list of various LCD controllers that [Achim] has put together. He summarizes the basic specifications for each controller and includes data sheet links if available (note — the website is in German, although most of the data itself is in English). All in all, he has collected 72 controllers from five different manufacturers, and 46 of them have data sheets. For each controller, he tabulates maximum resolution, color depth, type of interface, and the targeted display technology. For example, here is the entry for the Ilitech ILI9341 TFT controller commonly found in embedded projects:

Furthermore, many of the controllers also have a short video clip showing them in operation posted over on [Achim]’s YouTube channel, where he also has a bunch of quick (less than one minute) videos of all sorts of embedded goodies. We do find this table of controllers to be a little dated — for example, another popular controller used on small color OLED displays, the Solomon Systech SDS1351, is not included. But it is certainly a good resource to bookmark.

We suspect that [Achim] made this table as a result of developing µGUI, a small (only three files) C-language graphics library (see the GitHub repository) he released back in 2015. Do you have any good resources for tracking down unknown LCD controllers? If so, share in the comments below. And thanks to [Dmitry] for sending in this tip.

Continue reading “A Handy Reference For Display Drivers And LCD Controllers”

Smart Lid Spies On Sourdough Starter, Sends Data Wirelessly

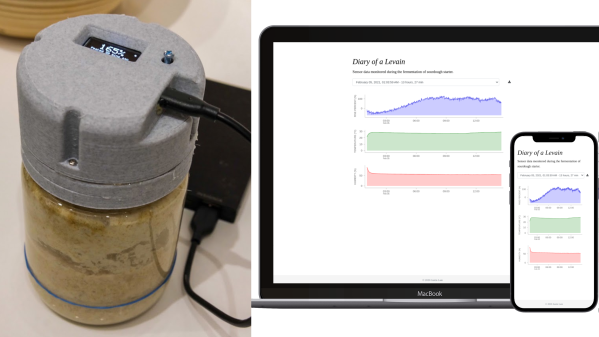
[Justin Lam] created a wonderfully-detailed writeup of his Smart Sourdough Lid project, which was created out of a desire to get better data on the progress and health of his sourdough starters, and to do so more efficiently. The result is a tidy, one-piece lid that constantly measures temperature, humidity, and height of the starter in the jar. Data is sent wirelessly for analysis, but there is also a handy OLED display on the top of the lid that shows immediately useful data like how much the starter has peaked, and how much time has passed since it did so.

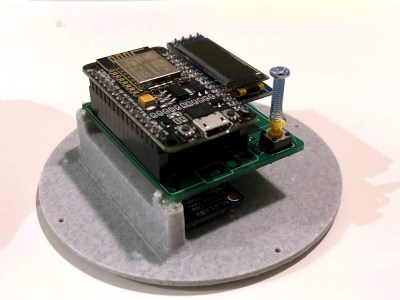
The PCB was optimized for size, and not designed with mounting in mind, so a hot-glued machine screw serves as a “button extender”. Issues like this can happen when enclosures are designed after the fact; it’s something to which we can all relate.

We really like how focused the design is, and the level of detail [Justin] goes into to explain his design decisions and describe how well they worked out. This isn’t [Justin]’s first kick at the can when it comes to getting data on his sourdough, after all. We remember his earlier work using computer vision to analyze sourdough starters, and he used what he learned to inform this new design; the smart lid is easier to use and handles data much more efficiently.

The project’s GitHub repository has all the information needed to build your own. The lid is ESP8266-based and integrates a VL6180X time-of-flight (ToF) distance sensor, DHT22 to sense temperature and humidity, and a small SSD1306 OLED display for data. A small custom PCB keeps the modules tidy, and a 3D-printed custom enclosure makes it one tidy package.

[Justin] also analyzes the results he obtained and talks about what they mean in the last part of his writeup, so if you’re into baking and interested in his findings, be sure to give that a look.

Volumetric OLED Display Shows Bladerunner Vibe, Curious Screen Tech

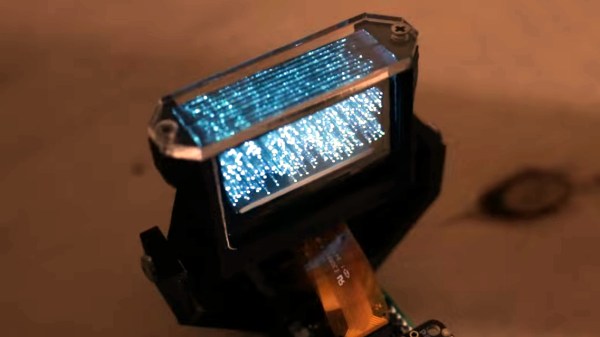
[Sean Hodgins] is out with his latest video and it’s a piece of art in itself. Beyond a traditional project show and tell, he’s spun together a cyberpunk vibe to premiere the volumetric display he built from an OLED stackup. Update: He’s also documented the build.

The trick of a volumetric display is the ability to add a third dimension for positioning pixels. Here [Sean] delivered that ability with a stack up of ten screens to add a depth element. This is not such an easy trick. These small OLED displays are all over the place but they share a common element: a dark background over which the pixels appear. [Sean] has gotten his hands on some transparent OLED panels and with some Duck-Duck-Go-Fu we think it’s probably a Crystalfontz 128×56 display. Why is it we don’t see more of these? Anyone know if it’s possible to remove the backing from other OLED displays to get here. (Let us know in the comments.)

The rest of the built is fairly straight-forward with a Feather M4 board driving the ten screens via SPI, and an MPU-6050 IMU for motion input. The form factor lends an aesthetic of an augmented reality device and the production approach for the video puts this in a Bladerunner or Johnny Mnemonic universe. Kudos for expanding the awesome of the build with an implied backstory!

If you can’t find your own transparent displays, spinning things are a popular trend in this area. We just saw one last week that spun an LED matrix to form cylindrical display. Another favorite of ours is a volumetric display that spins a helix-shaped projection screen.

Arduboy Gets Even Smaller With New Nano Edition

One of the selling points of the Arduboy is how slim [Kevin Bates] was able to get the Arduino-compatible game system, which is perhaps less surprising when you realize that it originally started out as a design for an electronic business card. But compared to the recently unveiled Nano version, it might as well be the old school “brick” Game Boy.

Now to be clear, [Kevin] isn’t looking to put these into official production. Though it does sound like the bare PCBs might be going up for sale in the near future. This was simply an experiment to see how far he could shrink the core Arduboy hardware while still keeping it not only playable but also code-compatible with the full-size version. While “playable” might be a tad subjective in this case, the video after the break clearly demonstrates that it’s fully functional.

Inside the 3D printed case is the same ATmega32U4 that powers the Arduboy, a 64×32 0.49″ OLED display, and a tiny 25 mAh pouch battery. There’s even a miniature piezo speaker for the bleeps and bloops. All of the pinouts have remained the same so existing code can be moved right over, though the screen is now connected over I2C. [Kevin] has released the schematics for the board in keeping with the general open nature of the Arduboy project, though for now he’s decided to hold onto the board files until it’s clear whether or not there’s a commercial future for the Nano.

We’ve seen attempts to shrink the Arduboy down before, most notably down to the point it could fit inside of a Dreamcast Visual Memory Unit, but the Nano certainly raises (or is that lowers?) the bar considerably.

Continue reading “Arduboy Gets Even Smaller With New Nano Edition”

A Not-So-Alarming Clock

By and large, alarm clocks (including phones that double as alarm clocks) are annoyingly alarming. If it’s not the light or the sound, it’s both. Yes, we know that’s the point of an alarm clock, but sometimes life presents opportunities to check the time and/or the weather and sleep in a little bit longer based on the result. We don’t know about you, but loud noises and eye-blasting light are not conducive to getting back to sleep, especially if you’re a light sleeper.

In [Stavros Korokithakis]’ case, if it’s a tennis practice morning but it’s raining, then it’s no longer a tennis practice morning and he can go back to sleep for a while. A phone seems perfect for this, but the problem is that it provides too much information: the phone can’t check the weather without the internet, and once it has internet access, a bunch of eye-opening notifications come flooding in.

[Stavros] had a long list of must-haves when it came to building the ultimate alarm clock, and we can totally get behind that. He needed something smarter than the average off-the-shelf clock radio, but nothing too smart. Enter the ESP8266. As long as it has an internet connection, it can fetch the time and the weather, which is really all that [Stavros] needs. It gets the current temperature, wind speed, and forecast for the next two hours with the OpenWeather API, and this information is converted to icons that are easy to read at a sleepy, one-eyed glance at the OLED.

Adaptive brightness was high on the list of must-haves, which [Stavros] solved by adding a photoresistor to judge the ambient light and adjust the OLED screen brightness appropriately. And he really did think of everything — the octagonal shape allows for the perfect angle for reading from bed. There’s just one problem — it can’t accept input, so it doesn’t actually function as an alarm clock. But it makes a damn good bedside clock if you ask us.

If you really want to start the morning right, use a winch to yank the covers off of you.

Via Adafruit

Magic 8-Ball Gets A Modern Makeover

Back in 2012, [sjm4306] was surprised when his breadboard rendition of the classic “Magic 8-Ball” popped up on Hackaday. If he had known the project was going to be enshrined on these hallowed pages, he might have tidied things up a bit. Now with nearly a decade of additional electronics experience, he’s back and ready to show off a new and improved version of the project.

The 3D printed case helps sell the look.

Conceptually, not much has changed from the original version. Press a button, get a random response. But on the whole the project is more refined, and not just because it’s moved over to a custom PCB.

The original version used a PIC16F886 with a charge controller and experimental RTC, but this time around [sjm4306] has consolidated all the functionality into the ATmega328P and is powering the whole thing with a simple CR2032 coin cell. As you can see in the video after the break, assembly is about as quick and straight-forward as it gets.

As with the original, there’s no accelerometer onboard. If you want to see a new message from your mystic companion, you’ve got to hold the button to “shake” the ball. A timer counts how long the button is held down, which in turn seeds the pseudorandom number generator that picks the response. Since each person will naturally hold the button for a slightly different amount of time, this keeps things from getting repetitive.

We don’t often see creators revisit their projects from the olden days, but we’d certainly like to. Consider this an open invitation to any hacker who wants to show off how much they’ve refined their skills; do-overs are always welcome here at Hackaday.

Continue reading “Magic 8-Ball Gets A Modern Makeover”